When I received my America's Test Kitchen Healthy Family Cookbook several years ago, I came across this recipe for Skillet Chicken Fajitas. I was hesitant to try them at first because I already have a favorite fajita recipe (Grilled Chicken Fajitas), but during the winter the last thing we want to be doing is grilling in the dark and in the cold, so I was hoping to have a good stove-top fajita recipe for the winter months. We love this recipe and welcome the different flavors not present in our go-to fajitas. The orange juice and chipotles in adobo make a great sauce that flavors the chicken, and I love the addition of the tomatoes and green onions at the end for some freshness.
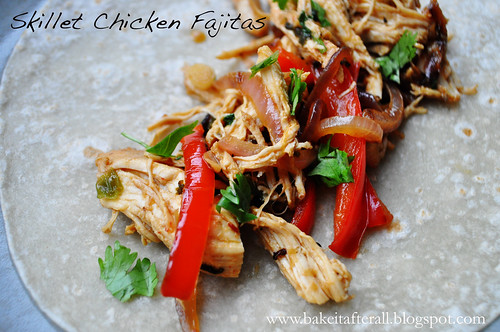
Skillet Chicken Fajitas
Ingredients:
2 teaspoons canola oil
2 red bell peppers, stemmed, seeded and sliced thin
1 red onion, halved and sliced thin
salt and pepper
3 - 4 chicken breasts
salt and pepper to taste
1/2 cup orange juice
3/4 cup cilantro, minced (divided)
2 teaspoons chopped chipotles in adobo sauce
1 tablespoon Worcestershire sauce
4 cloves garlic, minced or grated
*** 1 - 2 cups chicken broth (optional)
1 teaspoon yellow mustard
1 tomato, cored, seeded, and chopped
3 green onions, sliced thin
tortillas (I prefer Tortillaland brand)
Optional toppings:
sour cream
cheese
salsa
Directions:
1. Heat the oil in a 12-inch skillet. Add the sliced peppers and onions and season with salt and pepper. Cook, stirring occasionally, until softened and well-browned, about 5 to 7 minutes. Transfer the mixture to a bowl or plate and cover with foil, store in warm place.
2. Combine the orange juice, 1/2 cup of the of the cilantro, the chipotles, Worcestershire, and garlic in a measuring cup, then add to the skillet. Season the chicken with salt and pepper and add to the skillet. Bring the liquid to a simmer over medium-low heat, about 5 minutes. Flip the chicken over, cover, and cook until the chicken registers at least 165F on an instant-read thermometer. This may take 10 - 12 minutes, or longer depending on the thickness of your chicken. You will need to keep an eye on the liquid during this step. Often, mine evaporates and starts to burn in areas, so I add chicken broth to the pan when this begins to happen. This is not in the original recipe, but I have this issue every time - perhaps my pan is too large or the heat is too high, I'm not sure. Regardless, keep an eye on it because you don't want the sauce to burn on the bottom of the pan because of the sugar content.
3. Transfer the chicken a plate and shred. If necessary, simmer the sauce until reduced to 1/4 cup (I never have to do this step as my sauce is naturally reduced while the chicken cooks). Return chicken to pan. Off heat, stir in mustard, tomatoes, green onions, and remaining 1/4 cup cilantro. Season with salt and pepper to taste.
4. Serve the chicken mixture with the peppers/onions and warm tortillas (and toppings if desired).
Source: America's Test Kitchen Healthy Family Cookbook