Search This Blog

Showing posts with label Candy. Show all posts

Monday, September 7, 2015

Browned Butter Cookies with Apple Cider Caramel Filling

DSC_0296_labeled

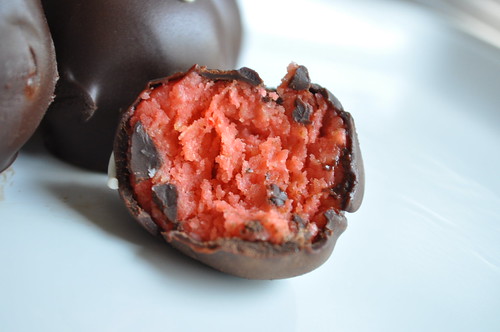
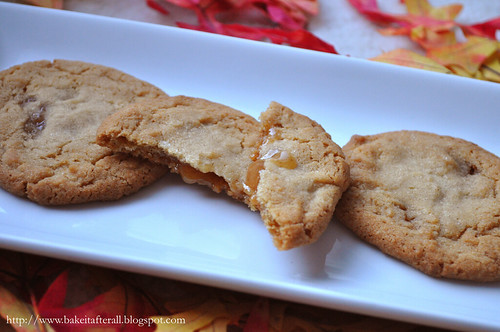
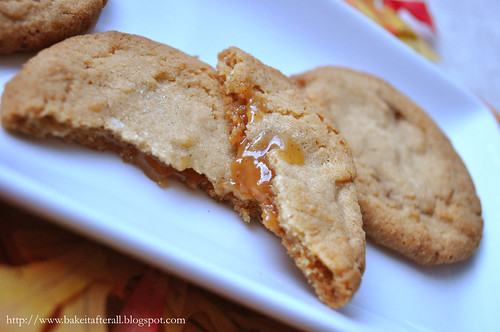
After making the Apple Cider Caramels, I had to try out this recipe that combines the caramels with Browned Butter Cookies. I wasn't sure how these would turn out, but I was blown away by how good they were.  The browned butter cookie base perfectly compliments the apple cider caramels. I know my words can't do these justice, so I will just let the pictures speak for themselves. Caramel oozing from a cookie? Yes please!

DSC_0313_labeled


Browned Butter Cookies with Apple Cider Caramel Filling

Makes about 20 cookies

Ingredients:
1 cup (2 sticks) unsalted butter
2 1/4 cups all-purpose flour
1 1/4 teaspoon baking soda
1/2 teaspoon coarse sea salt, plus more for sprinkling
1 cup light brown sugar
1/2 cup granulated sugar
1 large egg plus 1 egg yolk
2 1/2 teaspoons vanilla extract
1 tablespoon greek yogurt or sour cream
20 apple cider caramels (about 1-inch squares), unwrapped

Directions:
Preheat oven to 350F.

1. Place the butter in a medium skillet over medium heat. Melt completely. Continue to cook, whisking frequently, until the butter foams, bubbles slightly, and begins to brown. Continue whisking until the butter is evenly brown, being careful not to burn. Remove from heat and allow to cool.

2. Line baking sheets with parchment. In a medium bowl, whisk together the flour, baking soda, and salt. In the bowl of an electric mixer, combine the sugars and brown butter, mixing on medium speed until well blended and smooth.

3. Blend in the egg and yolk, scraping the bowl as needed. Blend in vanilla and yogurt or sour cream.  With the mixer on low, blend in the dry ingredients until just incorporated.

4. Use a medium dough scoop to place a ball of dough onto the prepared pan (about 2 tablespoons). Press the center of the dough down to create an indentation. Place a caramel in the indentation and pinch together the edges of the dough over the caramel to completely hide it in the center of the dough. At this point, you may pinch the top of the dough in multiple spots to create a more rustic look. Repeat with remaining dough, spacing cookies at least 2 - 3 inches apart.  Chill dough on cookie sheets in refrigerator for 30 minutes.

5. Bake the cookies until golden brown, about 14 minutes, rotating the pans halfway through cooking. Let cool briefly on the cookie sheet, then transfer to a wire rack to cool completely. Sprinkle with sea salt, if desired. Serve slightly warm to achieve gooey caramel texture.

Source: Annie's Eats

Thursday, September 3, 2015

Apple Cider Caramels


I made these apple cider caramels two falls ago and never got around to blogging them, which is sad because they are so, so good. I've never had anything like them before, and they truly do have a distinct apple cider flavor. Stay tuned for my next post where I show you an awesome recipe that uses these caramels!

Apple Cider Caramels

Ingredients:
4 cups apple cider
2 teaspoons flaky sea salt
1/2 teaspoon ground cinnamon
1/2 cup unsalted butter, cut into cubes
1 cup granulated sugar
1/2 cup light brown sugar
1/3 cup heavy cream

Directions:
1. Boil the apple cider in a 3- or 4-quart saucepan over high heat, stirring occasionally, until reduced to a dark, thick syrup, between 1/3-cup and 1/2-cup (approximately 35 to 40 minutes).

2. Meanwhile, line the bottom and sides of an 8-inch square baking dish with parchment paper, leaving excess hanging over the sides. In a small bowl, combine the cinnamon and salt.

3. After the cider has reduced, remove it from the heat and stir in the butter, sugars, and heavy cream. Return the pan to medium-high heat and attach a candy thermometer to the side. Let the mixture boil until the thermometer reaches 252 F, about 5 minutes.

4. Immediately remove the caramel from the heat, add the cinnamon and salt, and stir several times with a wooden spoon. Pour the caramel into the prepared pan. Let sit until cool and firm, about 2 hours.

5. Once the caramel is firm, use the parchment overhangs to lift it out of the pan and transfer to a cutting board. Using a very sharp knife coated with non-stick cooking stray, cut the caramel into 1-inch squares.  You may need to respray the knife several times during cutting to ensure clean slices.

6. Wrap each caramel in a 4-inch square of waxed paper, twisting the sides to close. The caramels can be stored in an airtight container for up to 2 weeks.

Source: Brown Eyed Baker, from The Smitten Kitchen Cookbook and blog


Sunday, May 3, 2015

Ava's 3rd Birthday Party - FROZEN


As always, I'm behind in posting, but I wanted to document Ava's 3rd Birthday. She requested a "Frozen" birthday party, and I happily obliged. There were so many cute ideas on Pinterest, and with her birthday being in December there was no shortage of snowflake decor! Hobby Lobby had a great sale on snowflake ornaments, and I went a little overboard but justified that I will be able to use them every year to decorate the house or the Christmas tree.


Ava asked for a chocolate cake, so I just made a Duncan Heinz boxed cake, two boxes to be exact.  I made four 9-inch layers - three for the cake and the 4th layer for the cake pops.

The cake was frosted with my standard go-to Easy Vanilla Buttercream.  I used Wilton gel food coloring to tint it. This is my favorite cake I've ever made!


For the "ice" candy, I use this recipe.  Note- I used a considerable amount of non-stick Canola cooking spray, and it affected the color of my candy. There was brownish greasy areas that pooled in certain areas. I would recommend using it sparingly or using a paper towel to wipe the pan after spraying to ensure the pan is greased evenly. Also, my candy ended up being a greenish-blue because I didn't add quite enough food coloring. I would have preferred it to be more blue, so I recommend adding more color if you think yours has a greenish look. The untinted candy is sort of yellow, so adding a small amount of blue makes it green, but if you add more I'm sure it would look more blue.


For the cake pops, I just smushed up a single 9-inch layer of bake boxed cake and formed into balls. I then dipped a stick into some melted white chocolate (I used "Pure White Vanilla Flavored Candy Wafers" from Hobby Lobby which I believe is for chocolate fountains, and it was the smoothest white chocolate I've worked with yet- loved it!), stuck the stick into the ball, then carefully coated the cake ball with chocolate by rolling it in the warm melted white chocolate.  I then set them, stick straight up in the air, on a piece of waxed paper, and immediately sprinkled with colored sugar. If you wait more than a minute or so, the chocolate will set-up and the sugar will not stick.  I have never made cake pops that stand up on their sticks yet - that makes me nervous!


These snowflakes were just royal icing piped into snowflake shapes on a piece of waxed paper. Let sit overnight to dry and carefully peel them off of the waxed paper!


It's hard to believe my first baby is now 3!  She loved her party, but now I fear I've set the bar too high.  It's only May, and she's already asking for a Cinderella party this December.  Better get to work! :-)


Tuesday, July 26, 2011

We're having a . . .

Bob and I revealed the sex of the baby this weekend to some of our friends and family by having them each bite into an Oreo truffle and look to see whether the inside was blue or pink . . .

DSC_0285

DSC_0295

I thought of this idea before I was pregnant and have been so excited and anxious to do this "Truffle Reveal" ever since.

After coming up with this idea and thinking it was completely novel, I saw on Saturday Night Live (the Weekend Update segment) that some people have started revealing the sex of their babies by having people cut into a cake with a blue or pink inside. I guess I wasn't as original as I thought, but I still maintain that these truffles are the way to go because you can announce to different groups of people, and each person gets to participate in the reveal. We ended up doing this in several shifts with different family and friends, so it ended up being the perfect way for us to announce since each truffle is individually concealed (unlike a cake that, when cut, is open for everyone to see). It's a win-win situation - we got to see each person's reaction, and they got a yummy truffle! I even took some to work yesterday and shared the news with my coworkers. We had so much fun with this!

On Thursday night, the night before our big appointment, I made up about 7 of each color. I took them to our appointment in a cooler, and afterwards we headed straight to dinner for our first reveal with my parents and sister. We did it in the bar area of a restaurant because we simply could not wait to be seated. My Mom said she was equally excited for a boy or a girl, but my Dad and my sister wanted it to be a girl.

Their reactions to this news . . .

DSC_0300

were priceless.

My Mom squealed and then leaned looked over to the woman sitting at the table next to us, who was obviously aware something was going on, and said, "Oh sorry! We just found out we're having a girl! --I mean, she's having a girl!!!" It was so cute! My Dad was smiling and saying, "I knew it!!!" and my sister was jumping up and down. My Mom even ordered a Pink Squirrel (a drink if you've never heard of it) to celebrate.

Saturday morning I made the rest of the truffles (in pink!), and we had our next reveal. We ended up being seated in a private room with a long table at a restaurant, and it was perfect! Those of us who knew sat on one side of the table and those who didn't sat on the other so we could watch their reactions. One of my aunts in particular REALLY wanted us to have a girl, so she was dancing in her seat when she found out!

The rest of the weekend was filled with more reveals and more celebrations. The love and support I felt from our family and friends was incredible, and I know our little girl is going to feel that too. We are so excited and feel so blessed to announce that we're expecting a daughter!

DSC_0315

If you're wondering how I made Oreo truffles look pink or blue, here's what I did:

I followed the classic Oreo truffle recipe (also see HERE for truffle tips), using Golden Oreos instead of regular. I added red or blue food coloring gel to the cream cheese and crushed cookies before mixing it up. I put on disposable kitchen gloves and used my hands - much easier than a spoon, and you don't risk dying your hands!

Because these cookies are slightly yellow, my colors ended up being a little more teal and coral but obviously could not be confused!

Wednesday, February 16, 2011

Football Truffles

Football season is over, much to my husband's dismay, but I wanted to share some pictures of the football truffles I made for Super Bowl. I followed Bakerella's instructions and, as is the case any time Oreo truffles are involved, they were greatly appreciated! I loved making them!

See my truffle tips for some hints on truffle making!

DSCN7966_labeled

DSCN7975_labeled

Wednesday, December 22, 2010

Gingerbread Cookies and Truffle Tips!

DSCN7594_labeled

In the interest of time (i.e. days until Christmas!), I'm tacking on some Truffle Tips to the end of this post, so scroll down if you've ever had trouble dipping truffles!

DSCN7583_labeled

As a child, I always thought Gingerbread Cookies, specifically Gingerbread "people" were so cool, probably because we didn't make gingerbread cookies as part of our Christmas baking tradition. One year, my sister and I convinced my mom to buy a box mix of gingerbread, and we made the cookies. We loved them and had so much fun decorating them. They are one of those cookies that I never considered making from scratch, that is until I saw them two years ago on the blog Good Things Catered. Katie made such beautiful snowflakes that I promptly saved the recipe and planned to make them the next year. Seeing them featured on Annie's Eats last December reminded me about this recipe that I had forgotten, and I made a point to remember this year!

I had so much fun decorating these because they are so pretty! I decided to use sparkly sugar, candy pearl balls, and even some edible shimmer. I had my favorite kitchen helper, my sister Lisa, who did the majority of decorating. This recipe makes a TON of cookies! I served them at the Holiday Party, took some to work, and froze a bunch for later. Some people commented that they were too pretty to eat but were glad when they did because they're delicious!

Gingerbread Cookies

Ingredients:

4 cups all-purpose flour

1 teaspoon salt

1 1/2 teaspoons baking powder

1/2 teaspoon baking soda

1 teaspoon ground cinnamon

1 1/2 teaspoon ground cloves

2 teaspoon ground ginger

1 teaspoon ground nutmeg

1 cup (16 tablespoons) unsalted butter, at room temperature

1 cup sugar

1 cup molasses

1 large egg

Directions:

1. In a large mixing bowl, whisk together the flour, salt, baking powder, baking soda, and spices to combine; set aside.

2. In the bowl of a stand mixer fitted with the paddle attachment, cream the butter and sugar on medium-high speed until light and fluffy, about 2 minutes.

3. Mix in the molasses and egg until combined. Add in the dry ingredients and mix just until incorporated. Cover the bowl and chill the dough for at least one hour.

4. Preheat the oven to 350F, and line baking sheets with parchment paper.

5. Roll the dough out on a lightly floured work surface to about 1/4-inch thickness. Cut into desired shapes with cookie cutters.

6. Place the cookie shapes onto the prepared baking sheets, about 2 inches apart. Bake for 10 minutes, rotating the pans halfway through baking.

7. Remove from the oven and let cool on the baking sheets for 10 minutes. Transfer to a wire cooling rack and let cool completely.

8. To decorate, brush cookie with edible shimmer or leave plain, then use Royal Icing to pipe on designs. Sprinkle with large-grain sugar and/or add pearl balls, if desired.

DSCN7587_labeled

DSCN7578_labeled

Source: Annie's Eats, originally from Good Things Catered

And now for some Truffle Tips:


DSCN7610_labeled

I've had a few people tell me that they have trouble dipping truffles, and I actually had quite a bit of trouble dipping the Cookie Dough Truffles. While I am not a truffle expert by any means, I've complied a few tips that I've found from trial and error.

First you need to get your chocolate the right consistency for dipping. While you can melt the dipping chocolate in the microwave, I prefer to melt it in a double boiler (or in a glass bowl set over a pan of barely simmering water - make sure water does not touch bottom of bowl). This way, the chocolate is continuously heated during the dipping process. Melt the chocolate and add a little vegetable shortening (Crisco) - this really helps thin out the chocolate. You can start with a teaspoon of shortening and keep adding a little more - maybe a total of a tablespoon depending on how much chocolate you are using. Basically, you want the chocolate to be thin enough so that dipping isn't a pain in the butt. I've read that vegetable oil works similarly, but I've never tried it.

Next, determine a method for dipping that works well for you. The way I found that worked best was to drop the formed truffle into the chocolate, one at a time, roll it around gently with two forks, then use only one fork to life it out, shaking off the excess chocolate as you lift up, then transfer the coated truffle to wax paper by gently sliding the truffle off the fork. To be clear, the fork does not stab the truffle, it is just use like a "fork-lift" if you will. This should help reduce the excess chocolate running off the truffle as it sits on the wax paper and pools at the bottom, making it look like a big blob.

One other thing that might make the process easier is freezing the truffles (even if just for 30 minutes) before you dip them in chocolate; I did this with the cookie dough truffles, but not the Oreo, but I might try it next time. I made my truffles all the way through, then froze them for a week before the party - they turned out perfect! In fact, and I'm a little embarrassed to admit this, but I actually chose our particular fridge/freezer partly because it's conducive to freezing trays of candy!

DSCN7469_labeled

DSCN7465_labeled

DSCN7463_labeled

In my experience, chocolate is much easier to work with than white chocolate (and tastes better in my opinion!), so from now on I mostly plan to use white chocolate for the design on top rather than dipping the whole truffle. But, the easiest way to melt white chocolate is the same exact way - double boiler and Crisco to thin. You can also do it in the microwave, but it's more difficult to control the temperature, and white chocolate is more prone to seizing up in my hands.
DSCN7623_labeled

When I do the designs on top, I just put the melted chocolate into a small resealable sandwich bag and snip off a corner. You can use a pastry bag of course, but I find that I can get enough control out of a sandwich bag without having to clean a pastry tip and coupler!

Happy Candy Making!!!

Thursday, December 16, 2010

Holiday Party!

DSCN7630_labeled_1
The "sweets" table!

We had our first annual Holiday Open House this past weekend for some friends and family! I have been wanting to do this for so many years, but we've never had a place that could really accommodate that many people. I went a little overboard on the desserts, especially considering we had our first real snow that morning so several guests had to cancel! We had savory food as well, but I'm just sharing the desserts - some of which are my favorite holiday recipes, some of which are new and will be posted next week. We had such a great time and hope our guests did as well! :)

DSCN7643_labeled

The Trio of Quick Breads:
DSCN7636_labeled

DSCN7645_labeled

DSCN7642_labeled

Gingerbread Cookies (recipe to be posted soon!)
DSCN7641_labeled

Oreo Truffles (I will post some tips for an easier way to make these soon!)
DSCN7639_labeled

Homemade Vanilla Marshmallows (I had a make-your-own hot cocoa station - just packets of cocoa with hot water in a carafe and candy canes to swirl around - this was a BIG hit!)
DSCN7638_labeled

Brown Sugar and Spice Mitten Cookies (recipe coming soon!), behind those are the chocolate/toasted coconut covered homemade marshmallows!
DSCN7640_labeled

Beware - if you make these "Let It Snow" cookies . . .DSCN7567_labeled

it just might happen:
DSCN7549_labeled

Hope everyone has a wonderful weekend! We leave tomorrow for our first Christmas celebration!

Wednesday, August 25, 2010

Cookie Dough Truffles

DSCN6858_labeled

DSCN6861_labeled

Bob and I threw an appetizers and desserts party at our townhouse on Sunday night. We called the party "Hello and Goodbye" to allow our friends and family to say "hello" and "goodbye" to our townhouse before we start packing up for the move to our new home. Everyone was asked to bring their favorite appetizer or dessert to share, and I made a few that I've been wanting to try forever.

Here's a picture of my contributions to the party (more recipes to come!):
DSCN6867_labeled

I've been wanting to try these Cookie Dough Truffles for a long time. I LOVE cookie dough - seriously I'd eat a whole batch of it right out of the bowl. The great thing about these truffles is that they don't contain raw eggs. I know my pregnant and nursing guests appreciated that!

I thought these truffles tasted amazing! They were a bit more work than I anticipated, but I've indicated some tips in the recipe below. I know at least one reader who had some trouble with chocolate-dipping the Oreo Truffles, so hopefully these tips will work for those as well.

Cookie Dough Truffles

Ingredients:
8 tablespoons unsalted butter, at room temperature
3/4 cup light brown sugar, packed
2 1/4 cup all-purpose flour
1-14 ounce can sweetened condensed milk
1 teaspoon vanilla extract
1/2 cup mini semisweet chocolate chips
1 1/2 pounds semisweet (or bittersweet) chocolate, coarsely chopped
Vegetable shortening (optional)
Mini chocolate chips (for garnish)

Directions:
1. Combine the butter and sugar in a mixing bowl and cream on medium-high speed until light and fluffy, about 2 minutes.

2. Beat in the flour, sweetened condensed milk, and vanilla until incorporated and smooth. Stir in the chocolate chips. Cover with plastic wrap and refrigerate until the mixture has firmed up enough to form balls.

3. Shape the chilled cookie dough mixture into 1-1½ inch balls. Place on a baking sheet lined with wax paper. Cover loosely, transfer the pan to the freezer and chill for 1-2 hours.

4. When ready to dip the truffles, melt the chopped chocolate in a heatproof bowl set over a pot of simmering water or very carefully in the microwave. The key to easily dipping the truffles is to the correct consistency of chocolate - make sure your chocolate melted is fairly thin. Mine was not, so I added tiny amounts of vegetable shortening (Crisco) to achieve the correct consistency. I think I added about a tablespoon to the chocolate mixture, perhaps a tad more.

5. Dip each chilled truffle, one at a time, coating in chocolate and shaking gently to remove the excess. (My aunt helped with this part!) To facilitate dipping, we took a wooden kabob skewer and used it to pick up a truffle, then swirled the truffle in the chocolate, then transfered the dipped truffle to a wax-paper lined surface. We twisted the skewer back and forth to remove it from the truffle. You can also use a fork to help remove the skewer. The optional mini-chocolate chip garnish will hide any imperfections left behind. Alternatively, you can use two forks to roll the truffle around in the chocolate and then, lifting the truffle out with the forks, let the excess chocolate run off. Note: If at any point during dipping, the cookie dough balls become too soft, return to the freezer to chill for 30 minutes. If using mini chocolate chips for garnish, sprinkle on top quickly after dipping each truffle before the chocolate sets.

6. Once all the truffles have been dipped, store them in the refrigerator (or freezer) until ready to serve.

Source: Adapted from Annie's Eats

  © Blogger template Brownium by Ourblogtemplates.com 2009

Back to TOP