Search This Blog

Wednesday, September 30, 2015

Cheddar Bay Biscuits

IMG_0432_CheddarBayBiscuits

As I mentioned in the last post, I used to love the Sonoma Chicken Stew at Panera. It was served with Dry Jack Cheese Biscuits, which I thought were amazing. They had a delicious, peppery flavor. In fact, on the way to the hospital when I was in labor with Ava, I had Bob stop at Panera so I could get a biscuit since I knew once I got to the hospital I would be strictly confined to clear liquids.

When my sister and I decided to recreate the Sonoma Chicken Stew, she suggested we try these Cheddar Bay Biscuits, since we like the ones at Red Lobster. I am happy to report that these are even better than the biscuits at Red Lobster! The fresh shredded Parmesan forms little pockets of cheese in the biscuits and really transforms these into some of the best biscuits we've ever had.  They really are best warm, so if possible aim to serve them that way.

Cheddar Bay Biscuits

Makes 12 biscuits

Ingredients:
2 cups Bisquick, store bought or homemade
2/3 cup milk (2%)
2/3 cup shredded cheddar cheese
1/3 cup freshly shredded (not grated) Parmesan cheese
1/4 tsp garlic powder
1/2 tsp Old Bay Seasoning
1/4 cup sour cream
2 tablespoons fresh chives, chopped
4 tablespoons melted butter

Directions:
1. Heat oven to 450F.

2. Mix all ingredients except for butter.

3. Drop onto ungreased baking sheet by spoonful.

4. Bake for 8 - 12 minutes or until golden brown.

5. Brush with melted butter, then bake an additional 1 - 2 minutes. Serve warm.

Optional: finish with sprinkle of fleur de sel (flaky sea salt)


Sunday, September 27, 2015

Sonoma Chicken Stew

DSC_0102_ChickenSonomaStew

In the fall of 2011, Panera Bread featured a Sonoma Chicken Stew. It was pricier than their typical soups, but it was served with Dry Jack Cheese Biscuits on top. This stew was very similar to their cream of chicken and wild rice soup, which has been one of my favorites since I was in high school. It is a creamy base with chicken and vegetables, but perhaps my favorite part was these small round carrots. I was completely baffled by them. They were so tasty and has a perfect texture. Each had a marking where a stem would be, so it wasn't just small pieces of carrot that were rolled around to form balls. I did some research and found that they are actually called thumbelina carrots and are sometimes grown in Sonoma, California.

I loved this stew so much that Bob and I often went to Panera while I was pregnant with Ava just to get this stew. Sadly, in the fall of 2012, the stew did not return to the fall menu! I was crushed and knew I had to come up with a way to recreate this stew.  My sister Lisa and I set out to do just that. We pulled components from recipes for Chicken & Dumplings, and added in what I remembered being in the Sonoma Chicken Stew. Of course, I couldn't find thumbelina carrots anywhere, so we made do with regular carrots. The stew turned out amazing!  Funny thing, shortly after we made the stew, I found "Parisian Carrots" in the freezer section of Trader Joe's- and they are the same little round carrot balls!  I stocked up!  

Sonoma Chicken Stew

Serves 4-6 dinner-sized portions

Ingredients:
2 tablespoons unsalted butter
1.25 - 1.5 lbs chicken breast, cut into small pieces
3 carrots, peeled and chopped (or thumbelina or Parisian carrots if you can find them!)
1 leek, quartered and sliced thin
1 yellow onion, chopped
2 tablespoons all-purpose flour
4 cups chicken broth
1 pound red potatoes, skin-on, diced small
1/2 cup baby peas (or more)
Fresh thyme, several sprigs
1/2 - 2/3 cup heavy cream

Directions:
1. Melt butter over medium high heat in a large Dutch oven. Season chicken with salt and pepper. Add chicken and cook until browned or opaque and cooked through, about 4-6 minutes. Remove chicken and keep warm.

2. Add carrots, onion, and leek to the Dutch oven. Season with salt and pepper and cook until vegetables begin to soften, 4 - 5 minutes. Add flour and cook for 2 minutes.

3. Add chicken broth slowly and bring to a boil.

4. Add potatoes, peas, and thyme, reduce heat and simmer uncovered until cooked through. If stew is getting too thick, cover while continuing to simmer. Add cooked chicken back to the Dutch oven and cook just until warmed.

DSC_0099_ChickenSonomaStew2

5. Add heavy cream. Season with salt and pepper to taste, if necessary.

Source: Lisa & Meghan Original Recipe :-)


Wednesday, September 23, 2015

Cheddar Dill Scones

DSC_0347_CheddarDillScones


In my spare time, I love to watch episodes of Barefoot Contessa. Ava shares my love of cooking, and she absolutely adores Ina!  She will often ask to watch "Barefoot" as she calls her. One particular episode of the Barefoot Contessa titled "Ladies Who Lunch" featured chicken salad and Cheddar-Dill Scones. I served these scones with Harvest Chicken Salad.  We all really loved them; I don't think I've ever made one of Ina's recipes that we didn't like!

Cheddar Dill Scones

Ingredients:
4 cups plus 1 tablespoon all-purpose flour, divided
2 tablespoons baking powder
2 teaspoons salt
3/4 pound cold unsalted butter, diced
4 extra-large eggs, beaten lightly
1 cup cold heavy cream
1/2 pound extra-sharp yellow Cheddar, small-diced
1 cup minced fresh dill
1 egg beaten with 1 tablespoon water or milk, for egg wash

Directions:
Preheat the oven to 400F.

1. Combine 4 cups of flour, the baking powder, and salt in the bowl of an electric mixer fitted with a paddle attachment.

2. Add the butter and mix on low speed until the butter is in pea-sized pieces. Mix the eggs and heavy cream and quickly add them to the flour-and-butter mixture. Combine until just blended.

3. Toss together the Cheddar, dill, and 1 tablespoon of flour and add them to the dough. Mix until they are almost incorporated.

4. Dump the dough onto a well-floured surface and knead it for 1 minute, until the Cheddar and dill are well distributed. Roll the dough 3/4-inch thick. Cut into 4-inch squares and then in half diagonally to make triangles. Brush the tops with egg wash.

DSC_0325_CheddarDillScones1

5. Bake on a baking sheet lined with parchment paper for 20 to 25 minutes, until the outside is crusty and the inside is fully baked.

Source: Barefoot Contessa


Thursday, September 17, 2015

Ultimate Steel-Cut Oatmeal

DSC_0952_ed

My sister and brother-in-law share my love for cooking and recipes. They have made several recipes from the America's Test Kitchen Healthy Family Cookbook, and it's something I had been wanting for a while. My mom and dad got it for me for Christmas several years ago, so I was so excited to find new recipes inside.

First off, I LOVE that it's a metal-ring binder style cookbook. My Mom's 1970's Betty Crocker Cookbook is in this format, and I always wanted a cookbook like this. Browsing through this book makes me want to cook non-stop for a month - there are so many recipes I would like to try! One that caught my eye right away was this recipe for Steel-Cut Oats. I had a container of them in my pantry and had every other ingredient on hand, (which never happens!).

I am not a traditional oatmeal lover. In fact, I had a very bad experience with oatmeal as a child. I begged my mom to let me have an oatmeal with red gummy bears (gag) for dinner one night instead of tuna casserole (double gag). Why we even had this in the house I will never know. It turned into a slimy, soggy, pink slop and I did not want to eat it. I remember trying to bribe my dad to eat it (he quickly shot me down). This was the last time I ate oatmeal until college, when my roommate Kathleen showed me how to make it in a way that is not soggy or slimy - she uses about 1/4 the amount of water recommended. I continued to enjoy my oatmeal this way, and even made a similarly-textured baked oatmeal.

This dish takes some time to make, but the result is a creamy, but not soggy, oatmeal that can be tailored to your specific tastes. I decided to add in grated apple, dried cranberries, cinnamon, and some brown sugar, but ATK suggests a number of different variations, including maple syrup, honey, figs, walnuts, and/or bananas. The second time I made this, I doubled the recipe and we reheated the leftovers each morning. 

Ultimate Steel-Cut Oats

Ingredients:
3 cups water
1 cup 1% lowfat milk*
1 tablespoon unsalted butter
1 cup steel-cut oats
1/4 teaspoon salt

Optional add-ins:
1/2 large, peeled and grated sweet apple (such as Fuji)
1/3 cup dried cranberries
3 tablespoons brown sugar
1/4 teaspoon ground cinnamon

*ATK advises against using skim milk. I actually only had skim and whole milk, so I used whole. Not as healthy, but it was gooood!

Directions:
1. Bring the water and milk to a simmer in a large saucepan over medium heat.

2. Meanwhile, melt the butter in a skillet over medium heat, then add the oats and toast, stirring constantly, until golden and fragrant, 1 1/2 to 2 minutes.

3. Stir the oats into the simmering liquid, reduce the heat,to medium-low, and simmer gently until the mixture is very thick, about 20 minutes.

4. Stir in the salt and the optional add-ins and continue to simmer, stirring occasionally, until almost all of the liquid has been absorbed and the oatmeal is creamy, about 10 minutes (if doubling the recipe, increase this to 15 minutes). Let stand for 5 minutes before serving.

DSC_0943_ed


Source: Adapted from the America's Test Kitchen Healthy Family Cookbook

Monday, September 14, 2015

Pumpkin-Chocolate Cheesecake Bars

DSC_0609_labeled

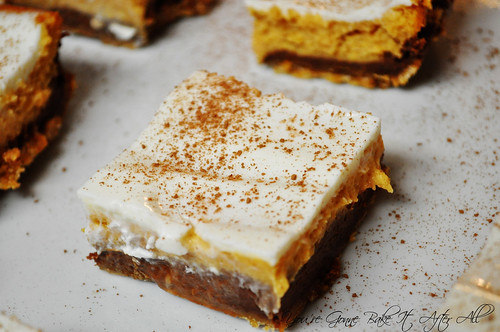
Although I didn't always think so, pumpkin and chocolate is such a great combination. Years ago in the fall, one of my labmates brought these Pumpkin-Chocolate Cheesecake Bars to a lab meeting. They are similar in theory to the Chocolate-Pumpkin Cheesecake Bars, but in these bars the chocolate and the pumpkin are layered rather than swirled, and the crust is graham cracker rather than chocolate cookies. These bars also have a delicious sour cream topping, and if I remember correctly, the cheesecake layers in these bars are slightly less firm than the Chocolate-Pumpkin Cheesecake Bars.  I am happy to have both bar recipes to make during my favorite time of year!

Pumpkin-Chocolate Cheesecake Bars 

Makes 24 to 36 bars

Ingredients: 
1 1/4 cups graham cracker crumbs
1/4
 cup sugar
1/3 
cup butter, melted
2 
8-ounce packages cream cheese, softened
1 3/4 
cups sugar
3
 eggs
1 
cup canned pumpkin
1/2 
teaspoon pumpkin pie spice
1/2 teaspoon ground cinnamon
1/2 
teaspoon vanilla
1/4 
teaspoon salt
6
 ounces semisweet chocolate, cut up (or 3 ounces semi-; 3 ounces bittersweet)
1 tablespoon bourbon, optional
2 
tablespoons butter
1 1/4 
cups sour cream
1/4 
cup sugar
Grated fresh nutmeg and/or milk chocolate or semisweet chocolate curls

Directions: 
1. Preheat oven to 325F. Lightly grease a 13x9-inch baking pan; set aside.

2. In a medium bowl, combine graham cracker crumbs and 1/4 cup sugar. Stir in the 1/3 cup melted butter. Press mixture evenly into bottom of the prepared baking pan; set aside.

3. In a large bowl, combine cream cheese and the 1 3/4 cups sugar. Beat with an electric mixer on medium speed until smooth. Add eggs, one at a time, beating on low speed after each addition just until combined. Beat in pumpkin, pumpkin pie spice, cinnamon, vanilla, and salt on low speed just until combined. Remove 1-1/4 cups of the mixture and set aside in a separate bowl (this mixture will have the chocolate added to it).

4. In a small heavy saucepan, combine the 6 ounces chocolate, the bourbon if using, and the 2 tablespoons butter. Cook and stir over low heat until melted. Whisk chocolate mixture into the 1 1/4 cups pumpkin mixture. Pour over crust, spreading evenly. Bake for 15 minutes.

5. Carefully pour the remaining pumpkin mixture over baked chocolate layer, spreading evenly. Bake for 40 to 45 minutes more or until filling is puffed and center is set. Cool on a wire rack for 30 minutes.

6. In a small bowl, combine sour cream and 1/4 cup sugar. Gently spread over bars. Cool completely. Cover and chill for at least 3 hours. Cut into bars.

* Before serving, sprinkle with nutmeg and/or chocolate curls.

 *To make triangle-shape bars, cut the cookies crosswise into four strips. Then cut each strip into five triangles (you'll end up with two half-triangles from the ends of each strip).

To Make Ahead: Bake and chill as directed; cut into bars. Place in a single layer in an airtight container; cover. Store in the refrigerator for up to 3 days. Do not freeze.

Source: Adapted from Midwest Living

Thursday, September 10, 2015

Harvest Chicken Salad

DSC_0337_HarvestChickenSalad


Several years ago, Subway introduced a chicken salad that had grapes, apples, raisins, and dried cranberries. I really liked the idea of this salad, although I felt like a homemade version would be much better. I love the sweet and savory balance of this chicken salad. I've served it on bread or in a dish. It's the perfect lunch or light dinner in early fall!

Harvest Chicken Salad 

Ingredients:
1 1/2 pounds boneless, skinless chicken breasts
Kosher salt and pepper
1/2 cup mayonnaise
1/2 cup sour cream
1 cup grapes, cut in half
1 apple, diced (I like Fuji)
1/4 cup raisins
1/4 cup craisins/dried cranberries

Directions:
Preheat oven to 350F.

1. Rub chicken with olive oil and place on a foil lined baking sheet. Sprinkle with kosher salt and pepper and bake until cooked through. Set aside to cool.

2. Cube cooled chicken. In a large bowl, combine mayonnaise, sour cream, grapes, apple, raisins, and craisins. Add chicken and stir to combine. Adjust seasoning with salt and pepper to taste. Chill until ready to serve.

Source: Inspired by the Orchard Chicken Salad from Subway, portions of chicken salad recipe from Barefoot Contessa

Monday, September 7, 2015

Browned Butter Cookies with Apple Cider Caramel Filling

DSC_0296_labeled

After making the Apple Cider Caramels, I had to try out this recipe that combines the caramels with Browned Butter Cookies. I wasn't sure how these would turn out, but I was blown away by how good they were.  The browned butter cookie base perfectly compliments the apple cider caramels. I know my words can't do these justice, so I will just let the pictures speak for themselves. Caramel oozing from a cookie? Yes please!

DSC_0313_labeled


Browned Butter Cookies with Apple Cider Caramel Filling

Makes about 20 cookies

Ingredients:
1 cup (2 sticks) unsalted butter
2 1/4 cups all-purpose flour
1 1/4 teaspoon baking soda
1/2 teaspoon coarse sea salt, plus more for sprinkling
1 cup light brown sugar
1/2 cup granulated sugar
1 large egg plus 1 egg yolk
2 1/2 teaspoons vanilla extract
1 tablespoon greek yogurt or sour cream
20 apple cider caramels (about 1-inch squares), unwrapped

Directions:
Preheat oven to 350F.

1. Place the butter in a medium skillet over medium heat. Melt completely. Continue to cook, whisking frequently, until the butter foams, bubbles slightly, and begins to brown. Continue whisking until the butter is evenly brown, being careful not to burn. Remove from heat and allow to cool.

2. Line baking sheets with parchment. In a medium bowl, whisk together the flour, baking soda, and salt. In the bowl of an electric mixer, combine the sugars and brown butter, mixing on medium speed until well blended and smooth.

3. Blend in the egg and yolk, scraping the bowl as needed. Blend in vanilla and yogurt or sour cream.  With the mixer on low, blend in the dry ingredients until just incorporated.

4. Use a medium dough scoop to place a ball of dough onto the prepared pan (about 2 tablespoons). Press the center of the dough down to create an indentation. Place a caramel in the indentation and pinch together the edges of the dough over the caramel to completely hide it in the center of the dough. At this point, you may pinch the top of the dough in multiple spots to create a more rustic look. Repeat with remaining dough, spacing cookies at least 2 - 3 inches apart.  Chill dough on cookie sheets in refrigerator for 30 minutes.

5. Bake the cookies until golden brown, about 14 minutes, rotating the pans halfway through cooking. Let cool briefly on the cookie sheet, then transfer to a wire rack to cool completely. Sprinkle with sea salt, if desired. Serve slightly warm to achieve gooey caramel texture.

Source: Annie's Eats

Thursday, September 3, 2015

Apple Cider Caramels


I made these apple cider caramels two falls ago and never got around to blogging them, which is sad because they are so, so good. I've never had anything like them before, and they truly do have a distinct apple cider flavor. Stay tuned for my next post where I show you an awesome recipe that uses these caramels!

Apple Cider Caramels

Ingredients:
4 cups apple cider
2 teaspoons flaky sea salt
1/2 teaspoon ground cinnamon
1/2 cup unsalted butter, cut into cubes
1 cup granulated sugar
1/2 cup light brown sugar
1/3 cup heavy cream

Directions:
1. Boil the apple cider in a 3- or 4-quart saucepan over high heat, stirring occasionally, until reduced to a dark, thick syrup, between 1/3-cup and 1/2-cup (approximately 35 to 40 minutes).

2. Meanwhile, line the bottom and sides of an 8-inch square baking dish with parchment paper, leaving excess hanging over the sides. In a small bowl, combine the cinnamon and salt.

3. After the cider has reduced, remove it from the heat and stir in the butter, sugars, and heavy cream. Return the pan to medium-high heat and attach a candy thermometer to the side. Let the mixture boil until the thermometer reaches 252 F, about 5 minutes.

4. Immediately remove the caramel from the heat, add the cinnamon and salt, and stir several times with a wooden spoon. Pour the caramel into the prepared pan. Let sit until cool and firm, about 2 hours.

5. Once the caramel is firm, use the parchment overhangs to lift it out of the pan and transfer to a cutting board. Using a very sharp knife coated with non-stick cooking stray, cut the caramel into 1-inch squares.  You may need to respray the knife several times during cutting to ensure clean slices.

6. Wrap each caramel in a 4-inch square of waxed paper, twisting the sides to close. The caramels can be stored in an airtight container for up to 2 weeks.

Source: Brown Eyed Baker, from The Smitten Kitchen Cookbook and blog


  © Blogger template Brownium by Ourblogtemplates.com 2009

Back to TOP