Showing posts with label Apple. Show all posts
Sunday, November 1, 2015
New England Sausage and Dried Cranberry Stuffing
Now that Halloween is officially over, it's time to start getting our Thanksgiving menus together. We always have our traditional Thanksgiving Dressing on Turkey Day, but a few years ago when my we started having a December "Dickens Dinner" with my sister's family, I started making this New England Sausage and Dried Cranberry Stuffing. Since I don't eat pork, I substitute chicken or turkey sausage and even the pork-eaters love this stuffing. Whether you're looking for a new recipe for Thanksgiving or one of the many holiday dinners ahead of us, this recipe is worth trying!
New England Sausage and Dried Cranberry Stuffing
Serves 5 - 6
Ingredients:
6 cups white bread, cut into 3/4-inch cubes
1/2 pound sausage, casings removed (traditional, chicken, or turkey)
1/4 stick butter
3 cups onion
1/2 pound tart green apples (or your choice), peeled, cored, chopped
1 cup celery, chopped
1/2 tablespoon poultry seasoning
1/4 cup dried cranberries
1 tablespoon dried parsley
1 1/2 eggs, beaten
3/4 cup chicken broth
Directions:
1. Place bread cubes on a large baking sheet and bake until slightly dry, about 15 - 20 minutes. Cool completely. You can also leave the cubes out overnight to dry.
2. Sauté the sausage in a large skillet over medium-high heat until cooked through, crumbling coarsely with the back of a spoon, about 10 minutes. Using a slotted spoon, transfer the sausage to a large bowl. Pour off any drippings from the skillet.
3. Using the same skillet, melt the butter. Add the onions, apples, celery, and poultry seasoning to the skillet. Sauté until onions are softened, about 5 – 8 minutes.
4. Mix in dried cranberries. Add the mixture to the sausage, then mix in the bread, eggs, and parsley. Season stuffing to taste with salt and pepper. Add the chicken broth to moisten stuffing depending on how most you like it (can be prepared one day ahead. Cover and refrigerate).
5. Butter a baking dish (I used a 7 x 11-inch glass dish). Transfer stuffing to the dish, cover, and bake at 350F until heated through, about 45 minutes. Uncover and bake until top is golden brown, about 15 minutes.
Source: Adapted from The Food Channel.com
Notes: I halved the original recipe, which serves 10. It calls for 4 teaspoons of chopped fresh rosemary (so that would be 2 teaspoons for the half batch) and the parsley to be fresh. Due to personal preference, I omitted the rosemary and substituted dried parsley.
Labels:
Apple,
Chicken sausage,
Fall,
Holiday,
Side dish,
Thanksgiving,
Turkey sausage
Thursday, September 17, 2015
Ultimate Steel-Cut Oatmeal
First off, I LOVE that it's a metal-ring binder style cookbook. My Mom's 1970's Betty Crocker Cookbook is in this format, and I always wanted a cookbook like this. Browsing through this book makes me want to cook non-stop for a month - there are so many recipes I would like to try! One that caught my eye right away was this recipe for Steel-Cut Oats. I had a container of them in my pantry and had every other ingredient on hand, (which never happens!).
I am not a traditional oatmeal lover. In fact, I had a very bad experience with oatmeal as a child. I begged my mom to let me have an oatmeal with red gummy bears (gag) for dinner one night instead of tuna casserole (double gag). Why we even had this in the house I will never know. It turned into a slimy, soggy, pink slop and I did not want to eat it. I remember trying to bribe my dad to eat it (he quickly shot me down). This was the last time I ate oatmeal until college, when my roommate Kathleen showed me how to make it in a way that is not soggy or slimy - she uses about 1/4 the amount of water recommended. I continued to enjoy my oatmeal this way, and even made a similarly-textured baked oatmeal.
This dish takes some time to make, but the result is a creamy, but not soggy, oatmeal that can be tailored to your specific tastes. I decided to add in grated apple, dried cranberries, cinnamon, and some brown sugar, but ATK suggests a number of different variations, including maple syrup, honey, figs, walnuts, and/or bananas. The second time I made this, I doubled the recipe and we reheated the leftovers each morning.
Ultimate Steel-Cut Oats
Ingredients:
3 cups water
1 cup 1% lowfat milk*
1 tablespoon unsalted butter
1 cup steel-cut oats
1/4 teaspoon salt
Optional add-ins:
1/2 large, peeled and grated sweet apple (such as Fuji)
1/3 cup dried cranberries
3 tablespoons brown sugar
1/4 teaspoon ground cinnamon
*ATK advises against using skim milk. I actually only had skim and whole milk, so I used whole. Not as healthy, but it was gooood!
Directions:
1. Bring the water and milk to a simmer in a large saucepan over medium heat.
2. Meanwhile, melt the butter in a skillet over medium heat, then add the oats and toast, stirring constantly, until golden and fragrant, 1 1/2 to 2 minutes.
3. Stir the oats into the simmering liquid, reduce the heat,to medium-low, and simmer gently until the mixture is very thick, about 20 minutes.
4. Stir in the salt and the optional add-ins and continue to simmer, stirring occasionally, until almost all of the liquid has been absorbed and the oatmeal is creamy, about 10 minutes (if doubling the recipe, increase this to 15 minutes). Let stand for 5 minutes before serving.
Source: Adapted from the America's Test Kitchen Healthy Family Cookbook
Monday, September 7, 2015
Browned Butter Cookies with Apple Cider Caramel Filling
After making the Apple Cider Caramels, I had to try out this recipe that combines the caramels with Browned Butter Cookies. I wasn't sure how these would turn out, but I was blown away by how good they were. The browned butter cookie base perfectly compliments the apple cider caramels. I know my words can't do these justice, so I will just let the pictures speak for themselves. Caramel oozing from a cookie? Yes please!
Browned Butter Cookies with Apple Cider Caramel Filling
Makes about 20 cookies
Ingredients:
1 cup (2 sticks) unsalted butter
2 1/4 cups all-purpose flour
1 1/4 teaspoon baking soda
1/2 teaspoon coarse sea salt, plus more for sprinkling
1 cup light brown sugar
1/2 cup granulated sugar
1 large egg plus 1 egg yolk
2 1/2 teaspoons vanilla extract
1 tablespoon greek yogurt or sour cream
20 apple cider caramels (about 1-inch squares), unwrapped
Directions:
Preheat oven to 350F.
1. Place the butter in a medium skillet over medium heat. Melt completely. Continue to cook, whisking frequently, until the butter foams, bubbles slightly, and begins to brown. Continue whisking until the butter is evenly brown, being careful not to burn. Remove from heat and allow to cool.
2. Line baking sheets with parchment. In a medium bowl, whisk together the flour, baking soda, and salt. In the bowl of an electric mixer, combine the sugars and brown butter, mixing on medium speed until well blended and smooth.
3. Blend in the egg and yolk, scraping the bowl as needed. Blend in vanilla and yogurt or sour cream. With the mixer on low, blend in the dry ingredients until just incorporated.
4. Use a medium dough scoop to place a ball of dough onto the prepared pan (about 2 tablespoons). Press the center of the dough down to create an indentation. Place a caramel in the indentation and pinch together the edges of the dough over the caramel to completely hide it in the center of the dough. At this point, you may pinch the top of the dough in multiple spots to create a more rustic look. Repeat with remaining dough, spacing cookies at least 2 - 3 inches apart. Chill dough on cookie sheets in refrigerator for 30 minutes.
5. Bake the cookies until golden brown, about 14 minutes, rotating the pans halfway through cooking. Let cool briefly on the cookie sheet, then transfer to a wire rack to cool completely. Sprinkle with sea salt, if desired. Serve slightly warm to achieve gooey caramel texture.
Thursday, September 3, 2015
Apple Cider Caramels
Ingredients:
4 cups apple cider
2 teaspoons flaky sea salt
1/2 teaspoon ground cinnamon
1/2 cup unsalted butter, cut into cubes
1 cup granulated sugar
1/2 cup light brown sugar
1/3 cup heavy cream
Directions:
1. Boil the apple cider in a 3- or 4-quart saucepan over high heat, stirring occasionally, until reduced to a dark, thick syrup, between 1/3-cup and 1/2-cup (approximately 35 to 40 minutes).
2. Meanwhile, line the bottom and sides of an 8-inch square baking dish with parchment paper, leaving excess hanging over the sides. In a small bowl, combine the cinnamon and salt.
3. After the cider has reduced, remove it from the heat and stir in the butter, sugars, and heavy cream. Return the pan to medium-high heat and attach a candy thermometer to the side. Let the mixture boil until the thermometer reaches 252 F, about 5 minutes.
4. Immediately remove the caramel from the heat, add the cinnamon and salt, and stir several times with a wooden spoon. Pour the caramel into the prepared pan. Let sit until cool and firm, about 2 hours.
5. Once the caramel is firm, use the parchment overhangs to lift it out of the pan and transfer to a cutting board. Using a very sharp knife coated with non-stick cooking stray, cut the caramel into 1-inch squares. You may need to respray the knife several times during cutting to ensure clean slices.
6. Wrap each caramel in a 4-inch square of waxed paper, twisting the sides to close. The caramels can be stored in an airtight container for up to 2 weeks.
Source: Brown Eyed Baker, from The Smitten Kitchen Cookbook and blog
Monday, August 31, 2015
Apple Crumble Pizza Pie
Let's kick off September with an apple recipe, shall we? This recipe is a family favorite from my mom's old Betty Crocker Cookbook. Interestingly, it has been omitted from the new Betty Crocker Cookbook, as the one I received as a wedding gift does not have this recipe! I was really surprised to discover this considering how much my family loves this dessert. It's so simple, especially if you use a store bought pie crust, but it looks impressive and tastes just like apple pie, but possibly better!
Apple Crumble Pizza Pie
Makes 8 to 10 servings
Ingredients:
Pastry for 8- or 9-inch two-crust pie, store-bought or homemade (see recipe below)
6 to 7 tart apples, peeled and cut into 1/2-inch thick slices
1/2 cup sugar
1 teaspoon cinnamon
1/4 teaspoon nutmeg
Crumble topping (see below)
Preheat oven to 450F.
1. Prepare pastry as directed except roll 1 inch larger than 12- or 13-inch pizza pan. Ease into pizza pan and flute edge. (Alternatively, roll the dough into a 13- or 14-inch circle and place on an ungreased baking sheet and flute).
2. Beginning at the ends of the crust and overlapping the slices, cover the crust with apples.
3. Stir together the sugar, cinnamon, and nutmeg. Sprinkle the mixture over the apple slices. Top with Crumble Topping.
4. Bake 30 to 40 minutes or until edge is golden brown and apples are tender. Best served warm and, if desired, topped with vanilla or cinnamon ice cream!
Crumble Topping
Ingredients:
3/4 cup all purpose flour
1/2 cup sugar
1/2 cup firm butter
Directions:
Mix until crumbly.
Source: The Betty Crocker Cookbook
This is my go-to pie dough recipe:
All-Butter Double-Crust Pie Dough
Ingredients:
1/3 cup ice water, plus extra as needed
3 tablespoons sour cream
2 1/2 cups (12 1/2 ounces) unbleached all-purpose flour, plus extra for the work surface
1 tablespoon sugar
1 teaspoon table salt
16 tablespoons (2 sticks) unsalted butter, cut into 1/4-inch pieces and frozen for 10 to 15 minutes
Directions:
1. Mix 1/3 cup of the ice water and the sour cream in a small bowl until combined. Process the flour, sugar, and salt together in a food processor until combined. Scatter the butter pieces over the top and pulse the mixture until the butter is the size of large peas, about 10 pulses.
2. Pour half of the sour cream mixture over the flour mixture and pulse until incorporated, about 3 pulses. Repeat with the remaining sour cream mixture. Pinch the dough with your fingers, if the dough feels dry and does not hold together, sprinkle 1 to 2 tablespoons more ice water over the mixture and pulse until he dough forms large clumps and no dry flour remains, 3 to 5 pulses.
3. If using for Apple Crumble Pizza Pie, refrigerate dough until it is a consistency suitable for rolling. If using for a pie, divide the dough into 2 even pieces and wrap in plastic wrap, forming into 4-inch disks before refrigerating.
Source: America's Test Kitchen
Tuesday, November 12, 2013
French Apple Cake
I will say that I have loved having this blog as a way to document not only our favorite recipes but also momentous occasions in our family, and I have missed not having a record of these events in time-stamped format. Our daughter Ava is turning 2 next month !!! and I really cannot believe it. Also, we are expecting her baby sister in February and are so excited to see what life as a family of 4 brings!
French Apple Cake
Ingredients:
1 1/2 pounds apples, peeled, cored, cut into 8 wedges then sliced 1/8 inch thick crosswise (ATK recommends Granny Smith; I used Golden Delicious)
1 tablespoon Calvados (this is a French apple brandy; you can substitute another apple brandy or white rum. I used regular brandy, and it was fine.)
1 teaspoon lemon juice
1 cup (5 ounces) plus 2 tablespoons all-purpose flour
1 cup (7 ounces) plus 1 tablespoon granulated sugar
2 teaspoons baking powder
1/2 teaspoon salt
1 large egg plus 2 large yolks
1 cup vegetable oil
1 cup whole milk
1 teaspoon vanilla extract
Confectioners' sugar, optional
Directions:
1. Adjust an oven rack to the lower-middle position and heat the oven to 325F. Spray a 9-inch springform pan with non-stick spray. Place prepared pan on a rimmed baking sheet lined with aluminum foil.
2. Place apple slices into a microwave-safe pie plate, cover, and microwave until apples are pliable and slightly translucent, about 3 minutes.* Toss apple slices with Calvados and lemon juice and let cool for 15 minutes.
3. Whisk 1 cup flour, 1 cup granulated sugar, baking powder, and salt together in a bowl. Whisk egg, oil, milk, and vanilla together in a second bowl until smooth. Add dry ingredients to wet ingredients and whisk until just combined. Transfer 1 cup batter to a separate bowl and set aside (this will become the cake layer).
4. Add the egg yolks to the remaining batter (to create the custard layer) and whisk until just combined. Using spatula, gently fold in cooled apples.
5. Transfer custard/apple batter to prepared pan and, using an offset spatula, spread the batter evenly to the pan edges, gently pressing on the apples to create an even, compact layer, and smooth surface.
6. Whisk the remaining 2 tablespoons flour into the reserved batter. Carefully and evenly pour this batter in the pan on top of the custard/apple layer. Spread the batter evenly to the pan edges and smooth the surface. Sprinkle the remaining 1 tablespoon granulated sugar evenly over the cake.
7. Bake until the center of the cake is set, a toothpick inserted in the center comes out clean, and the top is golden brown, about 1 1/4 hours.
8. Transfer pan to a wire rack; let cool for 5 minutes. Run a paring knife around the sides of the pan to dislodge the cake and then let cool completely, 2 to 3 hours. Dust lightly with confectioners' sugar if desired, cut into wedges, and serve. For a nice crisp top, serve the same day without covering the cake. I loosely covered the remaining cake with foil overnight, and the crispness was lost due to the moisture of the cake (it's still good though!)
Source: America's Test Kitchen
*I prefer not to microwave plastic wrap as I'm unsure what chemicals leach into the food during the heating process, so I covered my pie plate with waxed paper then topped it with plastic wrap to get a good seal so no moisture would escape. I suppose chemical could pass through the wax paper, especially if had gotten wet (it didn't), but it made me feel better to do it this way!
Wednesday, October 26, 2011
Apple Pie Floats
Do you ever find yourself looking for ways to use up that big container of apple cider? I always buy a big gallon of it at the apple orchard each year and then end up scrambling to finish it. This idea for an ice cream float with apple cider is fantastic! I've never thought of it before. I made one of these for Bob and I to share. Not knowing the name of this recipe, Bob took a sip and said "it tastes like apple pie!" :) He did comment that he would prefer a tad more ginger ale, so I've made a note in the recipe below to adjust to your own taste. Happy Fall!!!
Apple Pie Floats
Yield: 1 serving
Ingredients:
1 cup apple cider
1/2 cup ginger ale, or a little extra depending on personal preference
1 - 2 scoops vanilla ice cream, or any seasonal flavor such as cinnamon or apple pie
ground cinnamon and nutmeg for sprinkling
1 - 2 tablespoons jarred caramel sauce
Directions:
1. Pour apple cider and ginger ale into a glass.
2. Add vanilla ice cream.
3. Sprinkle on nutmeg and cinnamon to taste and drizzle caramel sauce on top.
4. Serve immediately with a straw and a spoon.
Source: Our Best Bites
Tuesday, September 27, 2011
Apple Cider Doughnuts
Apple picking is one of my favorite fall activities. My mom and aunt used to take my sister and I apple picking when we were kids. When I lived in Chicago, my friend Kathleen and I decided to carry on the tradition. We found this awesome orchard County Line and looked forward to our yearly visits. One of our favorite parts was the 
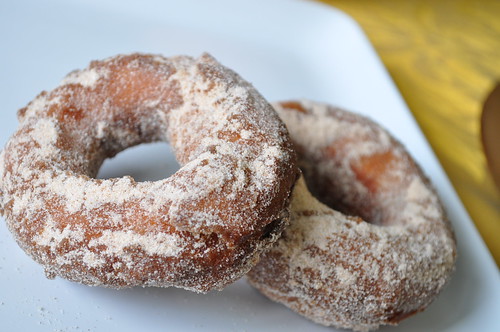
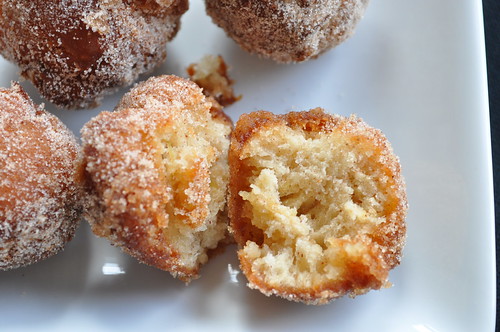
apple spiced donuts! They were best fresh - warm and slightly crispy on the outside, perfect spiced apple cake-doughnut texture on the inside, covered in loads of cinnamon sugar! We would even stop at a gas station on the way in or out and get some milk to have with the doughnuts!
When we made the big move to St. Louis last year, I knew that I would be missing out on the apple doughnuts. We still pick apples here, but to my knowledge the local orchards don't serve these doughnuts...in fact, a lot of people around here have never heard of them.
Last fall, when I saw Megan post this Apple Cider Doughnut recipe, I got really excited that it might closely mimic my favorite orchard doughnuts! We had a very busy fall last year - moving into our house, still settling into our new jobs, getting our home ready to host our first Thanksgiving - things were a little hectic. The thought of making homemade doughnuts wasn't an option. Plus, I didn't have a proper vessel to use for deep frying... Then this spring, Kathleen used her amazing discount for the kitchen store she works for to help me purchase something I've been dreaming about for years - a Le Creuset French Oven!
The Le Creuset is perfect for deep frying, so I made these doughnuts a priority this year. I have to admit, I was a bit nervous to deep fry. I've never done it before, but I had a candy/fry thermometer and some baking soda/fire extinguisher on hand, so I went for it. I got fresh apples and apple cider from a local orchard on a Saturday, made the dough on Saturday night, and on Sunday morning we enjoyed these babies. And I have to say, they were better than the ones at County Line! Bob said they are probably his favorite thing I've ever made! Wow - that is huge. He's surprisingly picky. I invited my sister and brother-in-law over since they've actually made homemade doughnuts before, and they loved these as well. Everyone commented on how the real flavor of the apples and the cider comes through. I love that! I'm thinking the doughnuts sold at orchards are probably from a mix, not from fresh apples and cider!
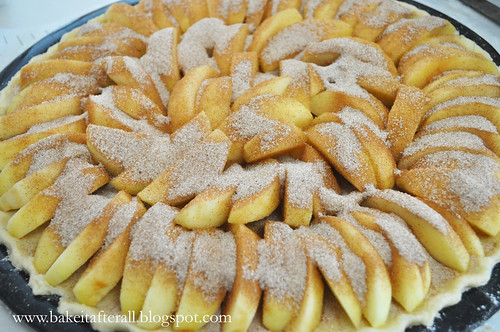
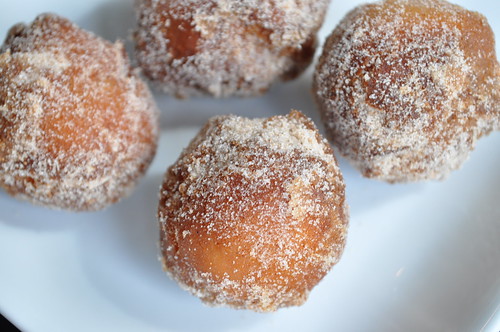
This recipe isn't difficult, but it does take some patience. Fresh apples are simmered in apple cider until soft, then pureed into a fresh apple sauce, which is reduced and incorporated into a cake doughnut dough. The dough chills for at least 2 hours (preferably overnight). Once chilled, the dough can be shaped however you'd like - traditional doughnuts or doughnut holes - and then fried, dipped in a reduced cider glaze, and rolled in cinnamon-sugar. YUM!
I found that I ran out of the cider glaze, likely because instead of following the original recipe and only dipping one side of the doughnuts in glaze and cinnamon sugar, we preferred to coat the entire thing (that's how County Line does it!). Because of this, I've doubled the amount in the recipe below. I also bumped up the cinnamon sugar because I used most of it and didn't make the full batch of doughnuts...some of the dough is in the freezer for another time!
I think we've decided to make these doughnuts a yearly tradition in our house. I hope our daughter will love apple picking as much as I do, and I'm sure she'll love these doughnuts! :-)
The Best Apple Cider Doughnuts
Ingredients:
For the doughnuts:
2 apples (they suggest red such as Cortland or McIntosh, I used my favorite Golden Delicious)
1 1/2 cups apple cider
3 1/2 cups all-purpose flour, plus more for dusting
4 teaspoons baking powder
1/4 teaspoon baking soda
1 1/2 teaspoons ground cinnamon
1 teaspoon salt
1/4 teaspoon nutmeg
2/3 cup granulated sugar
3 tablespoons vegetable shortening
1 egg plus 1 egg yolk
1/4 cup buttermilk
1 teaspoon vanilla extract
Vegetable oil, for frying (I needed about 2 1/2 quarts)
For the glaze:
2 cups apple cider
1/2 cup confectioners' sugar
For the topping:
1 1/2 cup sugar
1 tablespoon ground cinnamon (feel free to add more if you prefer a higher cinnamon to sugar ratio)
Directions:
1. To make the doughnuts: core and coarsely chop the apples (do not peel). Combine the apples with 1 1/2 cups cider in a medium saucepan over medium heat; cover and cook until softened, about 8 minutes. Uncover and continue cooking until the apples are tender and the cider is almost completely reduced, about 5 minutes.
2. Pour the mixture into a food processor, and puree until smooth (or use an immersion blender). Pour the applesauce into a measuring cup. If you have more than 1 cup, return the applesauce to the saucepan, and boil until reduced to 1 cup. (I had to do this step). Let cool slightly.
3. While the apples are cooking, whisk the flour, baking powder, baking soda, 1 1/2 teaspoons cinnamon, salt, and nutmeg in a medium bowl.
4. In bowl of electric mixer fitted with the paddle attachment, combine 2/3 cup granulated sugar and the shortening, and beat on medium speed until sandy.
5. Beat in the egg and yolk, and then gradually mix in the applesauce, scraping the bowl. Mix in half of the flour mixture, then the buttermilk and vanilla, and then the remaining flour mixture. Mix to make a sticky dough; do not overmix.
6. Scrape the dough onto a lightly floured sheet of parchment paper laid on a sheet pan turned upside down. Roll dough in the flour to lightly coat (I added this step, as the dough stuck to the parchment so perhaps this will help). Pat dough into a 7-by-11-inch rectangle, about 1/2 inch thick. Cover with plastic wrap and refrigerate for at least 2 hours or overnight. (Overnight is recommended because the colder the dough is, the easier it is to work with. It's a very sticky dough.)
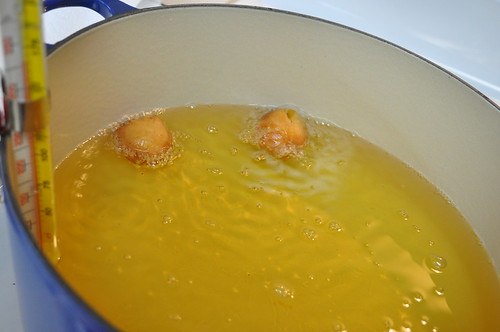
7. When you're ready to make the doughnuts, heat 2 inches of vegetable oil in a large heavy-bottomed pot over medium-high heat until a deep-fry thermometer registers 350 degrees.
8. While the oil is heating, 
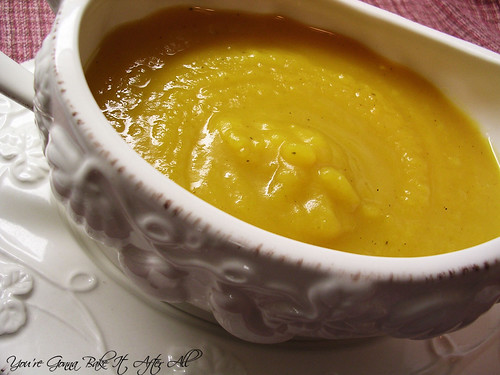
make the glaze: simmer 2 cups cider in a small saucepan over medium heat until reduced to 1/2 cup. Whisk in the confectioners' sugar, and set the glaze aside.
9. Then make the topping: Mix 1 1/2 cups granulated sugar and 1 tablespoon (or more) cinnamon in a shallow bowl or pie plate; set aside.
10. Line a baking sheet with paper towels, and set it near the stove.
11. Cut the chilled dough into rounds, using a floured-dipped 3-inch biscuit cutter. Cut out the centers of the doughnuts, using a 1- or 1.5-inch biscuit cutter. Or simply use the small biscuit cutter to cut all doughnut holes. (The dough expands when it hits the oil, so I ended up halving the doughnut holes made with a 1.5-inch biscuit cutter). At this point, I found it useful to lightly dust/roll the doughnuts in flour so they weren't so sticky. This really helped and didn't affect the frying process or the resulting taste of the doughnuts.
12. Using a skimmer, tongs, or your hands (be very careful!!!), slip 2 or 3 doughnuts or 4 or 5 doughnut holes at a time into the hot oil and fry until golden brown, 1 to 2 minutes per side for regular doughnuts, approximately 3 1/2 - 5 minutes for doughnut holes (this will depend on the temperature of the oil. I had a hard time regulating it with my electric range...perhaps gas is better for this?) I suggest starting out with one doughnut hole and seeing how long it takes to get the center totally cooked. This will give you a good idea of the outside color when the inside is cooked. Our first doughnut hole was gooey on the inside, but every other doughnut after that was perfectly cooked.
13. Transfer to the paper towels to drain. If you prefer to eat the doughnuts hot and fresh (like we did!), only allow the doughnuts to drain for a minute or so, then drop a doughnut into the cider glaze, roll around using tongs, and then transfer to cinnamon-sugar mixture and roll around to coat entirely. The original recipe suggests to just dip one side of each doughnut, but we like them totally coated in cinnamon-sugar!
14. Repeat with remaining dough. Check the oil temperature periodically, and adjust the heat as needed.
Note: You may want to return the remaining dough to the fridge in between fry batches so it doesn't get too warm and sticky. I found it helpful to keep plenty of flour on hand if the dough is sticking too much.
Source: Adapted from Delicious Dishings, originally from Food Network Magazine
Monday, November 9, 2009
Butternut Squash and Apple Soup
One of my favorite things about Fall is the wonderful fruits and vegetables that are at their peak. The cooler weather means that it's officially soup season (although some of us enjoy soup year round with the a/c cranked up!) I initially made this soup last year. It was my first time working with butternut squash, so I was a little intimidated, but it's really not difficult. The hardest part is cutting the squash open! This recipe does require a lot of peeling and chopping, but it's definitely worth it. Considering this is Ina Garten's recipe, it should come as no surprise that it's AMAZING!!! Bob and I LOVE this soup and highly, highly, highly recommend it! It makes a LOT, so be prepared for leftovers!

Butternut Squash and Apple Soup
Ingredients:
2 Tablespoons unsalted butter
2 Tablespoons olive oil
4 cups chopped yellow onions (3 large)
2 Tablespoons mild curry powder
5 pounds butternut squash (2 large)
1 1/2 pounds sweet apples (4)
2 teaspoons kosher salt
1/2 teaspoon freshly ground black pepper
2 cups water
2 cups good apple cider or juice
Directions:
1. Warm the butter, olive oil, onions, and curry powder in a large stockpot uncovered over low heat for 15 to 20 minutes, until the onions are tender. Stir occasionally, scraping the bottom of the pot.
2. Peel the squash, cut in half, and remove the seeds. Cut the squash into chunks. Peel, quarter, and core the apples. Cut into chunks.
3. Add the squash, apples, salt, pepper, and 2 cups of water to the pot. Bring to a boil, cover, and cook over low heat for 30 to 40 minutes, until the squash and apples are very soft. (This takes a bit longer for me).
4. Process the soup through a food mill fitted with a large blade, or puree it coarsely in the food processor fitted with a steel blade. (You may also use an immersion blender, which I did - much easier!)
5. Pour the soup back into the pot. Add the apple cider or juice and enough water to make the soup the consistency you like; it should be slightly sweet and quite thick. Season with salt and pepper if desired and serve hot.
Source: Adapted from the Barefoot Contessa Ina Garten
Wednesday, October 14, 2009
Caramel Apple Bars
As a physical therapy student, Bob has three clinicals he must complete. His current clinical is in acute care, and he works at a hospital with a big group of women. I had the pleasure of meeting them, and they seem like such a fun group! I decided to make these Caramel Apple Bars for Bob to take and and share with his coworkers.
Of course I had to try one to make sure they were ok :) and Bob participated too. We really like these alot! They are very gooey and moist, and the perfect balance of sweet and salty. We actually found out the next day, after they had chilled overnight in the fridge, that the bars stay together better and even the flavor is better, so I highly recommend following the recipe's suggestion to chill.
I found these Kraft Caramel Bits (pictured below step 3) and thought they were such an ingenious idea - who wants to unwrap an entire bag of caramels! I did some reading online to find out whether I still needed to melt them - the reviews were mixed. I decided to just dump them in the bars. While I think this was super easy and made for less cleanup, I'd like to try these with the caramel pre-melted and drizzled next time. The bits yield bars with little clumps of caramel, which is great, but I'd like to compare the two methods.
As far as the taste of the bits, they aren't quite as good as the wrapped caramels by themselves, but it's hard to tell a difference in these bars. I think they are a great alternative if you're in a time crunch or if the thought of unwrapping 45-50 caramels makes you run the other way!


Caramel Apple Bars
Ingredients:
1 cup packed brown sugar
1/2 cup (1 stick) butter or margarine, softened
1/4 cup vegetable shortening
1 3/4 cups all-purpose flour
1 1/2 cups quick-cooking oats
1 teaspoon salt
1/2 teaspoon baking soda
4 1/2 cups chopped, peeled tart apples (3 medium or 4 small)
3 Tablespoons all-purpose flour
1 bag (14 ounces) caramels, unwrapped, or 1 bag Caramel Bits
Directions:
Preheat oven to 400F.
1. Mix brown sugar, butter, and shortening in a large bowl (I did this in my stand mixer). Stir in 1 3/4 cups flour, the oats, salt, and baking soda. Reserve 2 cups oat mixture; press remaining oat mixture in ungreased, 13 x 9 x 2-inch rectangular pan.

2. Toss apples and 3 Tablespoons flour; spread over mixture in pan.

3. Heat caramels over low heat, stirring occasionally, until melted; pour evenly over apples. Alternatively, evenly disperse caramel bits over the apples.


4. Sprinkle reserved oat mixture on top; press lightly.

5. Bake 25 to 30 minutes or until topping is golden brown and apples are tender (mine took about 35 minutes). Cut bars while warm. Store covered in refrigerator.
Source: Adapted from Betty Crocker
Monday, August 10, 2009
Honey Yogurt Dip
My favorite fruit dips usually contain marshmallow fluff as the main ingredient, so I was delighted to discover that I love this Honey Yogurt Dip! It's so good! The combination of honey and cinnamon reminds me of sopaipillas. Not that I don't still love the marshmallow fluff dip, but I can't rationalize having it around for an everyday snack. I think the Greek Yogurt is really important for this recipe, otherwise the dip would be too liquidy. You can serve this dip with any fruit, but I especially like it with sliced apples. Apples + cinnamon + honey = delish! What a great recipe for the upcoming apple season (did I mention how excited I am for fall?!?)

Honey Yogurt Dip
Ingredients:
1 7- or 8-ounce container of Greek Yogurt
1/4 cup honey
dash of cinnamon
Directions:
1. Combine ingredients in a small bowl and store in refrigerator.
2. Serve with your favorite fruit!
Source: Annie's Eats
Subscribe to:
Posts (Atom)