Search This Blog

Monday, May 31, 2010

Lemon Chicken

DSCN6506_labeled

Hello out there!! With all of the hoopla involved in relocating to a different city, it's been a long time since I've actually cooked anything. We have been in our new place for a week now and are starting to settle in. I'm trying to get back into the groove of cooking and baking, which is nice, but we still don't have internet! I'm hopeful that it will be connected this week, so regular blogging can resume :)

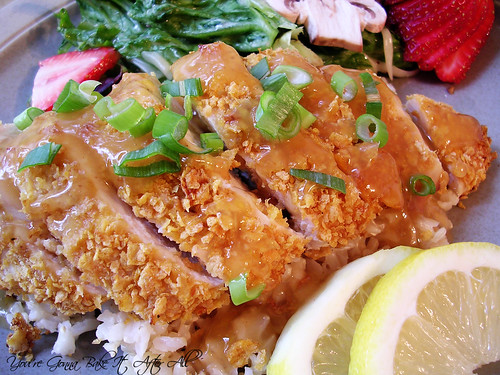
This is the first real meal I cooked in my new kitchen. I served this Lemon Chicken over brown rice with a mixed green salad topped with strawberries, grated mozzarella, sliced mushrooms (for Bob), and creamy poppy seed dressing. It was such a flavorful, summery meal!

I used 2 chicken breast halves instead of 4 and half the amount of corn flake coating but kept the amount of egg wash and sauce the same. I'm just providing the full recipe as it was originally written. I also think a little bit of salt on the chicken before the egg wash is necessary, the small amount of soy sauce did not do the trick for me. I also don't think it's necessary to slice the chicken before putting it on the plate. Sure it looks pretty, but I think this made the chicken get cold faster, so I wouldn't recommend it.

Lemon Chicken

Serves 4

Ingredients:
For the chicken:
¾ cup finely crushed corn flakes cereal
½ teaspoon ginger
1/8 teaspoon pepper
salt to taste
1 egg white
1 teaspoon soy sauce
4 boneless, skinless chicken breast halves

For the sauce:
½ cup chicken broth
1 tablespoon cornstarch
1/3 cup honey
3 tablespoons fresh lemon juice
1 teaspoon ketchup
1/8 teaspoon garlic powder
1 tesapoon grated lemon peel
2 green onions, sliced

Directions:
1. Line a baking sheet with foil; place in oven. Heat oven to 450F.

2. In a pie plate, combine crushed cereal, ginger, and pepper; mix well. In a small bowl, beat egg white, water, and soy sauce until frothy. Lightly salt each chicken breast half as desired, and dip in the egg white mixture. Place in pie pan; spoon cereal mixture over chicken to coat evenly.

3. Remove hot foil-lined baking sheet from oven; arrange coated chicken on sheet. Bake for 15 to 20 minutes, or until internal temperature of chicken reaches at least 165F.

4. Meanwhile, in a medium saucepan, combine broth and cornstarch; blend until smooth. Add honey, lemon juice, ketchup, and garlic powder; mix well. Bring to a boil over medium-high heat, stirring constantly. Remove from heat; stir in lemon peel.

5. To serve, cut each chicken breast half crosswise into 6 or 7 pieces (or leave whole), arrange on 4 individual plates (over rice if desired). Spoon sauce over chicken; sprinkle with green onions.

Source: Adapted from Pillsbury’s Best Chicken Cookbook

Tuesday, May 18, 2010

Guest Post: Mushroom and Mascarpone Ravioli

Since I've been out of the country, packing for our move, and will be losing internet access tonight (yikes!), my sister Lisa and her boyfriend Steve offered to do a guest post for me! They are both fantastic cooks, as I've mentioned before (here, here, and here), and have great palates, so you're in for a treat with this recipe. Hope to see you all soon with a recipe from my NEW kitchen! :)


Since Meghan will be busy packing and moving this week, I thought I would help her out by offering her this recipe to post. Steve and I had some mushrooms in the fridge that we wanted to use, so we decided to make mushroom ravioli. We found a recipe for Mushroom and Mascarpone Ravioli on allrecipes.com and thought it would be perfect since we had a container of the cheese in the fridge as well. It sounded so good and we had never made homemade ravioli before, so I was really excited to try this recipe out!

We had to make a few substitutions and slight changes because we didn’t have a couple of the ingredients, but overall we stayed fairly true to the recipe. One major change, however, was to use homemade pasta instead of the wonton wrappers. Steve got a pasta roller for Christmas, and we’ve wanted to make ravioli with it. The pasta can be topped with any sauce you want, but we topped it with just a little olive oil, chopped cherry tomatoes, black pepper, and Parmesan cheese. The filling of this ravioli is the real star of the recipe, so I would recommend trying to follow the filling recipe as best as you can to get the amazing flavor it adds. Some of the reviewers on allrecipes.com said this was the best ravioli filling they had ever eaten. I would have to agree! It really is that good!

If you use homemade pasta for the ravioli, I recommend making the pasta dough first and then making the filling while the dough is resting. Then you can roll out the pasta and fill it with the mixture. Enjoy!


Homemade Pasta

Ingredients:
In general, use 100 oz (about 1 cup) all-purpose flour for every 1 egg. For this recipe we used:
400 oz (about 1 cup) all-purpose flour
4 eggs
Extra flour for flouring countertop, dough, and pasta machine

Directions:
1. Put flour into a large bowl. In separate bowl, whisk eggs together.

2. Make a large well in the center of the flour and pour the eggs into the well.

3. With a fork, mix the flour into the eggs in the well. Continue mixing until the flour and eggs form a dough.

4. Shape the dough into a ball and knead it by hand on a floured countertop for 5 – 7 minutes. If the dough gets too dry, wet your hands and continue to knead. Alternately, if the dough is too sticky, add a little flour. Note: You want to have a pasta dough that tends on the dry side as it will need to be this way in order to not stick to your pasta maker, roller, etc.

5. Cover the pasta dough with the inverted bowl and let rest for one-half hour.

6. When dough has rested, slice into around 6 equally-sized pieces (to give you a top and bottom to your ravioli). Roll each piece of dough through the floured pasta roller. (Our roller has settings 1-9, and we rolled the dough up to a 6.)

7. Lay pasta sheets separately on a floured surface. (This is very important because we laid ours on top of each other and they stuck together. We had to re-roll the dough.)


Mushroom and Mascarpone Ravioli

4 servings

Ingredients:
1 tablespoon olive oil
2 large shallots, minced (We only had one shallot)
8 ounces fresh mushrooms, chopped (We used white mushrooms and shitakes)
1 tablespoon chopped fresh thyme (We substituted one-quarter tablespoon of finely chopped dried thyme)
2 tablespoons minced garlic
1 tablespoon chopped fresh chives (We substituted 1 green onion)
1 (8 ounce) container mascarpone cheese
salt and pepper to taste
32 (3.5 inch square) wonton wrappers (We made our own pasta instead – See recipe above)
1 egg, beaten
2 tablespoons milk

Directions:
1. Heat the olive oil in a large skillet over medium-high heat. Add the shallots; cook and stir until starting to brown. Reduce the heat to medium and add the mushrooms, thyme, garlic and chives; continue to cook until the liquid from the mushrooms has evaporated, 5 to 10 minutes. Remove from the heat and set aside to cool.

2. In a medium bowl, stir together the mascarpone cheese and mushroom mixture. Season to taste with salt and pepper; set aside.

3. *Lay out 16 wonton wrappers on a clean surface. Whisk together the egg and milk in a small cup. Brush the egg wash onto the wrappers. Place one tablespoon of the cheese mixture onto the center of each square. Place a second wonton wrapper over the top of the filling and press to seal the edges. You may refrigerate the ravioli on a baking tray covered with plastic wrap.

4. Bring a large pot of lightly salted water to a boil. Add the ravioli one at a time and cook until they float to the top, 3 to 4 minutes. (We cooked our ravioli at a simmer for about 10 minutes as recommended by a reviewer to prevent ravioli from opening up.)

5. Top with a little olive oil, pepper, and Parmesan cheese (or any other sauce) and enjoy!

*Step 3, if using homemade pasta: Drop the filling mixture by tablespoons onto one of the pasta sheets, leaving 1-2 inches between each spoonful. Whisk together the egg and milk in a small cup. Brush the egg wash onto the sheet in between and around the filling, wherever dough is exposed. Place another pasta sheet on top of the first, and press the top sheet onto the second, being careful not to press the filling out from the sheets. Press around the filling to form the pockets of filling. Use a biscuit cutter, pasta cutter, or scalloped edge cookie cutter to cut around each pocket of filling, forming the ravioli.

Source: Adapted from Allrecipes.com

Monday, May 10, 2010

Butterfly Cookies

Are you ready for some photos?

DSCN6252_labeled

DSCN6217_labeled

DSCN6245_labeled

DSCN6222_labeled

DSCN6221_labeled

DSCN6249_labeled

DSCN6242_labeled

DSCN6241_labeled

DSCN6233_labeled

DSCN6230_labeled

These were just SO much fun to photograph!

After discovering the amazing blog Sweetopia and then making these fun Easter Cookies using the techniques I learned, I couldn't wait to take on another project using this method - Butterfly Cookies! They are actually pretty simple to make, and I think the outcome is stunning. These may just be my favorite cookies I've made so far (though the Monkey Face Cookies and Easter Cookies are close!)

I definitely hope to make these again. I love the look of the pastels with the black; I'd also like to try some bolder colors in the future.

As far as the cookie recipe goes, use whatever recipe you like. I always like to try to top my favorite recipe, and I think the recipe I used this time does. My mom actually likes these better than her all-time favorite sugar cookie! I still have one more sugar cookie recipe I want to try soon to finally decide which is my favorite...


Butterfly Cookies

Ingredients:
1 batch sugar cookies (see below)
1 batch Royal icing (see below)

Equipment:
5 pastry bags
5 twist ties or rubber bands
5 couplers
5 piping tips (I used #2, but #1 would work as well)
5 glasses or cups, with damp paper towels in the bottom (or tip covers)
Toothpicks
Gel icing colors (red, blue, yellow, green, black, brown (optional))
Paper towels and wax paper

Directions:
1. Prepare black royal icing - I do this by adding brown to the thinned white base (see royal icing recipe below for how to thin), and then adding black until desired darkness is achieved. I use toothpicks to add color to the icing.

2. Transfer icing to a pastry bag fitted with #1 or #2 tip. The easiest way to do this is to fold over the top of the bag and place it in one of the glasses with a wet paper towel at the bottom. Fill bag with icing, then unfold the top, push out any air, and twist the bag, securing with a twist tie or rubber band. At this point, I like to line up my sugar cookies on a large piece of waxed paper.

3. Pipe the body of the butterfly and the outline of the wings:

DSCN6209_labeled

DSCN6211_labeled

TIP: Make sure to keep paper towels nearby to wipe the piping tip if icing leaks out, otherwise the tip can get messy. I also like to test each tip before piping by squirting out a little icing on the corner of the waxed paper or into the paper towel as I wipe the tip. Sometimes you'll find some of the moisture from the paper towel has gotten into the tip or that the bit of frosting at the tip has dried out a little and needs to be removed.

4. Allow to dry for at least 1 hour.

5. Meanwhile, prepare each of the colors and add to pastry bags fitted with #2 size tips. I used pastels: green, pink, yellow, and blue. Not sure why I didn't think to make purple, but I sure will next time! Make sure to place each of the filled bags into a glass with a damp paper towel in the bottom.

6. Working 1 section at a time (i.e. the top left wing), fill a color inside the black outline, using a toothpick to guide the icing to the edges if necessary. Immediately add lines or dots of other colors into the newly filled icing, then quickly and carefully run a toothpick through to create patterns. Note: Dragging the toothpick through dots yields the heart-shapes! See this step-by-step tutorial for more information on how to make the patterns. The reason you must only do 1 section at a time is because the icing sets rather quickly. How fast the icing sets will depend on the humidity of the room and whether there's a draft. My apartment was very hot and humid and the icing set FAST.

DSCN6219_labeled

7. Allow the cookies to dry uncovered, at room temperature, at least overnight or up to 24 hours before packaging.

DSCN6254_labeled

Source: Adapted from Sweetopia


Roll-out Sugar Cookies

Makes approximately 18 - 20 1/4-inch thick cookies, depending on size of cookie cutter.

Ingredients:
2 1/2 cups (12 ounces) all-purpose flour
1 teaspoon baking powder
1 egg
1/2 teaspoon vanilla extract
1/4 teaspoon almond extract
16 Tablespoons (2 sticks) unsalted butter, at room temperature
1/2 teaspoon salt
1 cup (7 ounces) granulated sugar
1/4 teaspoon lemon zest

Directions:
1. In a medium bowl, mix (or sift together) the flour and baking powder. In a one-cup measuring cup, lightly beat the egg with the extracts.

2. In the bowl of a standing mixer (or in a large bowl with a handheld mixer), beat the butter and salt on medium speed until smooth. With the mixer running, gradually pour in the sugar; add the lemon zest. Beat on medium until fluffy, about 1 minute.

3. With the mixer running, pour in the egg mixture and continue beating until incorporated. Scrape down the sides of the mixer bowl. With the mixer on low, gradually add the flour and mix just until evenly blended.

4. Lightly knead the dough to form a ball, press it into a disk 1-inch thick, and wrap tightly in plastic wrap. Refrigerate for 2 hours or overnight. You can also freeze the dough at this point!

5. Line a baking sheet with parchment paper or a silicone baking mat. Adjust an oven rack to the middle position and heat the oven to 375F. If you’ve chilled the dough overnight, it’ll need to sit at room temperature for half an hour or so to soften slightly. If you've frozen the dough, thaw it in the fridge overnight then allow it to soften at room temperature.

6. On a very lightly floured sheet of wax paper with a sheet of plastic wrap on top of the dough, roll the dough out to ¼-inch thick. I like to use dowel rods as guides for the cookie thickness; see this post for pictures. Cut cookies using a floured cookie cutter. Re-roll scraps, always using as little flour as necessary.

7. Bake the cookies, one sheet at a time, for 5-9 minutes, until they no longer look wet on top. The baking time will depend on the size of the cookies you’ve cut. You don’t want the bottoms to be browned, except for maybe just a bit on the edges.

8. Let the cookies rest for a couple minutes on the sheets before transferring them to cooling racks to finish cooling.

Source: Adapted from The Way the Cookie Crumbles

Royal Icing

Ingredients:
6 ounces (3/4 cup) warm water
5 Tablespoons meringue powder
1 teaspoon cream of tartar
2.25 pounds powdered sugar
*optional: 1 teaspoon of clear vanilla extract or extract of choice (I used almond)

Directions:
1. In the bowl of an electric mixer, pour in the warm water and the meringue powder. Mix it with a whisk by hand or with the whisk attachment until it is frothy and thickened, about 30 seconds.

2. Add the cream of tartar and mix for 30 seconds.

3. Pour in the powdered sugar and, using the paddle attachment, mix slowly on the lowest speed for a full 10 minutes. The icing will get thick and creamy.

4. Cover the bowl with a dampened tea-towel to prevent crusting and drying.

5. Remove some of the icing to a small bowl and add small amounts of warm water (~ 1 teaspoon at a time) to reach the desired consistency - run the icing off the back of a spoon back into the bowl, and if the drips disappear into the icing in 5-10 seconds, it's good. If you have gone too far and it's too thin, add more of the original "stock" to make thicker. Color as desired.

Source: Adapted from Sweetopia

My notes to make the process faster and run more smoothly:

-I made the sugar cookie dough in advance and froze it. I then thawed it in the fridge overnight and set it on the counter until it reached room temperature before rolling and baking.

-I baked the cookies a few days before icing them and stored them in an airtight container.

-Although I did not do this, you can always prepare the royal icing in advance and even color it, as long as you store it in airtight containers.


I'm out of town until Friday, so have a great week!!! :)

Thursday, May 6, 2010

Chocolate Babka

DSCN6271_labeled

DSCN6257_labeled

DSCN6263_labeled

DSCN6268_labeled

DSCN6264_labeled

I like to have TV on in the background when I'm cleaning, blogging, or lately, packing. Luckily I found an "I Love Lucy" marathon the other day! One of my favorite episodes came on - where Lucy and Ethel take on the roles of Pioneer Women and make their own bread and butter. Lucy mistakenly uses 13 cakes of yeast in her bread; the recipe called for 3. What ensues is kind of ridiculous, but pretty funny, and got me in the mood to make a yeast bread!

I've been saving this recipe since January when I saw it on Sugar Plum and finally decided to make it. My Polish relatives used to bring homemade babka to family functions. I've never made any sort of babka before, so I thought I'd practice with this one before attempting my family recipe. Plus, a Cooking Light recipe that involves chocolate and cinnamon? Sign me up!

A quick Wikipedia search turned up that this version of babka is a spin on the Eastern European Jewish tradition. Different from the Polish version I've had in the past, but certainly delicious sounding!

I really should have read the recipe reviews first, because although they are overwhelmingly positive, they would have alerted me to a mistake in the recipe. The streusel topping calls for softened butter, rather than cold. This goes against everything I've ever read about streusel, but I went with it. The mixture turned into a paste rather than crumbs. I decided to just use it anyway and it looks, well...interesting :)

One other problem with my bread is that the top layer seems to have separated from the others on one end of the loaf, maybe because the other layers didn't rise as well during baking? Or maybe I just didn't roll it up tight enough. Like I said, I need practice with this before I try to make our family recipe! Regardless, the bread was still delicious. Love the cinnamon and chocolate flavors together! I'm happy to report that this bread certainly doesn't taste "light." Bob was really surprised by how much he liked it. He took out the butter and a knife prepared to slather his slice, but soon realized he didn't need it. His words: "I usually don't like dessert breads that much, but this is great" and "I would pay for this stuff!" I'd say this recipe is a keeper!

Chocolate Babka

Ingredients:
For the dough:
1 teaspoon granulated sugar
1 package active dry yeast (about 2 1/4 teaspoons)
3/4 cup warm 1% low-fat milk (105 - 110F)*
6 Tablespoons granulated sugar
1/2 teaspoon vanilla extract
1/4 teaspoon salt
1 large egg yolk, lightly beaten
7.5 ounces all purpose flour (about 1 2/3 cups), divided
5.85 ounces bread flour (about 1 1/4 cups)
5 Tablespoons butter, cut into pieces and softened
Cooking spray

For the filling:
1/2 cup granulated sugar
3 Tablespoons unsweetened cocoa
1/2 teaspoon ground cinnamon
1/4 teaspoon salt
4 ounces semisweet chocolate, finely chopped (I used mini-chocolate chips)

For the streusel:
2 Tablespoons powdered sugar
1 Tablespoon all-purpose flour
1 Tablespoon butter, cold

*I used what I had on hand - 3/4 cup skim milk with 1/2 Tablespoon heavy cream. I guessed that the heavy cream was approximately 30% fat (it's probably more), and calculated how much to add to make 1% milkfat in the final solution.

Directions:
1. Dissolve 1 teaspoon granulated sugar and yeast in warm milk in the bowl of a stand mixer; let stand 5 minutes.

2. Stir in 6 Tablespoons granulated sugar, vanilla extract, 1/4 teaspoon salt, and egg yolk. Add 6 ounces (about 1 1/3 cups) all-purpose flour and the bread flour to milk mixture; beat with dough hook attachment at medium speed until well blended (about 2 minutes).

3. Add 5 Tablespoons butter, beating until well blended. Scrape dough out onto a floured surface (dough will be very sticky). Knead until smooth and elastic (about 10 minutes); add 1.5 ounces (about 1/3 cup) all-purpose flour, 1 tablespoon at a time, to prevent dough from sticking to hands (dough will be very soft). **I used my mixer to knead the dough. I just set it to medium speed and used the dough hook to knead for 10 minutes. I added the 1.5 ounces of flour, 1 tablespoon at a time, to the dough every minute or so, until it was completely incorporated.

4. Place dough in a large bowl coated with cooking spray, turning to coat top. Cover and let rise in a warm place (85°), free from drafts, 1 1/2 hours or until doubled in size. (Gently press two fingers into dough. If indentation remains, dough has risen enough.) Punch dough down; cover and let dough rest 5 minutes.

5. Line the bottom of a 9 x 5–inch loaf pan with parchment paper; coat sides of pan with cooking spray.

6. To prepare filling, combine 1/2 cup granulated sugar, cocoa, cinnamon, salt, and chocolate in a medium bowl; set aside.

7. Place dough on a generously floured surface; roll dough out into a 16-inch square. Sprinkle filling over dough, leaving a 1/4-inch border around edges. Roll up dough tightly, jelly-roll fashion; pinch seam and ends to seal. Holding dough by ends, twist dough 4 times as if wringing out a towel. Fit dough into prepared pan. Cover and let rise 45 minutes or until doubled in size.

8. Meanwhile, preheat oven to 350F and prepare streusel: combine powdered sugar, 1 tablespoon all-purpose flour, and 1 tablespoon cold butter, stirring with a fork until mixture is crumbly.

9. Sprinkle streusel evenly over dough. Bake for 40 minutes or until loaf is browned on bottom and sounds hollow when tapped.

10. Cool bread in pan 10 minutes on a wire rack; remove from pan. Cool bread completely on wire rack before slicing.

Source: Adapted from Cooking Light

  © Blogger template Brownium by Ourblogtemplates.com 2009

Back to TOP