Search This Blog

Tuesday, June 29, 2010

Sweet Cherry Pie

DSCN6663_labeled

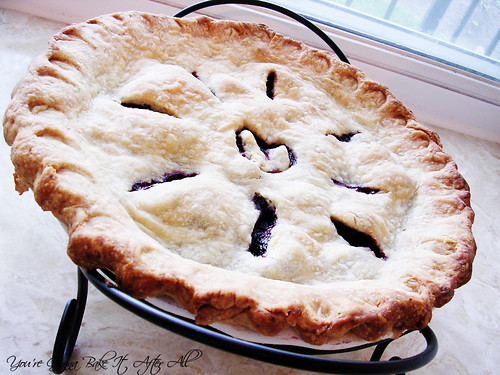
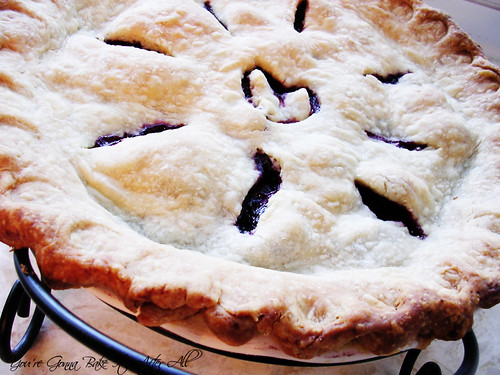
I attempted to make a heart in the center . . .

DSCN6659_labeled

Cherry pie is one of my dad's favorite desserts. I've always wanted to make a fresh cherry pie, and I even received a cherry pitter for Christmas to do just that. I served this pie for the Father's Day dinner Bob and I made for my parents. I find making a pie entirely from scratch very satisfying, and that is especially true for this pie because my family had never had a truly homemade cherry pie.

I don't typically like cherry pie. The cherries are soggy and have a strange texture. The cherries in this pie have a texture that is, well, natural. They are more firm but still very juicy. The pie crust was perfectly flaky, and the whole thing is relatively quick to make. I did the entire thing in 1 day, although I would have preferred to do the crust the day before to lessen the work. My family loved this pie, and I actually did too!

For me, the pie dough was very sticky. The high humidity here may have affected the consistency a bit, but the finished product was fantastic, so don't worry if yours doesn't quite match the description. Some CI notes - the vodka is not detectible at all but helps maintain the moisture in the crust (not recommended to skip), and the tapioca should be measured first, then ground. Since my instant tapioca came pre-ground, I used 2 tablespoons ground, and it was fine. Lastly, if you use frozen fruit, measure it frozen then let it thaw before making the filling. I was going to do a lattice top for this pie, but I read on CI's website that they do not recommend lattices for cherry pie - it allows too much moisture to evaporate and alters the juiciness of the filling.

Happy Baking!!!

Sweet Cherry Pie

Ingredients:
For the pie dough:
2 1/2 cups (12 1/2 ounces) unbleached all-purpose flour
1 teaspoon table salt
2 tablespoons sugar
12 tablespoons (1 1/2 sticks) cold unsalted butter, cut into 1/4-inch pieces
1/2 cup cold vegetable shortening, cut into 1/4-inch pieces
1/4 cup vodka, cold
1/4 cup cold water

For the cherry filling:
2 red plums, halved and pitted
6 cups (about 2 pounds) pitted sweet cherries or 6 cups pitted frozen cherries, halved
1/2 cup sugar (3 1/2 ounces)
1/8 teaspoon table salt
1 tablespoon juice from 1 lemon
2 teaspoons bourbon (optional)
2 tablespoons instant tapioca, ground
1/8 teaspoon ground cinnamon (optional)
2 tablespoons unsalted butter, cut into 1/4-inch pieces
1 large egg, lightly beaten with 1 teaspoon water

Directions:
1. For the pie dough: process 1 1/2 cups flour, salt, and sugar in a food processor until combined, about two 1-second pulses. Add butter and shortening; process until homogenous dough just starts to collect in uneven clumps, about 15 seconds (dough will resemble cottage cheese curds and there should be no uncoated flour).

2. Add remaining 1 cup flour and pulse until mixture is evenly distributed around bowl and mass of dough has been broken up, 4 to 6 quick pulses. Empty mixture into medium bowl.

3. Sprinkle vodka and water over mixture. With rubber spatula, use folding motion to mix, pressing down on dough until dough is slightly tacky and sticks together. Divide dough into 2 equal balls and flatten each into a 4-inch disk. Cover each with plastic wrap and refrigerate for at least 45 minutes or up to 2 days.

4. Remove 1 disk of dough from refrigerator and roll out on generously floured (up to ¼ cup) work surface to a 12-inch circle, about 1/8-inch thick. Roll dough loosely around rolling pin and unroll into pie plate, leaving at least 1-inch overhang. Ease dough into plate by gently lifting edge of dough with 1 hand while pressing into plate bottom with other hand. Refrigerate until dough is firm, about 40 minutes.

5. For the filling: Adjust oven rack to lowest position, place baking sheet on oven rack, and heat oven to 400 degrees. Process plums and 1 cup halved cherries in food processor until smooth, about 1 minute, scraping down sides of bowl as necessary.

5. Strain puree through fine-mesh strainer into large bowl, pressing on solids to extract liquid; discard solids. Stir remaining halved cherries, sugar, salt, lemon juice, bourbon (if using), tapioca, and cinnamon (if using) into puree; let stand for 15 minutes.

6. Transfer cherry mixture, including all juices, to dough-lined plate. Scatter butter pieces over fruit. Roll second disk of dough on generously floured work surface (up to ¼ cup) to 11-inch circle about 1/8 inch thick. Roll dough loosely around rolling pin and unroll over pie, leaving at least ½-inch overhang. Flute edges using thumb and forefinger or press with tines of fork to seal. Brush top and edges with egg mixture. With sharp knife, make 8 evenly spaced 1-inch-long vents in top crust. Freeze pie 20 minutes.

7. Place pie on preheated baking sheet and bake 30 minutes. Reduce oven temperature to 350 degrees and continue to bake until juices bubble around the edges and crust is deep golden brown, 30 to 40 minutes longer.

8. Transfer pie to wire rack; let cool to room temperature so juices have time to thicken, 2 to 3 hours. Cut into wedges and serve.

Source: Adapted from Cook's Illustrated

Friday, June 25, 2010

Italian Charcoal-Grilled Corn


DSCN6650_labeled

DSCN6655_labeled

My aunt and uncle recently gave Bob and I a small charcoal grill for a housewarming gift. We have used it several times and love the taste of charcoal-grilled food. My dad bought us a chimney starter, and it's amazing! I highly recommend it to anyone who cooks with charcoal. It seriously makes the entire process go so much faster.

For Father's Day, Bob and I made dinner for my Dad and Mom, and I knew I wanted to use the grill for a portion of the meal. Bob decided to make steak with a special sauce from my Complete America's Test Kitchen TV Show Cookbook, which is actually made on the stovetop and in the oven. I turned to this cookbook for a side dish. Charcoal-grilled corn stood out as something unique, and the Mexican-Style corn looked fantastic. Because we were going for more of an Italian theme (I served antipasti and Double Tomato Bruschetta - my Dad's FAVORITE - as appetizers), I decided to give the corn an Italian twist by using basil instead of cilantro, Parmesan cheese instead of queso fresco, and lemon juice instead of lime. I also decided to grill the corn with the cheese/herb mixture on it, instead of tossing the grilled corn in the mixture.

This corn is simple to whip up and is really delicious. The charcoal gave the corn a nice flavor, as did the coating. The corn is perfectly seasoned with this recipe - no need for extra salt or butter!

Italian Charcoal-Grilled Corn

Ingredients:
4 teaspoons vegetable poil plus extra for the cooking grate
1 1/2 ounces Parmesan cheese, grated (about 1/2 cup)
1/4 cup mayonnaise
3 tablespoons sour cream
3 tablespoons chopped fresh basil leaves
4 teaspoon juice from 1 lemon
1 medium garlic clove, minced or pressed through a garlic press (about 1 tsp)
1/4 teaspoon ground black pepper
1/4 teaspoon table salt
6 large ears corn, husks and silk removed

Directions:
1. Light a lareg chimney started filled with charcoal (about 6 quarts) and allow to burn until the coals are partially covered witha layer of ash, about 20 minutes.

2. Build a modified two-level fire by arranging all the coals over half of the grill, leaving the other half empty. Set the cooking grate in place, cover, and heat the grate until hot, about 5 minutes. Use a grill brush to scrape the cooking grate clean. Dip a wad of paper towels in vegetable oil holding the wad with tongs, oil the cooking grate (we just used Pam for grilling and sprayed it on the grate while it was suspended in the air with tongs - away from the flames!)

3. Meanwhile, combine the cheese, mayonnaise, sour cream, basil, lemon juice, garlic, pepper, and salt in a large bowl. Add corn and toss to coat evenly.

4. Grill the corn until lightly charred on all sides, 7 to 12 minutes total. Serve immediately.

Source: Adapted from the Complete America's Test Kitchen TV Show Cookbook


DSCN6652_labeled

Friday, June 18, 2010

Pasta with Sun-dried Tomatoes

DSCN6596_labeled

This is a great summer pasta! Tomatoes, mozzarella, and basil are some of my favorite flavors, and this dish combines them in perfect balance. Ina has a knack for great pasta dishes, so I knew I would love this one. I served it as our main dish, but it would be a great side as well.

I cut this recipe in half except for the pasta because I wanted to stretch the ingredients; however, I think Ina had it right, so I've posted the original. I also left out the olives because Bob hates them. I had intended to add them to my plate but forgot. This is especially great if you have a ton of fresh basil in your garden like I do - the leaves are gigantic! :)

Pasta with Sun-dried Tomatoes

Ingredients:
1/2 pound fusilli (spirals) pasta, or pasta of choice (I used angel hair)
Kosher salt
Olive oil
1 pound ripe tomatoes, medium-diced
3/4 cup good black olives, such as kalamata, pitted and diced (optional)
1 pound fresh mozzarella, medium-diced
6 sun-dried tomatoes in oil, drained and chopped

For the dressing:
5 sun-dried tomatoes in oil, drained
2 tablespoons red wine vinegar
6 tablespoons good olive oil
1 garlic clove, diced
1 teaspoon capers, drained
2 teaspoons kosher salt
3/4 teaspoon freshly ground black pepper
1 cup freshly grated Parmesan
1 cup packed basil leaves, julienned

Directions:
1. Cook the pasta in a large pot of boiling salted water with a splash of oil to keep it from sticking together. Boil for 12 minutes, or according to the directions on the package. Drain well and allow to cool.

2. Place the pasta in a bowl and add the tomatoes, olives, mozzarella, and chopped sun-dried tomatoes.

3. For the dressing, combine the sun-dried tomatoes, vinegar, olive oil, garlic, capers, salt, and pepper in a food processor until almost smooth.

4. Pour the dressing over the pasta, sprinkle with the Parmesan and basil, and toss well.

Source: Ina Garten's Barefoot Contessa Family Style via Foodnetwork.com

Tuesday, June 15, 2010

Fancy Chili

DSCN6586_labeled

After being here in St. Louis for about 3 weeks now, I'm finally beginning to feel more at home. Even though I grew up in STL, our new place is about 25 minutes north of my parents' house, and it's an adjustment from the big city living we had in downtown Chicago. It's so quiet here! Initially we had a hard time getting to sleep without the 'sounds of the city' - sirens, arguments, gun shots (j/k . . . kind of . . .).

I started my new job last week, and it's an adjustment as well. It's never easy to start at a new place and to learn new things that take me out of my comfort zone. One downfall is that, aside from a few quick glances at Google Reader, I can no longer read cooking blogs at work . . . at least for the next couple of months. I probably should have never done that at my old job though!

Getting back in the swing of cooking is difficult as well. By the time I get home from work, I'm exhausted! Bob was a good house-husband last week and made dinner every night. This week, I'm making more of an effort. My mother-in-law sent me Trisha Yearwood's cookbook "Home Cooking" as a surprise after seeing her on "The View." I love to get surprises in the mail :) There are a ton of great-looking recipes in this book - nothing fussy or complicated, just good, crowd-pleasing food.

Although it's summer and the temps here in St. Louis are in the '90's, I couldn't resist making this Fancy Chili, mainly because Trisha serves it over rice, and it's actually not much like chili at all. There's very little liquid, and it consists of a hearty yet healthy meal filled with veggies. I'm sure you can add a number of vegetables to the dish. I omitted the beans because I always do, and I used ground turkey of course. This was a fantastic dinner! You certainly don't have to serve this over rice, but I really liked it that way. The sour cream topping and fresh, sliced green onions on top added to the flavor and texture. I can't wait to take the leftovers to work for lunch!

Fancy Chili

Ingredients:
1 tablespoon olive oil
2 garlic cloves, minced
1/2 cup chopped green onion
1/2 pound lean ground beef or turkey
2 tablespoons hot chili powder
1 28-ounce can (or 2 14.5-ounce cans) fire-roasted diced tomatoes
1 15-ounce can black beans, rinsed and drained (optional)
1 medium bell pepper, cored, seeded, and diced
4 carrots, peeled and grated
1/2 teaspoon brown sugar
Pinch of salt, more to taste

For serving: sliced green onion, sour cream, cooked rice

Directions:
1. In a large saucepan, heat the oil over medium heat. Add the garlic and green onions, and cook for about 1 minute.

2. Add the ground meat and cook until browned, about 5 minutes.

3. Stir in the chili powder until fully combined.

4. Add the tomatoes, beans, bell pepper, carrots, brown sugar, and salt. Bring the mixture to a boil, then reduce the heat to low.

5. Cover and simmer the chili for 15 minutes.

6. Adjust salt if necessary, and serve over white rice with a dollop of sour cream and garnish of sliced green onions.

Source: Adapted from Home Cooking with Trisha Yearwood

Friday, June 11, 2010

Prosciutto and Melon

DSCN6523_labeled

DSCN6531_labeled

DSCN6534_labeled

I made these little bites for my aunt's pool party on Memorial Day weekend. Bob has loved prosciutto and melon ever since the first time he tried it many years ago. He loves the combination of the sweet melon and the salty prosciutto. Since I won't eat any meat other than poultry, I didn't try them, but Bob was really happy with how they turned out. These are an easy appetizer for outdoor barbecues and picnics!

Prosciutto and Melon

Ingredients:
1 large cantalope
~6 ounces thin-sliced prosciutto
mint or basil leaves, optional

wooden toothpicks

Directions:
1. Cut each slice of prosciutto crosswise into four strips.

2. Trim about 1/2-inch off the top and bottom of the melon to reveal the inner fruit and create a flat surface.

3. Stand the melon on one of the sliced, flat ends. Following the natural round shape of the melon, use a very sharp knife to remove the skin, turning the melon as you make each cut. Make sure your cuts are deep enough to cut beneath the rind and expose the vibrantly colored flesh, but be careful not to cut off too much of the fruit. Do not cut the melon in half.

4. Using a melon baller or small cookie scoop, press firmly into the flesh to create an indentation; twist in an even, clockwise motion to scoop out a round ball. Cutting as closely as possible, continue making balls until all that is left is a large melon "wiffle ball." You will have more melon balls than are needed for the canapes.

5. Take a piece of of sliced prosciutto and wrap it around a melon ball. Secure with a wooden toothpick. Arrange on a platter. Repeat with the remaining melon balls. Garnish platter with mint or basil leaves, if desired.

Source: Adapted from the Viking Range Corporation

Tuesday, June 8, 2010

Key Lime Bars

DSCN6578_labeled

In April, my dad gave my sister and I a surprise gift - the Complete America's Test Kitchen Cookbook TV Show Cookbook! I was so surprised and excited to start using this cookbook. Unfortunately, between wrapping up work and moving, I was only able to bookmark the recipes I wanted to try first and dream about making them. I decided my first recipe would be something I knew my dad would LOVE - Key Lime Bars! I finally got to make them for a barbeque at my parents' house Memorial Day weekend.

These bars are so delicious and perfect for summer! The have a prominent lime flavor that is nicely balanced by the sweetness of the cookie crust. I like the crunchiness of the toasted coconut on top, although some of my family members who don't like coconut chose to have their bars without it. The original recipe makes an 8 x 8-inch pan but states it can be easily doubled and made in a 13 x 9-inch pan. Since I made a double batch, I've provided the recipe for it below. If you make the single batch, just shave a few minutes off the baking time.

Key Lime Bars

Ingredients:
For the crust:
10 ounces animal crackers
6 tablespoons brown sugar
2 pinches of table salt
8 tablespoons (1 stick) unsalted butter, melted and cooled slightly

For the filling:
4 ounces cream cheese, at room temperature
2 tablespoons grated zest from 2 limes
2 pinches of table salt
2 14-ounce cans sweetened condensed milk
2 large egg yolks
1 cup fresh lime juice, from about 40 Key limes or about 6 Persian limes*

Optional garnish:
1 1/2 cups sweetened shredded coconut, toasted until golden and crisp

*I needed about 8 limes, but they were on the small side.

Directions:
1. Adjust an oven rack to the middle position and heat the oven to 325F.

2. Line a 13 x 9-inch baking pan with a double layer of foil, placed so that the foil extends beyond the sides of the pan to help lift the bars out when finished. Spray foil with vegetable oil spray.

3. For the crust, pulse the animal crackers in a food processor until broken down, about 10 pulses; process the crumbs until evenly fine, about 10 seconds. You should have about 1 1/4 cups crumbs.

4. Add the brown sugar and salt; process to combine, 10 to 12 pulses. If large lumps of sugar remain, break them apart with your fingers.

5. Drizzle the butter over the crumbs and pulse until the crumbs are evenly moistened with the butter, about 10 pulses.

6. Press the crumbs evenly and firmly into the bottom of the prepared pan. Bake until deep golden brown, 18 to 20 minutes. Cool on a wire rack while making the filling. Do not turn the oven off.

7. While the crust cools, in a medium bowl, stir the cream cheese, zest and salt with a rubber spatula until softened, creamy, and thoroughly combined.

8. Add the sweetened condensed milk and whisk vigorously until incorporated and no lumps of cream cheese remain; whisk in the egg yolks (I did this part using my stand mixer with the whisk attachment). Add the lime juice and whisk gently until incorporated. The mixture will thicken slightly.

9. Pour the filling into the crust; spread to the corners and smooth the surface with a rubber spatula. Bake until set and the edges begin to pull away slightly from the sides, 15 to 20 minutes.

10. Cool on a wire rack to room temperature, 1 to 1 1/2 hours. Cover with foil and refrigerate until thoroughly chilled, at least 2 hours.

11. Loosen the edges with a paring knife and lift the bars from the pan using the foil extensions; cut the bars into squares. Sprinkle with the toasted coconut and serve.

Source: Adapted from the Complete America's Test Kitchen TV Show Cookbook

Friday, June 4, 2010

Pan-Fried Onion Dip

DSCN6538_labeled

I made this dip for a Memorial Day pool party at my aunt's house. Everyone loved it, and I thought it had a great flavor. The onions are so sweet and delicious, and the cayenne adds a nice kick. Ina has done it again! Serve this dip with your favorite veggies or chips.

I have a great dessert coming up next week. Have a great weekend! :)

Pan-Fried Onion Dip

Ingredients:
2 large yellow onions
4 tablespoons unsalted butter
1/4 cup vegetable oil
1/4 teaspoon ground cayenne pepper
1 teaspoon kosher salt
1/2 teaspoon freshly ground black pepper
4 ounces cream cheese, at room temperature
1/2 cup sour cream
1/2 cup mayonnaise

Directions:
1. Cut the onions in half and then slice them into 1/8-inch thick half-rounds. (You will have about 3 cups of onions.)

2. Heat the butter and oil in a large saute pan over medium heat. Add the onions, cayenne, salt, and pepper and saute for 10 minutes. Reduce the heat to medium-low and cook, stirring occasionally, for 20 more minutes until the onions are browned and caramelized. Allow the onions to cool. *I did this the night before and stored the onions in a covered dish in the fridge. As I transferred the onions to the dish, I made sure to leave the excess grease in the pan.

3. Place the cream cheese, sour cream, and mayonnaise in the bowl of an electric mixer fitted with the paddle attachment and beat until smooth. Add the onions and mix well. Taste for seasonings. Serve at room temperature.

Source: Adapted from the Barefoot Contessa Cookbook via FoodNetwork.com

  © Blogger template Brownium by Ourblogtemplates.com 2009

Back to TOP