Search This Blog

Sunday, November 24, 2013

Thanksgiving Dressing


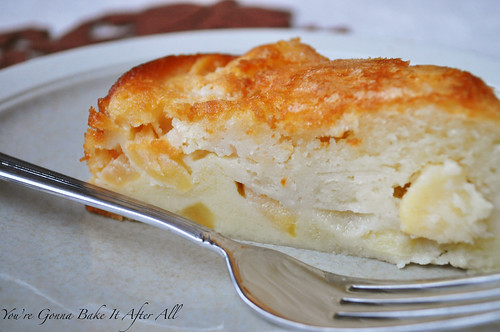
Some families have the same meal every Thanksgiving, using the same tried-and-true recipes year after year; while other's menu is constantly evolving to include new twists on classic dishes. For many years, my family's Thanksgiving was the former: the menu never changed. As Bob and I started hosting Thanksgiving at our house 3 years ago, we have tweaked the menu slightly- not eliminating dishes but rather adding a few of our own (like these Mashed Potatoes with Root Vegetables, Compound Herb Butter, and Honey Butter-YUM!) Each year we learn more about which dishes need tweaking and how to better execute the meal. One thing that we will never mess with is our traditional Thanksgiving Dressing. Dressing is basically "stuffing" that is cooked in a separate dish, not in the turkey. For that reason, it can get a crispy top and edges depending on how you bake it, which I think is one of the best parts! My family has never made stuffing in a turkey (and now it's actually not recommended because you either undercook your stuffing or overcook your bird). Our dressing recipe is very basic - no organ meat, sausage, or other fancy add-ins. It's actually the simplicity that I love, and it's one of my favorite dishes at Thanksgiving. My mom and my aunt got this recipe from their mother and have each adapted their own way to make it. I've taken each of their recipes and combined them into one master recipe. This dressing was designed to go well with chicken or turkey, so it's the perfect side dish any time of year!  

Thanksgiving Dressing

Ingredients:
1 stick butter                                               
¾ cup onion, diced small                                   
1 cup celery (boiled and diced small)   
1 loaf white sandwich bread (frozen and cubed into ½-inch cubes- crust and all)                                
1 tsp. salt                                                    
½ tsp. pepper
2 tsp. poultry seasoning
¾ cup celery water, hot
¾ cup chicken stock, hot

Directions:
1. Boil pieces of celery until soft. Remove strings.
2. Chop celery and onion into small dice.
3. Melt butter in pan, sauté onions and celery until onions are soft. 
4. Combine the celery water and chicken broth in a measuring cup, making sure it is hot (heat it up if it’s not).
5. Add bread cubes to a large bowl/pan, add the salt, pepper, and poultry seasoning.  Add the cooked onion/celery mixture and the hot celery water/chicken stock.  Stir until the bread is moist.  It is better to have the bread too moist than not enough because it will be baked.
6. Spoon the bread mixture into a pan. Do not flatten it out – leave little hills and valleys for the turkey juice or gravy to settle into.
7. Bake covered at 350F for around 40 minutes, then uncover for the last 20 minutes to brown (cook time total of 1 hour).  You may also add gravy to the top intermittently during the baking process, but not the last 20 minutes because you're looking to get that crispy top.

Notes:  Aunt Suey always doubles this recipe for Thanksgiving.  The dressing needs at least 1 hour in the oven depending on how deep the pan is.  Cook at 400F for a double batch. 

Source: Adapted from my Aunt Suey and my Mom


Friday, November 22, 2013

Warm Sticky Figgy Pudding


Last year, my sister, her husband, Bob, and I started talking about how fun it would be to have a Dickens Dinner around Christmas time.  At first, we joked about having a goose and eating only by candlelight, but soon we decided that our Dickens-inspired dinner would include only elements from the classic "A Christmas Carol".  As it turns out, goose is quite expensive, so we went with a turkey.  My brother-in-law made wassail, and I made a New England Sausage and Cranberry Stuffing, which I will share as soon as I can get a photo.  One thing we knew from the start, the English holiday dessert figgy pudding was a must!  While I don't know how traditional this figgy pudding is, it had great reviews on Food Network (and was featured on Ultimate Recipe Showdown) so I went with it.  I have to say, it was one of the best desserts I've ever had!  We all agreed that it was a hit and must return to our annual Dickens Dinner. We served ours with vanilla ice cream.  The combination of the warm cake and caramel sauce with the cold ice cream made this dessert even better.  I was only able to snap some poor shots last year because it was night time and I was wrangling a 1-year old.  I hope to get some better photos this year and will add them later, but I didn't want to sit on this recipe any longer - it's too good not to share!


Warm Sticky Figgy Pudding

Serves 4

Ingredients:
For the pudding:
¾ c. dried pitted dates, chopped
¼ c dried figs, chopped
1 c. water
½ tsp baking soda
3 ½ tablespoons butter, softened
½ c superfine sugar
1 egg
1 ¼ c. self-rising flour
1 ¼ oz. dark chocolate, grated
Butter for the ramekins

For the sauce:
1 c. brown sugar
1 c. heavy cream
7 tablespoons butter

For serving:
Vanilla ice cream or whipped heavy cream (optional)

Directions:
      1. Add the dates, dried figs, and water to medium saucepan and bring to boil over medium heat.  Remove the pan from heat and stir in the baking soda. Let cool for 5 minutes, then add to a blender to puree.
           2.  Using a hand mixer, cream the butter and sugar in a large bowl. Add the eggs and beat well. Fold in the flour, the pureed date mixture, and the chocolate.
      3. Pour the batter into buttered ramekins filling halfway.  I divided the batter equally into 4 ramekins. (At this point, I wrapped the ramekins in plastic wrap and took them to my sister's house, refrigerated them during dinner, then baked them.)
      4. Bake at 350F for 20 – 25 minutes.
      5. To prepare the sauce, stir the sugar and cream in a medium saucepan over low heat. Simmer until the sugar dissolves. Raise the heat to a boil, then reduce and simmer 5 minutes. Add the butter and stir until incorporated. (I made this at home and took it to my sister's. Then I reheated the sauce prior to spooning it over the cakes).
      6. Remove the ramekins from the oven and let stand for 10 minutes. Serve in the ramekin or unmold each cake onto a serving plate.  With a paring knife, cut a cross in the center of each cake.  Pour the sauce over the pudding and allow it to soak in slightly, then top with more sauce as desired.
      7. Serve warm topped with ice cream or whipped cream and enjoy!

Source: Adapted from FoodNework.com – Ultimate Recipe Showdown

Note:  The original recipe said it serves 4, but the reviews said it made much more so I cut the recipe in half and it was just right for 4 servings (meaning the recipe on FoodNetwork probably makes 8 servings rather than 4!)

Wednesday, November 13, 2013

Witches Brew Punch

DSC_0567


Although Halloween has since passed, I wanted to get this recipe up because I think it's a great punch for any occasion - a holiday party, a baby or wedding shower, etc.  My favorite punch, Christmas Punch, has a number of ingredients while this one only has 3, and I like it almost as much!

I found this punch recipe on Pinterest last year and served it at our annual Halloween party.  I loved it so much that it made a return this year.  I've also added some suggestions to make it more festive for Halloween.

And for fun, here's a picture of my little cat:

DSC_0682_ed

Witches Brew Punch

Serves 12

Ingredients:
1 large can pineapple juice, chilled
1 cup orange sherbet, softened
1 2-liter bottle of orange soda, chilled
*may add rum to make it more "adult"

Directions:
In a punch bowl, stir together the pineapple juice and sherbet until the sherbet dissolves.  Just before serving, slowly pour the soda into the juice mixture.  Add more scoops of sherbet.  Ladle into cups and enjoy!

Adapted from Very Culinary

Halloween touches:
Freeze water in a disposable glove, remove the glove (it helps to run the ice hand under cold-not hot-water to get the glove to separate from the ice. Using water that is too warm will cause the ice to crack! You may have to cut the glove off in certain spots).  Float the ice hand in the punch.  I recommend making at least 2 ice hands in case of a cracking incident.  A few fingers broke off the first hand I had- which may actually have been appropriate for Halloween!

Stuf canned lychees with dark colored grapes to make eyeballs and add to the punch or to individual cups when serving.

Lychee/grape "eyeballs"!
DSC_0571


Breaking Bad Spoiler Alert! 

My sister and brother-in-law's Halloween tribute to the finale of Breaking Bad:
DSC_0576

Tuesday, November 12, 2013

French Apple Cake

DSC_0941_label

I last posted on this blog in January.  It is now November.  Rather than go on about how busy we've been, how quickly time goes by, or list off excuses for my absence, I figured I would just dive right into a recipe.  We got rid of cable quite some time ago, and since then I have had to be creative to still get my fill of the types of shows I used to watch. America's Test Kitchen is great because it's on PBS and is similar in nature to the Food Network shows I love.  I saw this French Apple Cake featured on an episode this fall and almost immediately was in the kitchen making it.  We had leftover apples from the orchard that needed to be used, and I just wasn't in the mood to make a pie.  We really loved this cake.  Because it's made with oil instead of butter, it's more moist than other homemade cakes.  The bottom layer has a custard quality and contains the apples, and the top layer is more cake-like.  The cake is topped with sugar before baking to give it a nice crispy topping, although once you wrap it up the moisture in the cake takes away this crispiness.  I love that this cake is essentially one batter that is separated and then treated differently to create a custard layer and a cake layer.  It just seems simpler than having two batters from the start.  This cake cooks low and slow (1 1/4 hours!) so plan accordingly.

I will say that I have loved having this blog as a way to document not only our favorite recipes but also momentous occasions in our family, and I have missed not having a record of these events in time-stamped format.  Our daughter Ava is turning 2 next month !!! and I really cannot believe it.  Also, we are expecting her baby sister in February and are so excited to see what life as a family of 4 brings!

DSC_0952_label

 
French Apple Cake

Ingredients:
1 1/2 pounds apples, peeled, cored, cut into 8 wedges then sliced 1/8 inch thick crosswise (ATK recommends Granny Smith; I used Golden Delicious)
1 tablespoon Calvados (this is a French apple brandy; you can substitute another apple brandy or white rum. I used regular brandy, and it was fine.)
1 teaspoon lemon juice
1 cup (5 ounces) plus 2 tablespoons all-purpose flour
1 cup (7 ounces) plus 1 tablespoon granulated sugar
2 teaspoons baking powder
1/2 teaspoon salt
1 large egg plus 2 large yolks
1 cup vegetable oil
1 cup whole milk
1 teaspoon vanilla extract
Confectioners' sugar, optional

Directions:
1. Adjust an oven rack to the lower-middle position and heat the oven to 325F.  Spray a 9-inch springform pan with non-stick spray.  Place prepared pan on a rimmed baking sheet lined with aluminum foil.  
2. Place apple slices into a microwave-safe pie plate, cover, and microwave until apples are pliable and slightly translucent, about 3 minutes.*  Toss apple slices with Calvados and lemon juice and let cool for 15 minutes. 
3. Whisk 1 cup flour, 1 cup granulated sugar, baking powder, and salt together in a bowl. Whisk egg, oil, milk, and vanilla together in a second bowl until smooth. Add dry ingredients to wet ingredients and whisk until just combined. Transfer 1 cup batter to a separate bowl and set aside (this will become the cake layer).
4. Add the egg yolks to the remaining batter (to create the custard layer) and whisk until just combined. Using spatula, gently fold in cooled apples. 
5. Transfer custard/apple batter to prepared pan and, using an offset spatula, spread the batter evenly to the pan edges, gently pressing on the apples to create an even, compact layer, and smooth surface.
6. Whisk the remaining 2 tablespoons flour into the reserved batter. Carefully and evenly pour this batter in the pan on top of the custard/apple layer.  Spread the batter evenly to the pan edges and smooth the surface. Sprinkle the remaining 1 tablespoon granulated sugar evenly over the cake.
7. Bake until the center of the cake is set, a toothpick inserted in the center comes out clean, and the top is golden brown, about 1 1/4 hours.
8. Transfer pan to a wire rack; let cool for 5 minutes. Run a paring knife around the sides of the pan to dislodge the cake and then let cool completely, 2 to 3 hours. Dust lightly with confectioners' sugar if desired, cut into wedges, and serve.  For a nice crisp top, serve the same day without covering the cake. I loosely covered the remaining cake with foil overnight, and the crispness was lost due to the moisture of the cake (it's still good though!)

Source: America's Test Kitchen

*I prefer not to microwave plastic wrap as I'm unsure what chemicals leach into the food during the heating process, so I covered my pie plate with waxed paper then topped it with plastic wrap to get a good seal so no moisture would escape.  I suppose chemical could pass through the wax paper, especially if had gotten wet (it didn't), but it made me feel better to do it this way!


  © Blogger template Brownium by Ourblogtemplates.com 2009

Back to TOP