Search This Blog

Tuesday, January 25, 2011

Huli Huli Chicken

DSCN7850_labeled
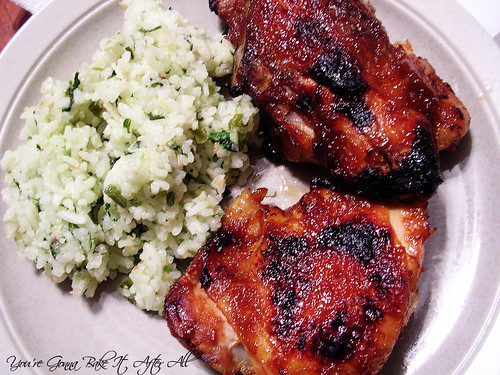
pictured with Cilantro Coconut Rice!

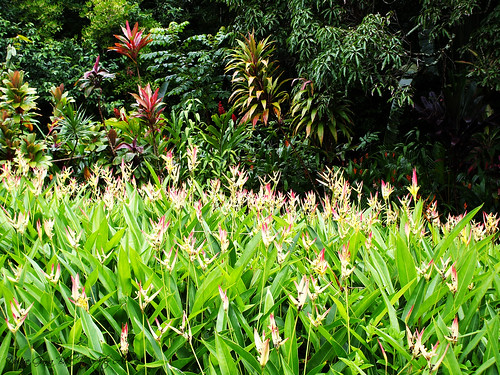
When Bob and I were in Maui on our honeymoon in 2007, we drove the famous Road to Hana. This winding, sometimes precarious road is peppered with waterfalls and some of the most amazing flowers and plants we have ever seen. We felt like we were in some alternate universe. The colors are so vibrant, and the sheer size of the trees and plant leaves was humbling - it's truly a magical place. This journey was definitely one of the highlights of our trip. Along the way, we stopped at a tiny road-side barbeque that served Hawaiian chicken - right in the people's front yard! They had a small tent set up with a few tables and that's where we ate. And it was soooo delicious!

When I saw Elly post this Huli Huli Chicken, I was taken right back to Hawaii. I was so excited to try to recapitulate this dish at home. When we had our good friends Jenny and Jeff over for dinner several weeks ago, I decided it would be Hawaiian night - a fruity salad, Cilantro Coconut Rice, and this Huli Huli Chicken. I was so happy with how it turned out, which was very similar to the chicken we had on the side of the road in Maui. This is one of the many, many times where having a leave-in digital meat thermometer makes cooking meat a breeze; it totally takes the guess-work out of the equation. We will definitely be having this again!
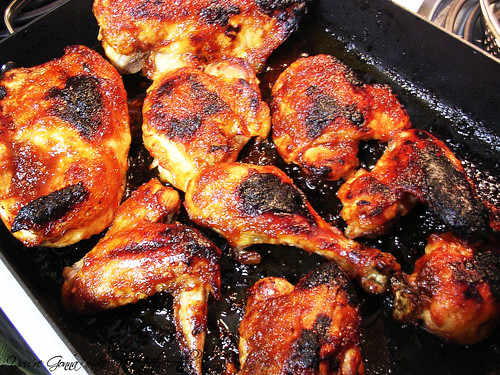
Bob and I on the Road to Hana
DSCF0114_labeled

The amazing flowers
DSCF0130_labeled

A whole cluster of those flowers
DSCF0117_labeled

Only in Hawaii???
DSCF0116_labeled

Huli Huli Chicken

Serves 4 - 6

Ingredients:
1/2 cup low sodium soy sauce
2/3 cup pineapple tidbits/chunks
4 tablespoons brown sugar
4 tablespoons ketchup
2 tablespoons rice vinegar
2 knobs ginger, grated
4 cloves garlic, chopped
1/2 teaspoon Worcestershire sauce
1 whole chicken, cut into 8 pieces (or 4 bone-in, skin-on leg quarters or 8 - 12 thighs)
2 - 4 teaspoons Canola oil

Directions:
Preheat the broiler.
1. Add the soy sauce through the Worcestershire sauce to a food processor and pulse until smooth.

2. Rub the chicken with the canola oil and then broil skin side up, about 6″ from the element, for 8 minutes.

3. Flip and broil for another 8 minutes.

4. Brush the chicken with the glaze mixture and broil for an additional 16 minutes or so, flipping and basting every 4 minutes or until a digital meat thermometer registers between 165 - 180F (depending on what you're comfortable with).

DSCN7848_labeled

Paired with Cilantro Coconut Rice, this makes a great tropical meal!

Source: Adapted from Elly Says Opa!

Thursday, January 20, 2011

Dark Chocolate-Covered Cherry Cookies

My good friend Melissa told me about these Chocolate-Covered Cherry Cookies she discovered from her coworker. Her description alone was enough - I had to make them. Bob and my dad both love chocolate-covered cherries, so I knew these cookies would go over well with them. I was surprised by how much I liked them - they are fantastic!!! The cookie part itself is so good, I would be happy with those alone, but the cherry-chocolate glaze is amazing, and I actually enjoyed the maraschino cherry (which I typically don't eat).

I used dark chocolate cocoa powder and bittersweet chocolate for the glaze to make these Dark Chocolate-Covered Cherry Cookies, but you can certainly use semisweet or even milk chocolate. I made these cookies for Christmas so I decorated half of them with Christmas sprinkles, but these cookies would be great for Valentine's Day. They would look so cute with some heart-shaped sprinkles!

DSCN7676_labeled

Dark Chocolate-Covered Cherry Cookies

Yield: about 3 dozen cookies

Ingredients:
1 1/2 cups all-purpose flour
1/2 cup unsweetened dark or regular cocoa powder (I used Hershey's Special Dark)
1/4 teaspoon salt
1/4 teaspoon baking soda
1/4 teaspoon baking powder
1/2 cup butter (1 stick), room temperature
1 cup granulated sugar
1 egg
1 1/2 teaspoons vanilla
1 (10-ounce) jar maraschino cherries, drained, reserve juice
6-ounces bittersweet or semisweet chocolate chips (milk chocolate would work too)
1/2 cup sweetened condensed milk

Directions:
Preheat oven to 350F.
1. In a large bowl, combine flour, cocoa powder, salt, baking powder and soda, blending well; set aside.

2. In a mixing bowl, beat together butter and sugar on low speed until fluffy. Add egg and vanilla; beat well. Gradually add dry ingredients to the creamed mixture; beat until smooth and well blended.

3. With hands, shape dough into 1-inch balls; place on ungreased baking sheet. Press down center of dough with thumb. Drain maraschino cherries well, reserving juice. Place a cherry in the center indention of each cookie.

DSCN7659_labeled

4. In small saucepan, combine chocolate pieces and sweetened condensed milk; heat on low until chocolate is melted. Stir in 1 tablespoon plus 1 teaspoon of the reserved cherry juice. If frosting seems too thick to spoon over cookies, thin with a little more cherry juice.

5. Spoon about 1 teaspoon of the topping over each cherry, spreading to cover cherry.

6. Bake cookies for 10 minutes, or until done. Remove to wire rack to cool. Store in airtight container.

Source: Adapted from About.com

I made these with Christmas sprinkles, but they would be perfect with Valentine's Day sprinkles or with multi-colored sprinkles for anytime!
DSCN7679_labeled

Tuesday, January 18, 2011

Samoa Bars

DSCN7776_labeled

DSCN7780_labeled

DSCN7785_labeled

DSCN7779_labeled

Samoas/Caramel DeLites are my favorite Girl Scout cookie, tied with Thin Mints that is. When I saw this recipe on Baking Bites (quite a long time ago!), I was so excited and quickly bookmarked it. As usual, I took my time getting to this recipe but finally decided it was time. I thought these bar cookies were great! They really do taste like Samoas! I love the combination of the toasted coconut and caramel - I could eat that by itself!

Samoa Bars

Yield: 30 bar cookies

Ingredients:
Cookie Base:
1/2 cup sugar
3/4 cup butter (1 1/2 sticks), softened
1 large egg
1/2 teaspoon vanilla extract
2 cups all-purpose flour
1/4 teaspoon salt

Topping:
3 cups shredded coconut (sweetened or unsweetened), toasted
12 ounces good-quality chewy caramels
1/4 teaspoon salt
3 tablespoons milk
10 ounces dark or semisweet chocolate (chocolate chips are fine) (I needed about 2 ounces more for drizzling the bars)

Directions:
Preheat oven to 350F.
1. Make the crust: Lightly grease a 13 x 9-inch baking pan, or line with parchment paper.
In a large bowl, cream together sugar and butter until fluffy. Beat in egg and vanilla extract. Working at a low speed, gradually beat in flour and salt until mixture is crumbly, like wet sand. The dough does not need to come together.

2. Pour crumbly dough into prepapred pan and press into an even layer. Bake for 20 - 25 minutes, until base is set and edges are lightly browned. Cool completely on a wire rack before topping.

3. Make the topping: Place the unwrapped caramels in a large microwave-safe bowl with milk and salt. Cook on high for 3 - 4 minutes, stopping to stir a few times to help the caramel melt. When smooth, fold in toasted coconut with a spatula.

4. Put dollops of the topping all over the shortbread base. Using the spatula, spread topping into an even layer. Let topping set until cooled.

5. When cooled, cut into 30 bars with a large knife or a pizza cutter (I used a large pizza chopper) .

6. Once bars are cut, melt chocolate in a small bowl by heating on high in the microwave in 45 second intervals, stirring thoroughly to prevent scorching. Dip the bottom of each bar into the chocolate and place on a clean piece of parchment or wax paper.

7. Transfer all remaining chocolate (or melt a bit of additional chocolate, if necessary) into a piping bag or a sandwich/storage bag with the corner snipped off and drizzle bars with chocolate to finish. Let chocolate set completely before storing in an airtight container. These bars also freeze well.

Note: For an easier finish, you can simply drizzle chocolate on top of the bars before slicing. You will not need as much chocolate as noted above, and you will not exactly get the Samoas look, but the results will still be delicious.

Source: Adapted from Baking Bites

Friday, January 14, 2011

Red Velvet Brownies with Cheesecake Swirl and Giveaway Winner!!!


DSCN7817_labeled

DSCN7832_labeled

And the Giveaway winner is . . .


Congratulations Natalie!!! You have won a $75 gift certificate to CSN Stores! Please email me at mtmbakesblog AT gmail.com to claim your prize. Thank you to CSN Stores for sponsoring this giveaway!

Now I must tell you about these brownies. I made them the night before having our good friends Jenny and Jeff, and their baby Andrew, over for dinner (you may remember them from the Monkey Cookies!) I had these in the oven for about 10 minutes when our power went out!! I was really annoyed thinking they were probably ruined. Not knowing how long it would be before power was restored, I moved the brownies to the very cold garage. After about an hour, the power came back and I put the brownies back in the oven until done. I have no idea how this affected them, but they did turn out very tall! These were really good brownies, definitely more cake-like than fudgey, but I can't say whether that's due to how I baked them. I loved the cheesecake swirl on top. These are definitely festive and would be perfect for Valentine's Day!

After deciding to make these brownies, I saw a similar recipe for Red Velvet Cheesecake Brownies on Baking Bites that looks fantastic as well!

Red Velvet Brownies with Cheesecake Swirl

Ingredients:
For the brownies:
4 ounces bittersweet chocolate, chopped
3/4 cup (1 1/2 sticks) butter
2 cups sugar
4 large eggs
1 1/2 cups all-purpose flour
1 (1-ounce) bottle red food coloring (I used about 1/2 container of Wilton icing gel)
1 1/2 teaspoons baking powder
1/8 teaspoon salt
1 teaspoon vanilla extract
1/4 cup buttermilk
1 teaspoon white vinegar

For the cream cheese swirl:
4 ounces cream cheese, at room temperature
2 tablespoons sugar
2 tablespoons sour cream
1/4 teaspoon vanilla extract
1/2 large egg yolk

Directions:
Preheat the oven to 350F.

1. Line a 9 x 9-inch square baking dish with two pieces of aluminum foil, folding ends over the edges. Spray with cooking spray.

2. Combine the chocolate and butter in a large, microwave safe bowl. Cook 30 seconds at a time until melted, stirring well after each time. Whisk in the sugar.

3. One at a time, add the eggs, whisking well between each addition. Stir in the flour, food coloring, baking powder, salt, buttermilk, vanilla, and vinegar. Combine well, then pour into the prepared baking dish.

4. In the bowl of a stand mixer fitted with a paddle attachment, beat the cream cheese, sugar, vanilla, and egg yolk. Drop spoonfuls over the brownie batter, then use a table knife to swirl into the batter.

5. Bake 40-50 minutes, or until a toothpick inserted into the center comes out with just a few crumbs attached. Allow to cool completely before slicing.

Source: Adapted from Pink Parsley

Friday, January 7, 2011

All I Wanted for Christmas...Giveaway!

Happy New Year! I took a small blogging break for the holidays, but it certainly wasn't a break from cooking and baking! I've updated the sidebar with some healthier recipes for the start of a new year!

I hope everyone had a very happy Holidays! Is there anything in particular that was on your list this holiday season and you didn't get? Or maybe you just thought of something you accidentally left off your list? Perhaps you've been pining after a kitchen item that's a tad out of your budget? I know that always happens to me. You are in luck - CSN Stores has offered to give one lucky person a $75 gift certificate! I've done a giveaway from CSN in the past, as well as a product review. They have over 200 stores, selling practically everything ranging from modern furniture to cookware, my personal favorite. I think this is fantastic because you can use it to get $75 worth of merchandise (from any one of their stores!), or you can choose to purchase a more expensive item and consider it $75 off your total!

There are several ways to enter (you do NOT have to have a blog to enter!):

1) Leave a comment stating what you plan to buy with the gift certificate.

2) Blog about this giveaway and leave a separate comment with a link to your post.

3) Post about this giveaway on Facebook and leave a separate comment with the link.

Entries must be in by 9:00 pm on Thursday, January 13.

Winner will be chosen using random.org. Note that the gift certificate can not be used towards shipping charges, but I'm sure you'll find many items on their site that have free shipping or that ship for a minimal charge. Free shipping was one of the criteria I used in choosing my product review!

Good luck!!! :)

  © Blogger template Brownium by Ourblogtemplates.com 2009

Back to TOP