Search This Blog

Tuesday, December 22, 2015

Pavel's Bread Pudding

DSC_0290_PavelsBreadPudding2

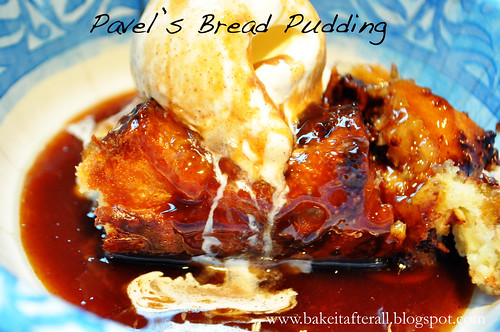
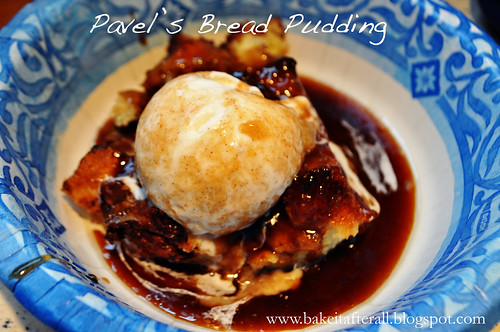
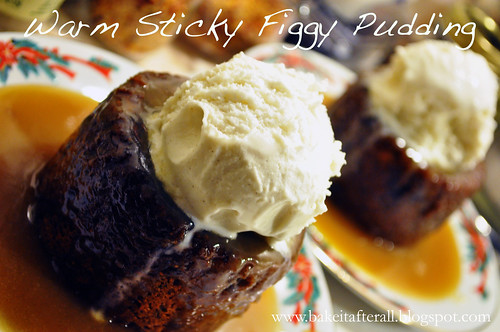
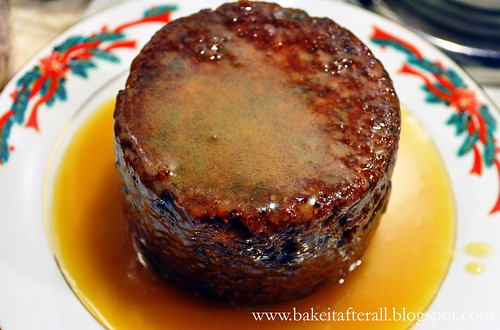
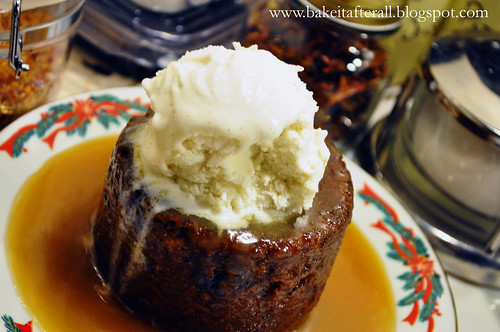
My Uncle Paul used to belong to a social club that occassionally held multi course dinners. One of these dinners was covered by a local newspaper and included his recipe for Bread Pudding. My uncle was quite proud of his Polish heritage and sometimes called himself Pavel, so the recipe was printed as "Pavel's Bread Pudding."  I have had a clipping of the newspaper for years and always intended to make it for my mom, my aunt, and my sister. It is a very rich and decadent dessert, so it had to be the right occasion.  Finally this summer, I decided to make it for my aunt's hot tub party, even though the occasion did not at all call for a rich and decadent dessert!  We really enjoyed this dessert, especially the sauce, and it would be a perfect dessert for the holidays.

Pavel's Bread Pudding

Makes at least 12 servings

Ingredients:
For the pudding:
Butter, to prepare the pan
1 pound brioche or Italian bread, cut into 1-inch pieces
10 tablespoons unsalted butter, melted, divided
1 cup semisweet chocolate chips
1 cup chopped walnuts, optional
1 cup half-and-half
1/2 cup whole milk
1 cup granulated sugar
6 eggs
4 egg yolks
2 tablespoons vanilla extract
1/8 teaspoon salt
2 tablespoons dark brown sugar

For the sauce:
1 cup (2 sticks) unsalted butter
1 cup packed dark brown sugar
1 teaspoon ground cinnamon
1/4 teaspoon salt
1/4 cup dark rum or bourbon
1 tablespoon vanilla extract

Directions:
To prepare the pudding:
1. Butter a 13x9-inch pan. In a bowl, mix the bread, 8 tablespoons melted butter, chocolate chips, and nuts if using. Spoon into the pan.

2. In a bowl, whisk together half-and-half, milk, sugar, eggs, yolks, vanilla, and salt. Pour over bread. Let sit at least 30 minutes. Meanwhile, preheat the oven to 350F.

3. Drizzle the bread pudding with the remaining 2 tablespoons of melted butter; sprinkle with the brown sugar. Bake until set, about 1 hour.

To prepare the sauce:
1. Melt the butter in a small saucepan. Add the sugar, cinnamon, and salt. Stir until dissolved and bully. Remove from heat. Stir in rum and vanilla. Serve warm over pudding.

Source: my Uncle Paul

DSC_0287_PavelsBreadPudding1

Sunday, December 20, 2015

Dairy-Free Soy-Free Chocolate Chip Cookies (MSPI)


DSC_0242_MSPIChocolateChipCookies


Here is another recipe from my days of following the MSPI (Milk Soy Protein Intolerance) diet while nursing my second baby. Normally I am not a fan of cooking with Crisco, but when you absolutely cannot have butter, these types of priorities often take a back seat. One nice thing about working with Crisco is that you don't have to wait for it to soften like butter since it's stored at room temperature.

My mom and sister really loved these cookies and actually preferred them to the typical all-butter chocolate chip cookie.

During my MSPI days, I relied on dairy-free soy-free chocolate chips. "Enjoy Life!" Brand is my favorite and thankfully my local grocery store carries them in the health/organic food aisle. These chocolate chips were so good - you would never know they were dairy-free!

This recipe is actually adapted from the Nestle Toll House Cookie recipe, so you know it won't dissapoint!

Dairy-Free Soy-Free Chocolate Chip Cookies (MSPI Friendly)

Ingredients:
2 1/4 cup all-purpose flour
1 teaspoon baking soda
1 teaspoon salt
1 cup traditional or butter-flavored Crisco
3/4 cup granulated sugar
3/4 cup light brown sugar, packed
1 teaspoon pure vanilla extract
2 large eggs
2 cups chocolate chips (I used Enjoy Life brand- they are dairy-free and soy-free)

Directions:
Preheat oven to 375F.
1. Combine flour, baking soda, and salt in a small bowl. Set aside.

2. Beat Crisco, sugars, and vanilla extract in a large mixer bowl until creamy. Add the eggs, one at a time, beating well after each addition. Gradually beat in the flour mixture. Stir in the chocolate chips.

3. Drop by rounded tablespoon onto ungreased cookie sheets.

4. Bake for 8 - 9 minutes or until edges begin to turn golden.  Cool for one minute on the cookie sheet and remove to a wire rack to cool completely.

Source: One Ordinary Day

Sunday, December 13, 2015

Skillet Chicken Fajitas

DSC_0045_SkilletChickenFajitas

When I received my America's Test Kitchen Healthy Family Cookbook several years ago, I came across this recipe for Skillet Chicken Fajitas.  I was hesitant to try them at first because I already have a favorite fajita recipe (Grilled Chicken Fajitas), but during the winter the last thing we want to be doing is grilling in the dark and in the cold, so I was hoping to have a good stove-top fajita recipe for the winter months. We love this recipe and welcome the different flavors not present in our go-to fajitas.  The orange juice and chipotles in adobo make a great sauce that flavors the chicken, and I love the addition of the tomatoes and green onions at the end for some freshness.

Skillet Chicken Fajitas

Ingredients:
2 teaspoons canola oil
2 red bell peppers, stemmed, seeded and sliced thin
1 red onion, halved and sliced thin
salt and pepper
3 - 4 chicken breasts
salt and pepper to taste
1/2 cup orange juice
3/4 cup cilantro, minced (divided)
2 teaspoons chopped chipotles in adobo sauce
1 tablespoon Worcestershire sauce
4 cloves garlic, minced or grated
*** 1 - 2 cups chicken broth (optional)
1 teaspoon yellow mustard
1 tomato, cored, seeded, and chopped
3 green onions, sliced thin

tortillas (I prefer Tortillaland brand)

Optional toppings:
sour cream
cheese
salsa

Directions:
1. Heat the oil in a 12-inch skillet. Add the sliced peppers and onions and season with salt and pepper. Cook, stirring occasionally, until softened and well-browned, about 5 to 7 minutes.  Transfer the mixture to a bowl or plate and cover with foil, store in warm place.

2. Combine the orange juice, 1/2 cup of the of the cilantro, the chipotles, Worcestershire, and garlic in a measuring cup, then add to the skillet. Season the chicken with salt and pepper and add to the skillet. Bring the liquid to a simmer over medium-low heat, about 5 minutes. Flip the chicken over, cover, and cook until the chicken registers at least 165F on an instant-read thermometer.  This may take 10 - 12 minutes, or longer depending on the thickness of your chicken. You will need to keep an eye on the liquid during this step. Often, mine evaporates and starts to burn in areas, so I add chicken broth to the pan when this begins to happen.  This is not in the original recipe, but I have this issue every time - perhaps my pan is too large or the heat is too high, I'm not sure. Regardless, keep an eye on it because you don't want the sauce to burn on the bottom of the pan because of the sugar content.

3. Transfer the chicken a plate and shred. If necessary, simmer the sauce until reduced to 1/4 cup (I never have to do this step as my sauce is naturally reduced while the chicken cooks). Return chicken to pan. Off heat, stir in mustard, tomatoes, green onions, and remaining 1/4 cup cilantro. Season with salt and pepper to taste.

4. Serve the chicken mixture with the peppers/onions and warm tortillas (and toppings if desired).

Source: America's Test Kitchen Healthy Family Cookbook

Sunday, December 6, 2015

Lasagne / Lasagna

DSC_0457_Lasagna

DSC_0461Lasagna


Obviously from my posts, I like a variety of different types of food - Mexican, Asian, American, and of course Italian. My grandmother was 100% Sicilian, and I have always identified strongly with my Italian heritage. Surprisingly, she didn't cook much Italian food, but her influence on our family has inspired many recipes. My aunt originally developed this lasagna years and years ago, and my mom then took it on - whether she tweaked anything, I'm not quite sure, but I do know that I put a major wrench in it by substituting ground turkey for the beef! To be honest, most of the people who have tried this recipe don't even realize it's turkey. The only thing that tips them off is this: I'm eating it!

My aunt and mom also make a homemade sauce with it, which I've made and really enjoy, but for me, as I've mentioned before, Prego Traditional is so good that it's not worth my time to make the homemade sauce. My new favorite sauce is Trader Joe's Tomato Basil Marinara.  I only go to Trader Joe's about 4 times a year so I make sure to stock up on this sauce. I buy so much that the checker once asked me if I was buying it for an Italian restaurant.  He actually had a customer who did this before! 

The ricotta-type layer actually uses cottage cheese. I always thought this was a little strange, but it's delicious so I ever complained. Then I saw Cook's Illustrated substitute cottage cheese for ricotta in some recipes! Guess it's not that strange!

One thing this lasagna does contain is a classic St. Louis ingredient - Provel cheese.  If you do not live in the area, you probably won't be able to find this cheese (and may not even like it if you didn't grow up with it), so you may substitute mozzarella or Provolone.  

DSC_0596_Lasagna

Lasagne / Lasagna

Ingredients:
For the sauce:
1 - 2 pounds ground meat (I use lean - not extra lean - ground turkey. 2 pounds if you like it a bit heartier)
homemade or store bought marinara sauce - I like a lot of sauce so I use about 40 ounces, but you may use less if desired

For the lasagna:
12 lasagna noodles
24 ounces small curd cottage cheese
2 eggs
1 teaspoon salt
1/2 teaspoon ground black pepper
chopped parsley (fresh or dried)
Parmesan cheese
2 - 2 1/2 cups shredded mozzarella cheese
2 cups shredded Provel cheese (if available - if not, you may substitute mozzarella or Provolone)

Directions:
1. Brown the meat in a skillet. If using ground turkey, you may want to add a teaspoon or two of olive oil.

DSC_0418_Lasagna


2. Drain the meat if necessary.  Sometimes with ground turkey there isn't much liquid left to drain, and the small amount that is there may lend flavor to the sauce.

3. Add the homemade or prepared sauce of your choice to the meat and simmer for at least 30 minutes, ideally an hour or more. I find that ground turkey starts to break down if cooked too long, so I wouldn't do an all-day simmer.

4. Cook the lasagna noodles as directed on the package to al dente (use the lower time or even a minute less). When the noodles are done, I like to lay them in a single layer on pieces of waxed paper to cool until I'm ready to assemble the lasagna.

5. Place the cottage cheese, eggs, salt, pepper and parsley (to taste) in a food processor and blend until smooth.

6. To assemble the lasagna: spread about 1 cup of sauce over the bottom of a 9x13" pan then beginning layering: 3 noodles, sauce to cover, 1/3 of the cottage cheese mixture, 1/2 cup mozzarella cheese, 1/2 cup Provel cheese, and a little Parmesan cheese. Repeat layers. If your pan is not deep enough for 4 layers, 3 will suffice. For the final layer, I top with lasagna noodles, sauce, and then an extra 1/c cup mozzarella and some Parmesan.

7. If the pan is full, place it on a baking sheet lined with foil because it may spill over the sides. Bake uncovered at 350F for 45 minutes. (To make ahead, assemble but do not bake, then refrigerate or freeze. If you make ahead and refrigerate, then bake for 1 hour. If make ahead and freeze, it may take up to 90 minutes or more).

8. Remove dish from oven and let rest at least 15 minutes before cutting.
Source: My Aunt Sue and my Mom :)  

Tuesday, December 1, 2015

Warm Sticky Figgy Pudding Revisited

DSC_0320_FiggyPudding

I posted this amazing recipe for Warm Sticky Figgy Pudding two years ago and promised better pictures.  I was able to capture some last year so I'm revisiting the recipe today. I make this "pudding" each year for our annual "Dickens Dinner."  It quickly became a hit the first year and will remain a staple on the menu.

This is a very rich dessert, and I only make it once a year, but it is SO worth it. The caramel sauce is an absolute must, and really, so is the ice cream.

Ina Garten had a chef friend on her show once who showed her how to make Date Toffee Pudding - the recipe I use is different because it has figs and also flecks of chocolate - to use Ina's own words against her, "how bad can that be?"

Warm Sticky Figgy Pudding

Serves 4 

Ingredients: 
For the pudding:
¾ c. dried pitted dates, chopped
¼ c dried figs, chopped
1 c. water
½ tsp baking soda
3 ½ tablespoons butter, softened
½ c superfine sugar
1 egg
1 ¼ c. self-rising flour
1 ¼ oz. dark chocolate, grated (I use Ghiradelli bittersweet chips)
Butter for the ramekins

For the sauce: 
1 c. brown sugar
1 c. heavy cream
7 tablespoons butter

For serving: 
Vanilla ice cream or whipped heavy cream (optional)

Directions: 

1. Add the dates, dried figs, and water to medium saucepan and bring to boil over medium heat. Remove the pan from heat and stir in the baking soda. Let cool for 5 minutes, then add to a blender to puree.

2. Using a hand or stand mixer, cream the butter and sugar in a large bowl. Add the eggs and beat well. Fold in the flour, the pureed date mixture, and the chocolate.

3. Pour the batter into buttered ramekins filling halfway. I divided the batter equally into 4 ramekins. (At this point, I wrap the ramekins in plastic wrap and take them to my sister's house, refrigerate them during dinner, then bake them. They turn out perfect! You may bake them immediately if that works with your schedule.)

4. Bake at 350F for 20 – 25 minutes.

5. To prepare the sauce, stir the sugar and cream in a medium saucepan over low heat. Simmer until the sugar dissolves. Raise the heat to a boil, then reduce and simmer 5 minutes. Add the butter and stir until incorporated. (I make this at home and take it to my sister's. Then I reheat the sauce prior to spooning it over the cakes).

6. Remove the ramekins from the oven and let stand for 10 minutes. Serve in the ramekin or unmold each cake onto a serving plate. With a paring knife, cut a cross in the center of each cake. Pour the sauce over the pudding and allow it to soak in slightly, then top with more sauce as desired.

DSC_0305_FIggyPudding

7. Serve warm topped with ice cream or whipped cream and enjoy! I highly recommend vanilla ice cream :-)

DSC_0316_FiggyPudding

Source: Adapted from FoodNework.com – Ultimate Recipe Showdown

Note: The original recipe said it serves 4, but the reviews said it made much more so I cut the recipe in half and it was just right for 4 servings (meaning the recipe on FoodNetwork probably makes 8 servings rather than 4!)

DSC_0310_FiggyPudding

  © Blogger template Brownium by Ourblogtemplates.com 2009

Back to TOP