Search This Blog

Sunday, May 31, 2015

Seven Layer Bars

DSC_0238_ed

Also known as Magic Cookie Bars, these famous layered treats are a very popular dessert with multiple variations floating around, many of which contain a nut layer. Because I'm allergic to nuts, I obviously must omit this layer, so I was pleased to find that one of my favorite bloggers Annie had decided to omit the nuts due to personal preference and found success with the resulting product. Sometimes omitting the nuts is detrimental to the outcome of your recipe (such as Pecan Pie - trust me, I've tried!), so it's good to know that these bars are still amazing when they only have 6 layers!

DSC_0248_ed

Seven Layer Bars


Ingredients:

1 cup sweetened flaked coconut

5 ounces graham crackers

8 tablespoons unsalted butter

1 cup semisweet chocolate chips

½ cup white chocolate chips

½ cup butterscotch chips

1 14-ounce can sweetened condensed milk

Directions:
1. Adjust an oven rack to the lower-middle position and heat oven to 350F.

2. Line a 13 x 9-inch baking dish with aluminum foil and spray lightly with nonstick cooking spray.

3. In a medium nonstick skillet over medium heat, toast the coconut, stirring occasionally until lightly browned and golden. Remove from heat.

4. Place the graham crackers in a large resealable plastic bag and crush with a rolling pin to create multiple sizes of crumbs.

5. Meanwhile, place the sticks of butter into the prepared baking pan and put it in the oven to melt the butter, about 6 minutes. When the butter has melted, remove the pan from the oven. Add the graham cracker crumbs and toss lightly with a fork until all the butter is absorbed and the crumbs are evenly distributed over the bottom of the pan.

6. In order, sprinkle the chocolate chips, white chocolate chips, butterscotch chips, and the toasted coconut over the grapher cracker crumbs. Pour the condensed milk evenly over the entire baking pan.

7. Return the pan to the oven and bake until the tool is golden brown, about 25 minutes. Remove pan from oven and cool on a wire rack until room temperature, about 2 hours. Remove bars from the pan using the foil and transfer to a cutting board. Cut into bars using a sharp knife.

DSC_0239_ed

Source: Annie's Eats, originally adapted from Baking Illustrated

Thursday, May 28, 2015

Grilled Shrimp with Spicy Lemon-Garlic Sauce

DSC_0468_ed

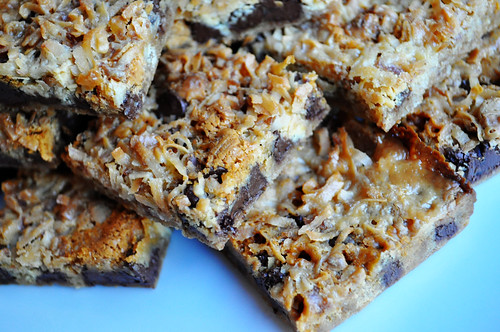
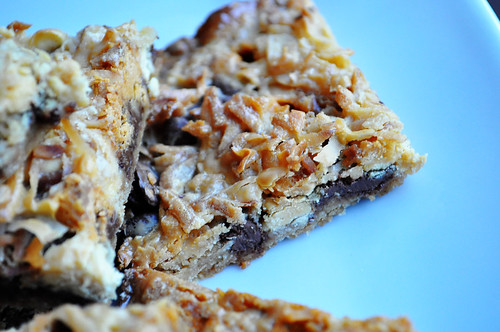
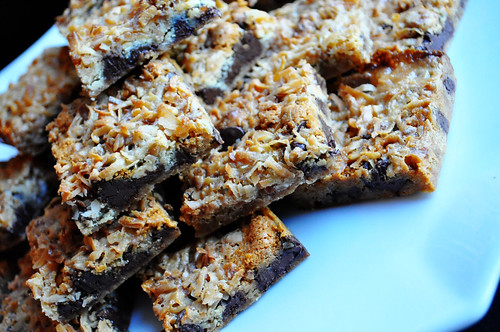
As you may have noticed, I'm attempting to update the blog with recipes I've made over the past, oh, 2 years or so! I am always diligent about photographing but when it comes to actually having time to sit down and craft a recipe / edit photos, I fall short. Hopefully over the next few months I will be able to post these stragglers that never quite made it to the blog.

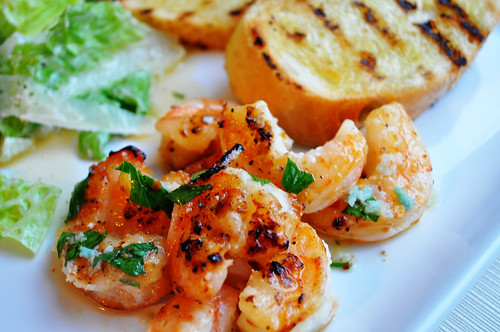
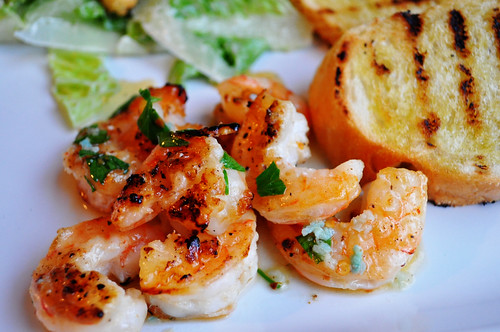
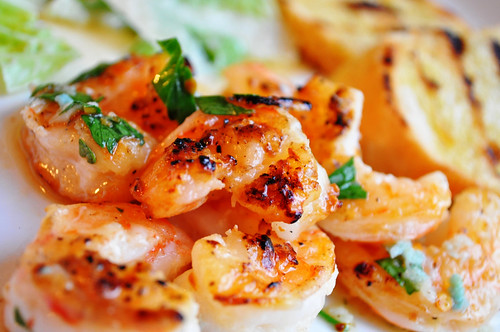
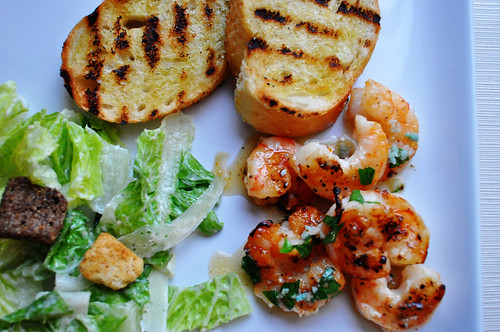
This is probably my favorite way to cook shrimp - grilled and tossed in a garlicky lemon sauce. ATK recommends serving with grilled bread, and I have to agree. We also had a Caesar salad, and this was one of my favorite meals - perfect for spring and summer!


DSC_0446_ed

Grilled Shrimp with Spicy Lemon-Garlic Sauce

Ingredients:
1 1/2 pounds extra-large shrimp (21 to 25 per pound), peeled and deveined
2 - 3 tablespoon olive oil for brushing the shrimp
table salt and ground black pepper
1/4 teaspoon sugar
vegetable oil for the cooking grates
1 recipe Spicy Lemon-Garlic Sauce (see below)
Lemon wedges, for serving

Directions:
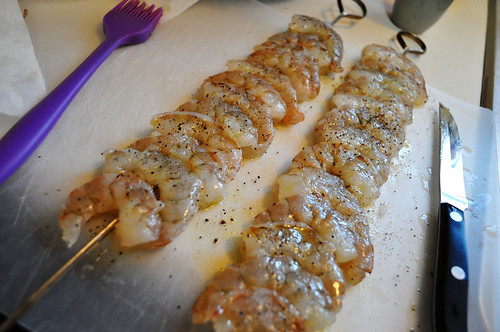
1. Pat the shrimp dry with paper towels. Thread the shrimp onto 3 skewers, alternating direction of heads and tails. Brush both sides of the shrimp with olive oil and season lightly with salt and pepper. Sprinkle one side of each skewer evenly with the sugar.

DSC_0436_ed


2. If using a charcoal grill, light a chimney starter filled with charcoal (about 6 quarts) and allow to burn until coals are partially covered with ash, about 20 minutes. Open the bottom vent on the grill. Build a modified two-level fire by arranging coals over half the grill, leaving the other half empty. Set the cooking grate in place, cover grill, and heat until hot, about 5 minutes. If using a gas grill, turn burners to high to heat grill with lid down until very hot, about 15 minutes.

3. Use grill brush to scrape grates clean. Dip wad of paper towels in vegetable oil; holding wad with tongs, oil the grates.

4. Set the disposable pan with the sauce ingredients (see below) on the hot side of the grill and cook, stirring occasionally, until hot, about 1 1/2 minutes; transfer the pan to the cooler side of the grill.

5. Place the shrimp skewers, sugared sides down, on the hot side of the grate and use tongs to push the shrimp together on the skewers if they have separated. Grill the shrimp, uncovered, until lightly charred, 4 to 5 minutes.

6. Using tongs, flip and grill until the second side is pink and slightly translucent, 1 to 2 minutes longer.

7. Using a potholder or oven mitt, carefully lift each skewer from the grill and use tongs to slide the shrimp off the skewers into the pan with the sauce. Toss the shrimp and sauce to combine and transfer the pan to the hot side of the grill; cook, stirring, until the shrimp are opaque and fully cooked, about 30 seconds. Remove from the grill, add the fresh parsley, and toss to combine. Transfer to a serving platter and serve immediately with lemon wedges.

DSC_0461_ed

Spicy Lemon-Garlic Sauce

Makes about 1/2 cup

Ingredients:
4 tablespoons unsalted butter, cut into 4 pieces
4 tablespoons lemon juice from 2 lemons
3 medium garlic cloves, minced or pressed (about 1 tablespoon)
1/2 teaspoon red pepper flakes
1/8 teaspoon table salt
1/3 cup minced fresh parsley

Directions:
1. Combine the butter, lemon juice, garlic, pepper flake, and salt in a 10-inch disposable aluminum pan or pie plate.

2. Cook over the hot side of the grill, stirring occasionally, until the butter melt, about 1 1/2 minutes; transfer to the cooler side of the grill (if using a charcoal grill) or off heat (if using a gas grill).

3. Proceed to grill the shrimp (see above), adding the parsley just before serving.

DSC_0442_ed

Source: America's Test Kitchen

Tuesday, May 26, 2015

Blueberry Boy Bait


DSC_0101_ed

Another gem from my America's Test Kitchen Cookbook. The story goes that the girl who created this recipe for the Pillsbury Grand National Baking Contest said that teenage boys found this cake irresistible.  I don't make a habit of entertaining teenage boys (ha!), but Bob loved this cake and I still consider him a boy.  Of course, ATK improved upon the original recipe by swapping out shortening and subbing some of the granulated sugar with brown sugar. The result is a moist, simple cake perfect for brunch or an afternoon treat.

Blueberry Boy Bait

Note: if using frozen blueberries, do not let them thaw or they will discolor the batter.

Ingredients:
For the cake:
2 cups (10 ounces) plus 1 teaspoon unbleached all-purpose flour
1 tablespoon baking powder
1 teaspoon table salt
16 tablespoons (2 sticks) unsalted butter, softened
3/4 cup packed (5 1/4 ounces) light brown sugar
1/2 cup (3 1/2 ounces) granulated sugar
3 large eggs
1 cup whole milk
1/2 cup blueberries, fresh or frozen (see note)

For the topping:
1/2 cup blueberries, fresh or frozen (see note)
1/4 cup (1 3/4 ounces) granulated sugar
1/2 teaspoon ground cinnamon

Directions:
1. Adjust an oven rack to the middle position and heat to 350F.  Grease and flour a 13 x 9-inch baking pan.

2. Whisk 2 cups of the flour, the baking powder, and salt together in a medium bowl. With an electric mixer, beat the butter and sugars on medium-high speed until fluffy, about 2 minutes.

3. Add the eggs, one at a time, beating until just incorporated. Reduce the speed to medium and beat in one-third of the flour mixture until incorporated; beat in 1/2 cup of the milk. Beat in half of the remaining flour mixture, then the remaining 1/2 cup milk and finally the remaining flour mixture.

4. Toss the blueberries in a small bowl with the remaining 1 teaspoon flour. Using a rubber spatula, gently fold the blueberries into the batter. Spread the batter into the prepared pan.

5. For the topping, scatter the blueberries over the top of the batter.

DSC_0070_ed


6. Stir the sugar and cinnamon together in a small bowl and sprinkle over the batter. Bake until a toothpick inserted in the center of the cake comes out clean, 45 to 50 minutes. Cool in the pan for 20 minutes, then turn out and place on a serving platter (topping side up). Serve warm or at room temperature.  The cake can be stored in an airtight container at room temperature for up to 3 days.

DSC_0078_ed


DSC_0096_ed

Sunday, May 24, 2015

Cupcake Gender Reveal!

DSC_0708_ed


When I found out I was having a girl during my first pregnancy, I knew I wanted to reveal the sex of our baby in a fun way and ended up doing a Truffle Reveal.  For our second, I wanted to do something different but still incorporate my love for baking.  I like the idea of an individual dessert so each person can discover the surprise on his/her own.  I decided to fill cupcakes with either pink or blue frosting so each person would bite into the cupcake to reveal whether Ava was getting a little brother or sister.  If you've been reading earlier posts, you know that the we had a girl!  I was beyond excited for Ava to have a little sister, since I love my little sister so much and can't imagine my life without her.  Of course I meant to blog this when the news was actually news, but being pregnant plus taking care of a toddler got the best of me. Regardless, I thought it would be fun to document how we revealed our surprise to our family and show a little step-by-step of how to make these cupcakes.


Cupcake Gender Reveal 

1. Bake cupcakes of choice in gender-neutral cupcake liners. (I chose a boxed chocolate Duncan Heinz cake for convenience and used green liners).

DSC_0692_ed

  2. With a small knife, cut out a round, cone shape from the top of the cupcake.

DSC_0696_ed


 3. Using the knife, cut the tip off of the small piece of cake you have removed (eat the small tip of cake if you'd like a snack!)

DSC_0697_ed
 

DSC_0700_ed

4. Prepare pink or blue buttercream (I used Easy Vanilla Buttercream) and pipe into the hole created when you removed the small piece of cake.

DSC_0701_ed
 

 5. Replace the small piece of cake on top of the buttercream.

DSC_0702_ed
 

6. Frost and decorate cupcakes as desired. (I used Easy Vanilla Buttercream and gender neutral sprinkles).  


DSC_0703_ed

DSC_0704_ed

DSC_0705_ed


 7. Pass out cupcakes to family/friends.

DSC_0709_ed
 

8. Tell everyone to bite into his/her cupcake to reveal the sex of your baby!

DSC_0724_ed2
 

Thursday, May 21, 2015

Samoa Bundt Cake

DSC_0239_ed

We have several March birthdays in our family, but each person chooses his/her own birthday dessert. A couple years ago, I was designated to make my sister's dessert, and she chose this Samoa Bundt Cake inspired by one of my favorite Girl Scout Cookies. It looked a little overwhelming at first, having two batters and a homemade dulce de leche frosting, but I was up for the challenge. And let me say, this cake was worth it! I received so many compliments on it.  I thought the frosting/coconut combination was incredible even without the cake and could be added to any cake, so if you're looking to cut corners and want to make a simpler cake batter (or even use a boxed mix!), I think spending the time to make the frosting is well worth it!  I might suggest a chocolate boxed cake with this frosting and toppings!

Love Samoas?  Check out these Samoa Bars!

Samoa Bundt Cake

Note: Read the entire recipe before you begin. You will need to prepare a batch of dulce de leche and allow it to cool completely before making the frosting for this cake.

Ingredients:

Batter #1:
1 stick of butter, softened
1 cup dark brown sugar
2 eggs
1/2 cup whole milk
3/4 cup all purpose flour
3/4 teaspoon baking powder
1/2 teaspoon baking soda
1/4 teaspoon salt

Batter #2:
1/4 cup vegetable oil
1 cup sugar
1 egg
1/2 cup whole milk
1 teaspoon vanilla
3/4 cup + 2 tablespoons all purpose flour
1/2 cup + 2 tablespoons cocoa powder
3/4 teaspoon baking powder
1/2 teaspoon baking soda
1/2 teaspoon salt
1/2 cup boiling water

For the frosting:
1 batch Dulce de Leche
1/2 cup powdered sugar
2 tablespoons vanilla extract
2 sticks butter, softened
1/2 teaspoon salt
1 cup toasted coconut

For the topping:
1 1/2 cups toasted coconut
1/2 cup semi-sweet chocolate chips, melted

Directions:

Prepare dulce de leche, if needed. Let cool completely.

Preheat oven to 350.

Prepare each batter separately for this marbled cake:

1. For each batter, beat butter or oil and sugar(s) on medium-high speed until fluffy. Add in eggs one at a time, mixing well after each addition. Add milk and vanilla (if applicable) and mix until well combined.

2. In a separate bowl, sift together the dry ingredients for each batter.

3. Add the dry ingredients to the wet ingredients slowly and mix until well combined.

4. For Batter #2, add the boiling water at this step.

5. Grease and flour the bundt pan well.  Layer the cake pouring some of each batter and alternating layers until both batters are completely transferred to the pan.  Tap the bundt pan on the counter a couple of times to remove any bubbles.

6. Bake approximately 1 hour or until a skewer inserted in the center comes out clean.  (Mine took about 50 minutes).

7. Let the cake cool completely.

DSC_0997_ed

For the frosting:
1. To toast coconut, place on a cookie sheet in the oven at 350 degrees, tossing occasionally, or in a dry skillet stirring constantly until desired color is achieved.

2. Beat the cooled dulce de leche, butter, powdered sugar, vanilla and salt for 3 minutes.  Add in 1 cup toasted coconut.  Chill for 1 hour.

3. Frost the cake with the frosting, and top with the remaining toasted coconut.

4. Melt the chocolate chips in the microwave and place in a pastry bag with a small tip or in a ziploc bag with a corner cut off.  Drizzle stripes on the cake.

DSC_0245_ed

Source: Adapted from Breakfast to Bed 


Tuesday, May 19, 2015

Homemade Dulce de Leche

Some homemade dulce de leche recipes are made from actual ingredients like sugar and cream. This is actually a shortcut method that uses sweetened condensed milk, but it's more homemade than opening a jar of store-bought dulce de leche, so we'll go with it.

I first made dulce de leche years ago for these Tres Leches Coconut Cupcakes with Dulce de Leche Buttercream and was amazed by how a simple cooking technique could transform canned sweetened condensed milk into delectable caramel. I have since made it several times for different recipes and always have perfect results. I've seen some recipes that boil the unopened can or put it in the crockpot, but from what I've read neither is particularly safe, so I prefer this method. 

Stay tuned for my next post where I share the awesome recipe for which this dulce de leche was created!

Homemade Dulce de Leche

Ingredients:
1 can sweetened condensed milk

Directions:

Preheat the oven to 425F.

1. Pour 1 can of sweetened condensed milk into a glass pie plate or pyrex dish. and cover with foil.

DSC_0937_ed


2. Place dish in a larger roasting pan where it can sit flat.

3. Pour hot water into the roasting pan to a depth of about halfway up the pie plate/dish.

DSC_0939_ed


4. Place in oven and bake for 1 hour 15 minutes.

DSC_0944_ed


5. Remove from oven and let cool. Stir until smooth.

DSC_0945_ed

Sunday, May 17, 2015

Ambrosia Pie

DSC_0631_ed

Tippin's was a restaurant that served amazing pies and really good casual dining fare. My extended family often met there for birthday lunches or just to get together, especially when some of us would come home from college.  Sadly, Tippin's closed several years ago. One of my cousins Angie loved  their Ambrosia Pie. She remembers when she worked at Tippin's and would sneak some of the glaze as she made pies in the back of the restaurant. For her birthday a couple years ago, I decided to try to recreate this pie. I remembered it as a graham cracker crust, topped with a cheesecake-like filling (but softer than cheesecake), and covered with fruit that was coated in a sweet glaze.  I pieced together different components from multiple sources for this pie.  Everyone thought it was great, and it's pretty darn close to the original.  You can customize this pie to contain any combo of fruit you'd like, which is nice because it can be great for any season.  


Ambrosia Pie

Inspired by Tippins Restaurant

Graham Cracker Crust
5 graham crackers (full sheets)
5 tablespoons unsalted butter, melted and cooled
3 tablespoons sugar

Pulse graham crackers in a food processor.  Add butter and sugar and pulse until combined.  Press into a 9-inch pie plate and bake at 325 degrees for 13 - 18 minutes until fragrant and browned.  

Source: The Complete America's Test Kitchen TV Show Cookbook 

Cheesecake Filling
8 oz cream cheese
1/2 cup powdered sugar
1/2 teaspoon vanilla extract
1 tablespoon heavy cream
1 cup heavy cream (to be whipped with hand mixer)

1. Mix together cream cheese and powdered sugar in stand mixer or with hand mixer until smooth and creamy.  Stir in vanilla extract and 1 tablespoon heavy cream.

2. In a separate bowl, whip cream until peaks form.

3. Carefully fold whipped cream into cream cheese mixture.

4. Spread into crust and chill. 

Source: Adapted from Allrecipes.com

Fruit
~1 large peach
~1/3 cup blueberries
~6 large strawberries, diced
~2 kiwi, sliced into wedges
~1/3 cup red grapes, sliced in half

Fruit Glaze
1 cup water
1/2 cup sugar 
1 teaspoon clear vanilla extract (or regular)
1 tablespoon cornstarch (or more)
1/4 cup water
1 tablespoon lemon juice

1. Combine water, sugar, and vanilla in a saucepan over medium heat.  Bring to a simmer. 

2. Dissolve cornstarch in 1/4 cup water.  Add to the saucepan and stir.  Simmer a few minutes until thickened.  (Add more water/cornstarch if it's not getting thick).  Stir in lemon juice and cool glaze.

Source: Adapted from Ehow.com

To assemble pie:

1. Bake graham cracker crust and cool. 

DSC_0623

2. Fill shell with cheesecake filling mixture. 

DSC_0624

3. Top pie with diced fruit.

4. Brush warm glaze onto fruit.

5. Chill pie until ready to serve.


Enjoy!

DSC_0627


Wednesday, May 13, 2015

Ava's 2nd Birthday Party - Daniel Tiger

Ava was very into Daniel Tiger around the time of her 2nd birthday. She still likes DT, but has now has an obsession with Disney Princesses that overshadows the little tiger. Ava was still a little young to ask for a birthday party theme, so I chose Daniel Tiger for her.  I was able to find some cute, free printables and party ideas on the PBS Kids website. The bright colors that represent each DT character made it easy to find decorations consistent with the theme.

I used bright tissue paper to make tissue paper poufs and hung them with fishing line from tiny, clear 3M command hooks on the ceiling.  I kept the monthly picture banner from her 1st birthday and added the monthly pictures I took from 13 - 23 months, so every month of her first 2 years was represented above the dessert table.


Yellow boxed cake cupcakes with Easy Vanilla Buttercream and round candy sprinkles:


Pretzel rods dipped in melted orange candy melts (actually found these in the fall- pumpkin spice flavor!) with melted bittersweet chocolate drizzled on top for tiger stripes:


Tiny version of my grandma's butter cookies


I was really nervous about the cake, but I think it turned out really cute. Just a round, single-layer 9-inch boxed yellow cake covered with tinted Easy Vanilla Buttercream:


The trolley and penner banners on top were projects on the PBS Kids website. They provided instructions and free printables to complete:


Ava loved playing with her tiger balloons the day after the party!


Sunday, May 10, 2015

Ava's 1st Birthday Party - Penelope Bird Birthday


I never shared the photos from Ava's 1st Birthday almost 2 1/2 years ago! Her nursery was decorated with Pottery Barn Kids Penelope Birds, so I decided to use that theme for her party. My aunts had made some beautiful table runners and decorations using these birds for my baby shower and let me keep them to use for this party.


The cake was a boxed chocolate cake covered with Easy Vanilla Buttercream. I always used boxed cakes when I'm going to be decorating extensively.  I love how they taste, and they save me time when I know I will need to focus my energy on decorating.

I used royal icing to make the birds - just pipe the shapes onto waxed paper, let dry overnight, and carefully peel off. Store in an airtight container until ready to use.


 Mini-cupcakes made with batter from a boxed cake and topped with Easy Vanilla Buttercream:


 The entire dessert table.  I love how it turned out with the bright, fun colors!


Although she didn't enjoy us singing to her, Ava loved her smash cake!


  © Blogger template Brownium by Ourblogtemplates.com 2009

Back to TOP