Search This Blog

Showing posts with label Lime. Show all posts

Wednesday, September 8, 2010

Citrus-Glazed Butter Cookies

I hope everyone had a great Labor Day weekend! Bob and I hit up the Labor Day sales to buy some furniture for our new house. All I have been thinking of lately is furniture! So many decisions! Meanwhile, I was invited to do a product review for CSN Stores, and what is one of the focus of one of the many CSN stores - furniture! I have been browsing all of their kitchen tables and dining room sets to get a good idea of the styles we like. I even Googled "dining rooms" recently and CSN Stores came up!

As we get closer to Closing Day for our home, things are getting busier. Have I even started packing yet? NO!

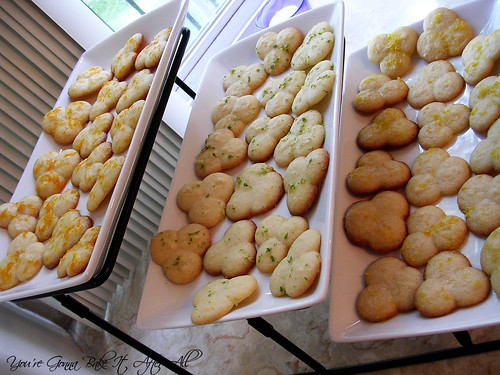
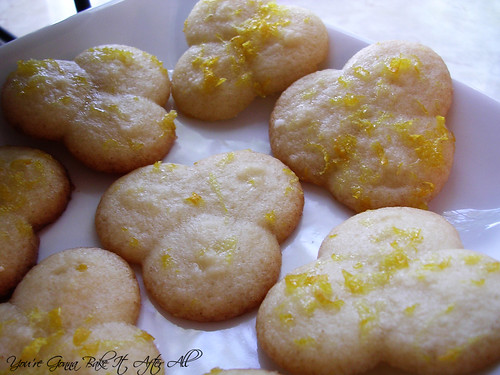
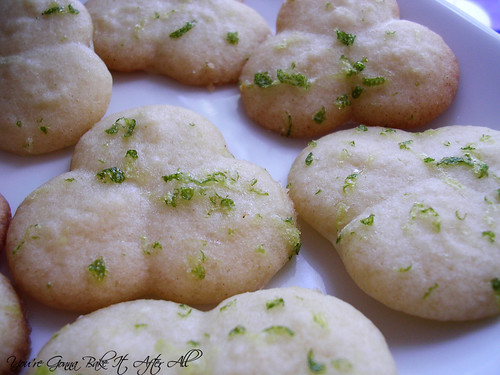
I wanted to share this quick recipe with you because it was a huge hit at the "Hello and Goodbye" party we held a few weeks ago. I have had this idea for a very long time, and finally forced myself to make it happen. The big Whole Foods in Chicago sells these incredibly delicious lemon-glazed butter cookies made at a local bakery - they tasted very much like my grandma's butter cookies with a lemon glaze. So, I figured why not try glazing my grandma's butter cookies with different citrus glazes - lemon, lime, and orange to be exact. The result - a delicious, citrusy, buttery cookie! These cookies are normally a little hard in texture but the glaze made them softer. Overall, the favorite citrus glaze of the night (because I asked of course!) was lime. I was a bit surprised but certainly agreed. The lemon and the lime were in close running, with the orange slightly behind because we decided it didn't have as prominent a flavor.

The glazing is as simple as can be and adds a new flavor and color to already amazing cookies!


DSCN6853_labeled

DSCN6847_labeled

DSCN6842_labeled

DSCN6845_labeled


Citrus-Glazed Butter Cookies

Ingredients:
1 cup powdered sugar, divided
1 lime, small
1 lemon, small
1 orange, small

Directions:
1. Prepare butter cookies as directed and let cool completely on wire racks.

2. Place 1/3 cup powdered sugar in each of 3 bowls. Grate some of the zest of each fruit into each bowl - the amount varies by personal preference, but I believe I used the zest from the whole lemon, the whole lime, and half of the orange.

3. Juice the lime, lemon, and orange separately.

4. Add each citrus juice to each bowl, a little at a time, stirring to observe consistency. You would like the glaze to run off the back of the spoon - not too thick. I used approximately the juice of 1 small lemon, 1 small lime, and 1/2 small orange - although I held back a little juice from each. This will depend on how 'juicy' your fruit is!

5. Place waxed paper under cookies on wire racks. Spoon glaze over cookies, making sure to distribute zest as evenly as possible. Let dry for several hours. Serve or store in an airtight container.

Source: Glaze adapted from Mini Baker


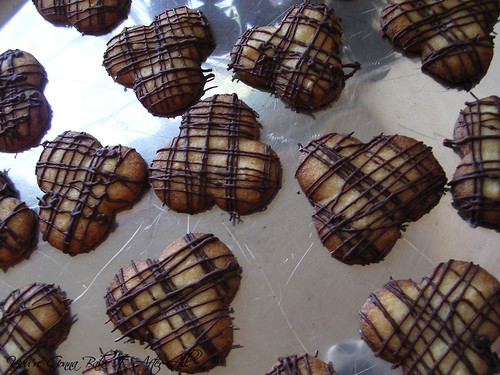
Some of the cookies got a little more done that I'd like, so I drizzled them with chocolate. These went fast!

DSCN6866_labeled

DSCN6864_labeled

Tuesday, June 8, 2010

Key Lime Bars

DSCN6578_labeled

In April, my dad gave my sister and I a surprise gift - the Complete America's Test Kitchen Cookbook TV Show Cookbook! I was so surprised and excited to start using this cookbook. Unfortunately, between wrapping up work and moving, I was only able to bookmark the recipes I wanted to try first and dream about making them. I decided my first recipe would be something I knew my dad would LOVE - Key Lime Bars! I finally got to make them for a barbeque at my parents' house Memorial Day weekend.

These bars are so delicious and perfect for summer! The have a prominent lime flavor that is nicely balanced by the sweetness of the cookie crust. I like the crunchiness of the toasted coconut on top, although some of my family members who don't like coconut chose to have their bars without it. The original recipe makes an 8 x 8-inch pan but states it can be easily doubled and made in a 13 x 9-inch pan. Since I made a double batch, I've provided the recipe for it below. If you make the single batch, just shave a few minutes off the baking time.

Key Lime Bars

Ingredients:
For the crust:
10 ounces animal crackers
6 tablespoons brown sugar
2 pinches of table salt
8 tablespoons (1 stick) unsalted butter, melted and cooled slightly

For the filling:
4 ounces cream cheese, at room temperature
2 tablespoons grated zest from 2 limes
2 pinches of table salt
2 14-ounce cans sweetened condensed milk
2 large egg yolks
1 cup fresh lime juice, from about 40 Key limes or about 6 Persian limes*

Optional garnish:
1 1/2 cups sweetened shredded coconut, toasted until golden and crisp

*I needed about 8 limes, but they were on the small side.

Directions:
1. Adjust an oven rack to the middle position and heat the oven to 325F.

2. Line a 13 x 9-inch baking pan with a double layer of foil, placed so that the foil extends beyond the sides of the pan to help lift the bars out when finished. Spray foil with vegetable oil spray.

3. For the crust, pulse the animal crackers in a food processor until broken down, about 10 pulses; process the crumbs until evenly fine, about 10 seconds. You should have about 1 1/4 cups crumbs.

4. Add the brown sugar and salt; process to combine, 10 to 12 pulses. If large lumps of sugar remain, break them apart with your fingers.

5. Drizzle the butter over the crumbs and pulse until the crumbs are evenly moistened with the butter, about 10 pulses.

6. Press the crumbs evenly and firmly into the bottom of the prepared pan. Bake until deep golden brown, 18 to 20 minutes. Cool on a wire rack while making the filling. Do not turn the oven off.

7. While the crust cools, in a medium bowl, stir the cream cheese, zest and salt with a rubber spatula until softened, creamy, and thoroughly combined.

8. Add the sweetened condensed milk and whisk vigorously until incorporated and no lumps of cream cheese remain; whisk in the egg yolks (I did this part using my stand mixer with the whisk attachment). Add the lime juice and whisk gently until incorporated. The mixture will thicken slightly.

9. Pour the filling into the crust; spread to the corners and smooth the surface with a rubber spatula. Bake until set and the edges begin to pull away slightly from the sides, 15 to 20 minutes.

10. Cool on a wire rack to room temperature, 1 to 1 1/2 hours. Cover with foil and refrigerate until thoroughly chilled, at least 2 hours.

11. Loosen the edges with a paring knife and lift the bars from the pan using the foil extensions; cut the bars into squares. Sprinkle with the toasted coconut and serve.

Source: Adapted from the Complete America's Test Kitchen TV Show Cookbook

Monday, March 15, 2010

Southwestern Roasted Chicken

This year I'm not doing any St. Patrick's Day recipes, but check out these previous posts: St. Patrick's Day Sugar Cookies, Grasshopper Pie, and Turkey Pastrami Reuben Sandwiches!


DSCN5230_labeled

I love roasting a whole chicken in the oven. The smell is amazing and, when cooked properly, the chicken is flavorful and juicy. I made Pam's Spicy Roasted Chicken last year for Easter, and it was such a hit that I quickly bookmarked her Southwestern Roasted Chicken as soon as it was posted.

This chicken is fantastic! It's so simple to make and the blend of spices is simply delicious. The leftovers are great for any Mexican dish - think quesadillas, enchiladas, Mexican Pizzas, tostadas, Tortilla Soup, you name it!

Southwestern Roasted Chicken

Ingredients:
1 4 - 5 pound chicken
Onion powder
Chili powder
Sea or Kosher salt
Freshly ground black pepper
Oregano
Cumin
Garlic Powder
1/2 sweet yellow onion, quartered
1 lime
6 cloves of garlic
Handful of fresh cilantro

Directions:
Preheat oven to 275F.
1. Clean chicken and pat dry. Squeeze half the lime juice on the outside of the bird and the other half inside the cavity. Sprinkle all of the seasonings evenly over the entire bird. Season the back first then flip it over and season the breast side.

2. Place onion and garlic inside the cavity along with the cilantro and used lime halves.

3. Place chicken on a roasting tray in a tinfoil lined baking dish. Place the meat thermometer in the thickest part of the thigh, making sure not to touch bone. Roast uncovered for 3 1/2 - 4 hours or until the meat thermometer reads 170 - 180 F (I think USDA says 165 is safe). To baste: begin basting bird after 2 hours and repeat every 1/2 hour after. This will yield a sticky and slightly crispy skin. If you want a crispy skin, don't baste the last hour and turn the heat up to 350F for the last 5 minutes of cooking.

NOTE: I think an oven safe instant-read meat thermometer is critical for perfect baked chicken. These times are just approximate, and ovens vary a lot (at least mine does!) I was short on time when I made this so I turned the heat up to about 375 - 400F and just monitored with my meat thermometer. I made sure that the skin didn't get too brown (if so, just cover with foil). It ended up cooking much faster and was perfectly moist and juicy, thanks to the thermometer!

4. Remove from oven and let the bird rest for at least 10 minutes before carving.

Source: Adapted from For the Love of Cooking

Tuesday, March 3, 2009

First Post!

For my first entry, I decided to post a 'Meghan Original' recipe!  Although, it's not exactly a recipe as much as a concept.  I was having lunch with my husband Bob at Foodlife in Water Tower Place.  Foodlife is a food court on steroids - it has many different stations, but all are somewhat unique and not your typical food court fare.  They have stir-fry, soup, Mexican, Italian, comfort food, and even desserts where they serve up freshly prepared crepes.  Only someone as picky as me would have to resort to sneaking in baos from Wow Bao in an unmarked bag since nothing at Foodlife sounded good to me on this particular day.  Bob was in line at the salad place, when I noticed that they have miniature desserts for sale, like tiny pieces of carrot cake for just $1.  One of the desserts was very intriguing - it was a slice of orange Jello, but it was inside of an orange peel.  How cool!  I started brainstorming about the possibilities:  lime Jello inside a lime, lemon Jello inside a lemon, ant then it hit me - watermelon Jello inside a lime so that it looks like a tiny watermelon!  Genius!  Ok, not quite, but I thought it had the potential to be pretty cute, so I made a prototype to send in to Kraft Food & Family magazine.  Here's what it looks like:
I followed the jiggler recipe, but didn't realize that it called for 4-3oz. boxes - I had only bought 1.  So I used 1/4 the amount of boiling water, and they turned out fine.  The color of the watermelon Jello is a bit lighter than I imagined, so if you're going for the most authentic looking presentation, I'd suggest using another flavor like cherry.  For some, I added brown sprinkles for the watermelon seeds, and the others are seedless.  I had to come up with something to do with all the lime juice, so I made some limeade.  Bob and I started thinking of other uses - like if you made these Jello snacks for a party, the lime juice could be used to make caipirinhas or mojitos.  Then Bob came up with a brilliant idea for an adult party - make the watermelon Jello snacks into Jello shots by using tequila (or vodka, rum, etc.) and then press course/kosher salt on the outside!  We haven't tried this, but I don't see why it wouldn't work.

I had 2 limes, so 4 halves, and had a little leftover from the 1 pkg. of Jello made the jiggler way, so that might give you a rough idea of the lime to Jello ratio for scaling up.  Here's the recipe as it now stands:

Watermelon Jello Jiggler Snacks

Ingredients:
Limes 
Pink or red Jello gelatin (any flavor, watermelon, cherry, etc.)
Decorations (optional)

Directions:
Slice limes lengthwise, and juice them completely.  Use kitchen sheers to remove the excess pulp/membranes from the insides of the limes.  Invert the lime halves on a paper towel to drain off any moisture, if necessary. Turn halves over and arrange them on a plate so they are ready to be filled.  Prepare Jello according to jiggler recipe on back of box.  Transfer mixture to a glass measuring cup (or you can even prepare it in the measuring cup!)  Gently pour the Jello into the lime halves.  Some may spill onto the plate, but it can easily be cleaned later.  If adding decoration, like sprinkles, add them now, or press them on after the Jello has set. Carefully transfer plate to refrigerator for at least 3-4 hours or until completely set.  If desired, slice limes lengthwise again to create the look of a watermelon slice. 

  © Blogger template Brownium by Ourblogtemplates.com 2009

Back to TOP