Search This Blog

Showing posts with label Thanksgiving. Show all posts

Sunday, November 1, 2015

New England Sausage and Dried Cranberry Stuffing

_NewEnglandStuffing

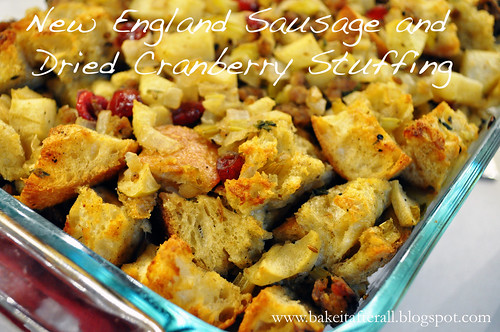
Now that Halloween is officially over, it's time to start getting our Thanksgiving menus together. We always have our traditional Thanksgiving Dressing on Turkey Day, but a few years ago when my we started having a December "Dickens Dinner" with my sister's family, I started making this New England Sausage and Dried Cranberry Stuffing. Since I don't eat pork, I substitute chicken or turkey sausage and even the pork-eaters love this stuffing. Whether you're looking for a new recipe for Thanksgiving or one of the many holiday dinners ahead of us, this recipe is worth trying!

New England Sausage and Dried Cranberry Stuffing

Serves 5 - 6 

Ingredients: 
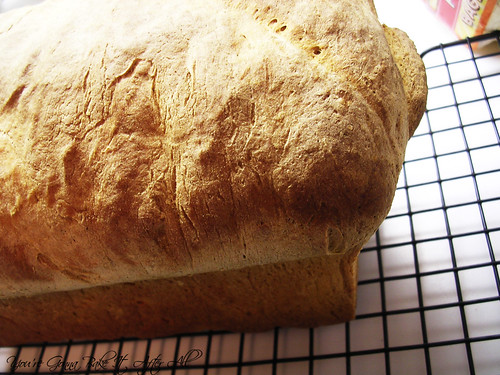
6 cups white bread, cut into 3/4-inch cubes
1/2 pound sausage, casings removed (traditional, chicken, or turkey)
1/4 stick butter
3 cups onion
1/2 pound tart green apples (or your choice), peeled, cored, chopped
1 cup celery, chopped
1/2 tablespoon poultry seasoning
1/4 cup dried cranberries
1 tablespoon dried parsley
1 1/2 eggs, beaten
3/4 cup chicken broth 

Directions:
1. Place bread cubes on a large baking sheet and bake until slightly dry, about 15 - 20 minutes. Cool completely. You can also leave the cubes out overnight to dry.

2. Sauté the sausage in a large skillet over medium-high heat until cooked through, crumbling coarsely with the back of a spoon, about 10 minutes. Using a slotted spoon, transfer the sausage to a large bowl. Pour off any drippings from the skillet.

3. Using the same skillet, melt the butter. Add the onions, apples, celery, and poultry seasoning to the skillet. Sauté until onions are softened, about 5 – 8 minutes.

4. Mix in dried cranberries. Add the mixture to the sausage, then mix in the bread, eggs, and parsley. Season stuffing to taste with salt and pepper. Add the chicken broth to moisten stuffing depending on how most you like it (can be prepared one day ahead. Cover and refrigerate).

5. Butter a baking dish (I used a 7 x 11-inch glass dish). Transfer stuffing to the dish, cover, and bake at 350F until heated through, about 45 minutes. Uncover and bake until top is golden brown, about 15 minutes.

Source: Adapted from The Food Channel.com

Notes: I halved the original recipe, which serves 10. It calls for 4 teaspoons of chopped fresh rosemary (so that would be 2 teaspoons for the half batch) and the parsley to be fresh. Due to personal preference, I omitted the rosemary and substituted dried parsley.

Sunday, November 24, 2013

Thanksgiving Dressing


Some families have the same meal every Thanksgiving, using the same tried-and-true recipes year after year; while other's menu is constantly evolving to include new twists on classic dishes. For many years, my family's Thanksgiving was the former: the menu never changed. As Bob and I started hosting Thanksgiving at our house 3 years ago, we have tweaked the menu slightly- not eliminating dishes but rather adding a few of our own (like these Mashed Potatoes with Root Vegetables, Compound Herb Butter, and Honey Butter-YUM!) Each year we learn more about which dishes need tweaking and how to better execute the meal. One thing that we will never mess with is our traditional Thanksgiving Dressing. Dressing is basically "stuffing" that is cooked in a separate dish, not in the turkey. For that reason, it can get a crispy top and edges depending on how you bake it, which I think is one of the best parts! My family has never made stuffing in a turkey (and now it's actually not recommended because you either undercook your stuffing or overcook your bird). Our dressing recipe is very basic - no organ meat, sausage, or other fancy add-ins. It's actually the simplicity that I love, and it's one of my favorite dishes at Thanksgiving. My mom and my aunt got this recipe from their mother and have each adapted their own way to make it. I've taken each of their recipes and combined them into one master recipe. This dressing was designed to go well with chicken or turkey, so it's the perfect side dish any time of year!  

Thanksgiving Dressing

Ingredients:
1 stick butter                                               
¾ cup onion, diced small                                   
1 cup celery (boiled and diced small)   
1 loaf white sandwich bread (frozen and cubed into ½-inch cubes- crust and all)                                
1 tsp. salt                                                    
½ tsp. pepper
2 tsp. poultry seasoning
¾ cup celery water, hot
¾ cup chicken stock, hot

Directions:
1. Boil pieces of celery until soft. Remove strings.
2. Chop celery and onion into small dice.
3. Melt butter in pan, sauté onions and celery until onions are soft. 
4. Combine the celery water and chicken broth in a measuring cup, making sure it is hot (heat it up if it’s not).
5. Add bread cubes to a large bowl/pan, add the salt, pepper, and poultry seasoning.  Add the cooked onion/celery mixture and the hot celery water/chicken stock.  Stir until the bread is moist.  It is better to have the bread too moist than not enough because it will be baked.
6. Spoon the bread mixture into a pan. Do not flatten it out – leave little hills and valleys for the turkey juice or gravy to settle into.
7. Bake covered at 350F for around 40 minutes, then uncover for the last 20 minutes to brown (cook time total of 1 hour).  You may also add gravy to the top intermittently during the baking process, but not the last 20 minutes because you're looking to get that crispy top.

Notes:  Aunt Suey always doubles this recipe for Thanksgiving.  The dressing needs at least 1 hour in the oven depending on how deep the pan is.  Cook at 400F for a double batch. 

Source: Adapted from my Aunt Suey and my Mom


Thursday, November 3, 2011

Pumpkin Yeast Bread


This is an oooold recipe - meaning that I made it a long time ago. In fact, these photos were taken in my apartment kitchen in Chicago . . . in December 2009! By the time I loaded them on my computer, pumpkin season was pretty much over. I planned to post this recipe last fall but never did. So here we are.

This is a really good bread recipe - just a hint of sweetness and a mellow pumpkin flavor. It's great for the leftover turkey sandwiches that we all love to enjoy throughout the holidays. I plan to make this again this year and follow Annie's example of creating a Thanksgiving leftover panini - yum!
Pumpkin Yeast Bread

Ingredients:

1/2 cup warm water

1 1/2 tablespoon instant yeast

2/3 cup warm milk

2 large eggs

1 1/2 cups pumpkin puree

2 tablespoons vegetable oil

1/2 cup brown sugar

2 teaspoons salt

1/2 teaspoon ground cinnamon

1/4 teaspoon ground ginger

1/4 teaspoon ground nutmeg

Dash of ground cloves

6 1/2 cups bread flour (approximately)

Directions:

1. In the bowl of an electric mixer fitted with the paddle attachment, combine the warm water and yeast. Add in the milk, eggs, pumpkin, oil, brown sugar, salt, and spices. Mix briefly to combine.

2. Add 4 cups of the bread flour to the bowl, and mix until a sticky dough has formed. Switch to the dough hook. With the mixer on low speed, gradually add the remaining flour until you have a dough that is smooth and elastic, and not sticky.

3. Transfer the dough to a well-oiled bowl, turning once to coat the dough. Cover the bowl with a damp kitchen towel and let the dough rise until doubled in size, about 1 hour.

4. Turn the dough out onto a lightly floured work surface. Divide in half. Press each pieces into a rectangle about 1 inch thick and no longer than 9 inches long. With the long side of the dough facing you, roll the dough firmly into a cylinder, pressing down to make sure the dough sticks to itself. Turn the loaf seam-side up and pinch the seam closed. Place the loaves in two well-oiled 9 x 5-inch loaf pans and press down gently so the dough touches all four sides of the pan. Cover with a towel and let rise until almost doubled, about 45 minutes.

5. Preheat the oven to 375F. Bake the loaves for about 30 minutes, or until an instant-read thermometer inserted into the loaf reads 190F. Transfer to a wire rack and let cool.

Source: Annie's Eats, originally adapted from King Arthur Flour

Monday, October 31, 2011

Honey Butter

DSCN7329_labeled

Wow, there's a lot of 1's in the date today...and just think about what it will be like in 10 days!

Last year, Bob and I hosted our first Thanksgiving. Because my family's Thanksgiving menu has remained virtually unchanged for 30+ years, I had to be creative with how I would add my personal touch to the meal without sacrificing the dishes we've all come to expect and love. A few years ago, the amazing Annie posted some compound butters that she served at her first Thanksgiving. I thought this was a fantastic idea! No one would mind having a few extra choices to add to their roll, so it was a great opportunity for me to add a little something extra without causing a scene :-)

I found this honey butter recipe of Alton Brown's. I loved that it had cinnamon and some extra flavors. As I mentioned last year when I posted the delicious Herb Butter that these butters were my brother-in-law's favorite part of the entire meal! Either the butters were that good, or the meal was that bad (just kidding! We have our dishes down to a science at this point!)

Compound butters are not only great for holidays but there are nice way to add a little something extra to a dinner party or a small, intimate gathering with friends. Plus, they are so completely easy to make!

Honey Butter

Ingredients:
8 tablespoons (1 stick) salted butter, cut into chunks
1 tablespoon honey
1/8 teaspoon ground cinnamon
1/4 8 teaspoon vanilla extract

Directions:
1. To loosen the butter, place butter into the bowl of a mixer (or you may use a hand mixer) and beat at low speed using the whisk attachment.

2. Increase the speed to medium and add the honey, cinnamon, and vanilla extract and beat until well combined, about 5 to 7 minutes.

3. Remove butter from bowl and spoon onto parchment paper or plastic wrap. Roll into a log and refrigerate for at least 2 hours. Alternatively, use decorative tip and piping bag to pipe butter into small dishes, cover with plastic wrap, and refrigerate for at least 2 hours.

Friday, March 4, 2011

Homemade Turkey Soup

DSCN7919_labeled

DSCN7924_labeled

Turkey soup is one of my favorite winter meals. It just screams cold weather to me, and nothing is as warm and comforting as a big bowl of this soup. Whether you come down with a bad cold virus or come in from a day of playing in the snow, this soup is the perfect remedy.

After hosting our first Thanksgiving, I was completely wiped out and the thought of making turkey soup was too daunting to tackle, but I absolutely could not give up the opportunity to make my beloved turkey soup. I threw the turkey carcass in the freezer and saved it for another day. On one of my days off after Christmas, I invited my mom over to teach me how to make her turkey soup. She doesn't have a written recipe, so I tried to document what we did along the way.

Much of this recipe is adaptable to your personal taste; put in what you like! I like to just make enough of the soup with noodles for one meal to avoid the noodles getting overly soft. I love the texture of al dente wide egg noodles in this soup. Cooking the noodles in the soup itself gives them a fantastic flavor, adds a little starch to the broth, and omits the use of an extra pot - added bonus! As I mentioned earlier this week, it may be March but I'm not convinced the winter weather is behind us, so there are plenty more turkey soup days left!

Homemade Turkey Soup

Ingredients:
For the stock:
1 tablespoon oil (I used extra-virgin olive oil)
4 carrots, peeled and rough chopped
2 sweet yellow onions, rough chopped
5 ribs of celery with tops, rough chopped
1 tablespoon kosher salt
1/2 teaspoon ground pepper
leftover turkey parts, with some meat left (I had the carcass of a 22 pound turkey)
chicken bouillon, optional
parsley (dried or fresh), thyme, poultry seasoning, to taste

For the soup:
Amount vary according to taste:
carrots, cut lengthwise then chopped into 1/4" thick slices (or however you prefer)
yellow onion, chopped
celery, chopped (optional)
wide egg noodles

Directions:
1. Make the stock: In a 10-quart stock pot, heat the oil over medium heat. Add the carrots, onions, celery, salt, and pepper. Cook until vegetables are softened slightly.

2. Add the turkey parts and fill the pot to the top with water. Heat to a simmer, then reduce heat to maintain a simmer for approximately 2 hours or more.

3. Using a fine-mesh strainer set over a large bowl, pour the stock into the strainer to remove vegetables and turkey parts. Return the stock to the pot and set aside.

4. Assemble the soup: Carefully pick through the stock solids/turkey parts to remove the turkey meat. Add it back to the stock. At this point, add any other veggies you would like in your soup (I added a little yellow onion and some carrots). Season to taste with poultry seasoning, thyme, parsley, salt, and/or pepper. If the stock lacks a bold poultry flavor, you may add some chicken bouillon to bump it up (I did not have to do this).

5. Return pot containing soup to a burner and heat to a simmer until veggies are cooked through. Remove the pot from heat, let cool slightly, then place in refrigerator. The fat will rise to the top of the soup and can be skimmed off later.

6. Finish the soup: When ready to eat the soup, make sure fat has been skimmed off, add as much soup as you'd like to a pot and heat to a boil, add dry egg noodles and cook until al dente. Taste to make sure seasoning is to your liking, and serve soup immediately. The longer the soup sits, the softer the noodles will be.

Source: My mom

DSCN7926_labeled

Tuesday, November 30, 2010

Compound Herb Butter

DSCN7340_labeled

Well it's been quite a while since my last post! I hope everyone had a great Thanksgiving! Bob and I hosted our first Thanksgiving last week. We also had out of town guests and a surprise baby shower at our house this weekend. Overall, everything went well! It was a bit overwhelming getting the house ready in time, but it was worth the effort.

I have many posts to share from the last few weeks, but I wanted to post this amazing compound herb butter first because, although it would be great anytime, it is especially perfect for any holiday gathering involving bread or rolls.

I first tried this recipe last Christmas, and I used unsalted butter and kosher salt to taste. I accidentally over-salted the butter, so this time I decided to just stick with salted butter and save myself the trouble of taste testing butter multiple times :)

I was really happy with the outcome, and many of the guests commented on how much they liked the herb butter. In fact, my future brother-in-law stated that the butters (another one to be shared soon!) were his favorite part of the entire meal! We still have some of both varieties in the fridge that we've been enjoying each day since Thanksgiving!

Compound Herb Butter

Ingredients:
1 stick (8 tablespoons) salted butter, at room temperature
1 clove garlic, very finely minced or put through a garlic press
1 tablespoon fresh basil, finely minced
1 teaspoon fresh dill, finely minced
1 teaspoon fresh thyme, finely minced
Freshly ground black pepper, to taste

Directions:
1. Combine all ingredients in a small bowl.

2. Mix well with a spoon until combined and all ingredients are evenly incorporated.

3. To serve, pipe butter into small serving dishes with a decorative pastry tip (I used a large star tip). Alternatively, place the butter mixture onto plastic wrap, form into a log, and wrap tightly.

4. Freeze or refrigerate butter until ready to serve. Allow to come to room temperature before serving so it is spreadable.

Source: Adapted from Annie's Eats

Monday, February 8, 2010

Herb-Roasted Turkey Breast

This year Bob and I hosted a Christmas celebration in Chicago for his parents the weekend before Christmas. This was my first holiday dinner, and really my first big dinner where I was responsible for the entire meal. I was so excited but very nervous. I knew I wanted to make a turkey breast, since there were just 4 of us, but I had never made one before. My 'practice' turkey breast was a flop because we accidentally bought a turkey breast roast, which is boneless, and I'm convinced it was injected with saline or something because it was overly salty.

In searching for a fool-proof recipe for the turkey breast, I found this one of Ina Garten's that had 5 stars on Food Network - there were SO many overwhelmingly positive reviews, I couldn't pass it up. This turkey was so incredible - it was juicy (thanks to my remote control digital meat thermometer!) and so flavorful. I think rubbing the herb paste underneath the skin is key - it allows the flavors to penetrate the meat. I made a gravy to go with this (ok by "made" I mean opened a can and added some bourbon!) but I ate mine plain - it was that juicy and good.

One of my reasons for serving it with gravy, instead of pan juices like the recipe suggests, was two-fold: 1) Bob's favorite food is gravy (sadly not kidding) and he would be devastated without it, and 2) reviewers on Food Network noted that they had to keep adding wine or water to the pan and it would keep evaporating so they weren't left with much pan juice in the end. I had a similar issue - the pan juices browned and stuck to the pan as the 'juice' dissipated. If you'd like to use the pan juices for the turkey (which I'm sure would be delicious given the herbs, lemon juice, and wine), I recommend adding much more wine or water or a combination, then checking occasionally and adding more as needed. Yes, the holidays are over, but a turkey breast can be great any time of year, especially if you use the leftovers to make turkey soup, one of my favs!

Sorry no pic of the intact bird - things were a little hectic!


A boneless turkey breast I made in January:

Herb-Roasted Turkey Breast

Note: This recipe is for a bone-in turkey breast, but I have since made it again using a boneless turkey breast and it came out fantastic as well. Use what you like!

Ingredients:
1 whole bone-in turkey breast, 6 1/2 - 7 pounds (mine was almost 8)
1 Tablespoon minced garlic (3 cloves)
2 teaspoons dry mustard
1 Tablespoon chopped fresh rosemary leaves (I used 1 teaspoon dried)
1 Tablespoon chopped fresh sage leaves
1 Tablespoon chopped fresh thyme leaves
2 teaspoon kosher salt
1 teaspoon freshly ground black pepper
2 Tablespoons good olive oil
2 Tablespoons freshly squeezed lemon juice
1 cup dry white wine
water

Directions:
Preheat oven to 325F.
1. Wash turkey breast and pat dry with paper towels if desired. Place the turkey breast, skin side up, on a rack in a roasting pan.

2. In a small bowl, combine the garlic, mustard, herbs, salt, pepper, olive oil, and lemon juice to make a paste.

3. Loosen the skin from the meat gently with your fingers and smear half of the paste directly on the meat. Spread the remaining paste evenly on the skin. Pour the wine into the bottom of the roasting pan. Note: At this point you may want to add extra wine or water to the pan because, as I indicated above, the liquid evaporates rather quickly.

4. Roast the turkey for 1 3/4 - 2 hours (or longer if it's bigger), until the skin is golden brown and an instant-read thermometer registers 165F when inserted into the thickest and meatiest areas of the breast (test several places to be sure). Note: If the skin is over-browning during the cooking process, cover the breast loosely with aluminum foil.

5. When the turkey is done, cover with foil and allow it to rest to room temperature for 15 minutes. Slice and serve with the pan juices spooned over the turkey, or with gravy.

Source: Adapted from Ina Garten

Wednesday, November 4, 2009

Fluffy Pumpkin Dip with Cinnamon Tortilla Cutouts

Here is another recipe I had made for Thanksgiving brunch last year. I just thought it was so adorable when I saw it on Leslie's blog, The Hungry Housewife. I'm really into using food as serving dishes, so this was right up my ally. Plus, the Cinnamon Tortilla Cutouts are so ridiculously cute! I have a bunch of fall-themed cookie cutters that I knew would be perfect for this sort of thing. My family really liked the dip, and especially liked the Cinnamon Tortillas. I may just make this again at our Thanksgiving Day brunch this year. I recommend this recipe for any fall-themed party!
(Pictures taken by my Dad last year!)

Fluffy Pumpkin Dip

Ingredients:
1 16-ounce container of cool whip, thawed
1 5-ounce packet of instant vanilla pudding
1 15-ounce can pure pumpkin puree
1 1/2 teaspoons pumpkin pie spice
1/2 teaspoon vanilla extract
1 pie pumpkin, hollowed, for serving (if desired)

Directions:
1. In a large bowl, mix together the pudding, pumpkin, pumpkin pie spice, and vanilla. Gently stir in the cool whip. This will take about 5 minutes to get a smooth texture.

2. Add dip to the hollowed pumpkin and serve with fruit and Cinnamon Sugar Tortillas (see below).

Cinnamon Sugar Tortilla Cutouts

Ingredients:
Flour tortillas
Cinnamon sugar
Butter flavored cooking spray

Directions:
Preheat oven to 350F.
1. Use cookie cutters or cut tortillas into desired shapes. Place them on a lined baking sheet.

2. Spray tortillas with butter flavored spray and sprinkle with cinnamon sugar as desired. Spray again to make sure the cinnamon sugar adheres.

3. Bake for 10 minutes or until lightly browned.

Monday, September 28, 2009

The Great Pumpkin Bread-Off!

My friend Kathleen and I like everything pumpkin. Our favorite season is fall, and as soon as September rolls around, we break out our Sweet Cinnamon Pumpkin lotion and look forward to the pumpkin-filled treats to come. We both love this chocolate chip pumpkin bread we found years ago at Breadsmith, but this year I found out that the location near us had closed. I had one recipe for pumpkin bread that I've made a few times, and another one saved to make, so we decided to have a Bread-Off (rather than a Bake-Off) with the two recipes. We held the contest on our way to the apple orchard - which has the best cinnamon apple donuts ever by the way! It was a sugary day to say the least...

I'm mixed on my feelings about having chocolate chips in pumpkin bread - on one hand the combination of chocolate and pumpkin is a great; on the other, I think the chocolate distracts from the purity of the pumpkin. In the end, I decided to include chocolate chips in both breads, so the experiment was controlled. I should also mention that only I knew which bread was which and what components went into the breads; my two tasters (Kathleen and Bob) knew nothing going into it :)

Each original recipe makes 2 large loaves, so I just cut the recipes in half and made 1 loaf of each. The first time I made pumpkin bread, I used applesauce instead of the oil - to be honest, it wasn't nearly as good. I'd rather use the oil and just eat less!

I cannot even tell you how hard it was for me to find the pumpkin puree!!! So hard that this bread-off almost didn't happen. I went to two of the big chain grocery stores with no luck, and finally found some organic pumpkin puree at Whole Foods (for $3 a can - what the?!) Dominick's had canned pumpkin pie mix, but no thank you - I prefer to spice my pumpkin myself!

One of the recipes recommends making the bread a day ahead for best flavor. I've tried this before and happen to agree, so that's what I did with both loaves. As I was making the breads, I realized that these recipes are veeerrrry similar, and that made the tasting a little difficult. However, I think we were able to declare a winner. See below for the results!

Downeast Maine Pumpkin Bread (Bread A)

Recipe for 1 loaf.

Ingredients:
1/2 a 15-ounce can pumpkin puree
2 eggs
1/2 cup vegetable oil
1/3 cup water
1 1/2 cups white sugar
1 3/4 cups all-purpose flour
1 teaspoon baking soda
3/4 teaspoon salt
1/2 teaspoon ground cinnamon
1/2 teaspoon ground nutmeg
1/4 teaspoon ground cloves
1/8 teaspoon ground ginger
1/2 cup semi-sweet chocolate chips, optional

Directions:
1. Preheat oven to 350F. Grease and flour one 9 x 5-inch loaf pan.

2. In a large bowl, mix together pumpkin puree, eggs, oil, water, and sugar until well blended.

3. In a separate bowl, whisk together the flour, baking soda, salt, and spices, and then stir in the chocolate chips if using.

4. Stir the dry ingredients into the pumpkin mixture until just blended. Pour into the prepared pan.

5. Bake for about 50 minutes. Loaf is done when toothpick inserted in center comes out clean.

Source: Adapted from Allrecipes.com

RESULT: Both tasters liked this bread. They both noted that it has good spice and was very moist.


Pumpkin Pie Bread (Bread B)
Recipe for 1 loaf.

Ingredients:
1 3/4 cups all-purpose flour
1 teaspoon baking soda
1/2 teaspoon baking powder
1 1/2 teaspoons pumpkin pie spice
1/2 teaspoon salt
1 1/2 cups white sugar
1/2 cup vegetable oil
2 eggs
1/2 a 15-ounce can pumpkin puree
1/4 cup water
1/2 cup semi-sweet chocolate chips, optional

Directions:
1. Preheat oven to 350F. Grease and flour one 9 x 5-inch loaf pan.

2. Sift together the flour, baking soda, baking powder, salt, and pumpkin pie spice, then stir in chocolate chips, if using. Set aside.

3. In a large bowl, beat together sugar, oil, eggs, and pumpkin. Stir in flour mixture alternately with water. Add batter to prepared pan.

4. Bake in oven for 50-60 minutes, or until toothpick inserted into center comes out clean. For best flavor, store wrapped in plastic wrap at room temperature for a full day before serving.

Source: Adapted from Allrecipes.com

RESULT: Both tasters again agreed that this is a moist bread. Kathleen thought it had more of a "pumpkin" taste, perhaps because it didn't have the same 'spiciness' as the other bread.


OVERALL RESULTS: Although these breads are almost too similar to compare, the winner is Bread A - the Downeast Pumpkin Bread. Overall, the tasters felt it had more of the "spice" one looks for in a pumpkin bread. I think that's because this bread has the spices added individually, rather than the premade pumpkin pie spice blend. Maybe that's why it has 5/5 stars from over 2,721 reviewers on Allrecipes!!!

  © Blogger template Brownium by Ourblogtemplates.com 2009

Back to TOP