Search This Blog

Tuesday, November 30, 2010

Compound Herb Butter

DSCN7340_labeled

Well it's been quite a while since my last post! I hope everyone had a great Thanksgiving! Bob and I hosted our first Thanksgiving last week. We also had out of town guests and a surprise baby shower at our house this weekend. Overall, everything went well! It was a bit overwhelming getting the house ready in time, but it was worth the effort.

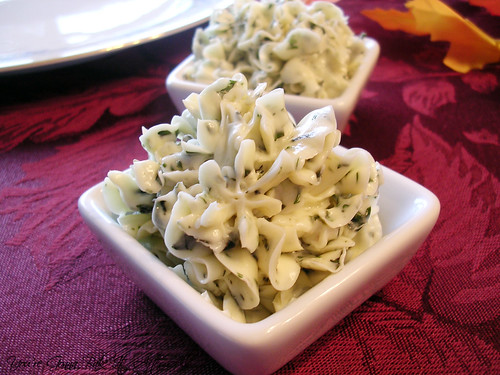
I have many posts to share from the last few weeks, but I wanted to post this amazing compound herb butter first because, although it would be great anytime, it is especially perfect for any holiday gathering involving bread or rolls.

I first tried this recipe last Christmas, and I used unsalted butter and kosher salt to taste. I accidentally over-salted the butter, so this time I decided to just stick with salted butter and save myself the trouble of taste testing butter multiple times :)

I was really happy with the outcome, and many of the guests commented on how much they liked the herb butter. In fact, my future brother-in-law stated that the butters (another one to be shared soon!) were his favorite part of the entire meal! We still have some of both varieties in the fridge that we've been enjoying each day since Thanksgiving!

Compound Herb Butter

Ingredients:
1 stick (8 tablespoons) salted butter, at room temperature
1 clove garlic, very finely minced or put through a garlic press
1 tablespoon fresh basil, finely minced
1 teaspoon fresh dill, finely minced
1 teaspoon fresh thyme, finely minced
Freshly ground black pepper, to taste

Directions:
1. Combine all ingredients in a small bowl.

2. Mix well with a spoon until combined and all ingredients are evenly incorporated.

3. To serve, pipe butter into small serving dishes with a decorative pastry tip (I used a large star tip). Alternatively, place the butter mixture onto plastic wrap, form into a log, and wrap tightly.

4. Freeze or refrigerate butter until ready to serve. Allow to come to room temperature before serving so it is spreadable.

Source: Adapted from Annie's Eats

Monday, November 15, 2010

"P.F. Chang's" Lettuce Wraps

DSCN7269_labeled

Years ago, I started hearing about the lettuce wraps at P.F. Changs. I believe the first time was when I was at a salon chatting with the girl who was washing my hair. She got really excited when she spoke of the P.F. Chang's lettuce wraps. I thought this was really odd because a "lettuce wrap" sounded so unappealing to me. I figured it was a fallout from the Atkins/South Beach craze.

When we moved in May, we received a coupon for free lettuce wraps at a nearby restaurant Pei Wei, which we soon discovered is a sister company of P.F. Chang's. Importantly, Pei Wei's lettuce wraps are the same as the popular ones from P.F. Chang's!

We quickly made a stop there for for dinner, and I was blown away by the lettuce wraps! They are SO good - very flavorful with a nice balance of crunch. We then went back again...and again...and each time I ordered the lettuce wraps as my meal. Now that we've moved and are no longer close to Pei Wei, I knew I had to devise a way to get in my lettuce wrap fix. Also, as delicious as they were, it was obvious that they use a heavy hand with the oil, as is true for most restaurants.

This copycat of P.F. Chang's/Pei Wei's lettuce wraps is really delicious, and nearly spot on. The restaurant uses ground chicken; whereas, this recipe simply has you cut chicken breast into small pieces, which I prefer anyway. The flavors are very similar but being able to control the amount of oil (and salt!) is the great benefit of making it at home. I just love the combination of ingredients - chicken with chopped mushrooms and water chestnuts. I usually hate mushrooms, but I think because they are chopped so small and sauteed in a sauce they impart more texture than flavor. The water chestnuts add some crunch, which I love. We will definitely be making these again, especially now that I've purchased several of these condiments!

"P.F. Chang's" Lettuce Wraps

Ingredients:
For the wraps:
2 tablespoons oil of choice, divided (we used Canola)
2 boneless skinless chicken breasts
1 cup water chestnuts
2/3 cup mushrooms
3 tablespoons chopped onion
1 teaspoon minced garlic
4-6 iceberg lettuce leaves

For the special sauce:
1/4 cup sugar
1/2 cup water
2 tablespoons soy sauce (we use reduced sodium)
2 tablespoons rice wine vinegar
2 tablespoons ketchup
1 tablespoon lemon juice
1/8 teaspoon sesame oil*
1 tablespoon hot mustard*
2 teaspoons hot water
1 - 2 teaspoons garlic and red chile paste*

For the stir fry sauce:
2 tablespoons soy sauce (we use reduced sodium)
2 tablespoons brown sugar
1/2 teaspoon rice wine vinegar

*I found all of these in the Asian section of my grocery store

Directions:
1. Make the special sauce by dissolving the sugar in the water in a small bowl. Add the soy sauce, rice wine vinegar, ketchup, lemon juice, and sesame oil. Mix well and refrigerate sauce until ready to serve.

2. Combine the hot water with the hot mustard and set this aside as well.

3. Bring 1 tablespoon oil to high heat in a wok or large frying pan. Saute chicken breasts for 4 to 5 minutes per side until done; remove from pan to cool. Keep oil in pan and keep hot.

4. While the chicken cools, mince the mushrooms and water chestnuts to the size of small peas.

5. Prepare the stir fry sauce by mixing the soy sauce, brown sugar, and rice vinegar together in a small bowl.

6. Mince the cooled chicken to the sized of small peas.

7. With the pan still on high heat, add the other tablespoon of oil. Add the chicken, garlic, onions, water chestnuts, and mushrooms to the pan. Add the stir fry sauce to the pan and saute the mixture for a couple minutes.

8. To complete the "special sauce," add your desired measurement of the mustard and garlic chili sauce to the special sauce mixture to reach preferred spiciness.

9. Serve the chicken mixture in the lettuce cups and top with "special sauce" as desired.

Source: Adapted from Food.com

Tuesday, November 9, 2010

Fly Cookies - Both Butter and Dragon

DSCN6900_labeled

I mentioned in my last post that I had a few sets of decorated sugar cookies to share. I made this batch for my cousin's little girl Hailey's 6th birthday at the beginning of September. Why did I wait so long to post? I guess you could say I've been a bit busy and forgot!

DSCN6903_labeled

DSCN6907_labeled

DSCN6896_labeled

DSCN6892_labeled

DSCN6888_labeled

DSCN6886_labeled

DSCN6883_labeled

DSCN6881_labeled

My aunt gave me this neat dragonfly cookie cutter, and a new butterfly, so I made a variety of shapes. I used the same principles as the original Butterfly Cookies post, but this time I decided to do letters and numbers - her name and age to be exact. To do this, I made dots of icing and then ran the toothpick through to create her name and age in little tiny hearts. Hailey's favorite color is pink and my favorite color is purple, so I used those and threw in some yellow to compliment. I love the look of the black outline and design with these cookies - I think it really accentuates the colors. As always, these cookies were so fun to make and a true creative outlet! Hailey loved these and so did the rest of the family. Look for more sugar cookies to come!

  © Blogger template Brownium by Ourblogtemplates.com 2009

Back to TOP