Search This Blog

Sunday, December 27, 2009

NYE Ideas: Party Snacks

I hope everyone is having a very Happy Holidays!!! Like I've mentioned before, on Christmas Eve my family has an appetizer party instead of dinner. I decided to post the menu now because any of these recipes would be great for upcoming New Year's Eve parties. My mom and I went a bit overboard for 15 people, but there were surprisingly few leftovers! As obvious from this list, I love dips! Sometimes I joke that dip is my favorite food - it's so versatile in terms of the type of dip and the things you can dip in it :)

I've provided a brief explanation below with each item and a picture or link. I've been so busy in St. Louis with family and apartment hunting for our move in May/June (we put a deposit down on a townhome this week!!!). Needless to say, I haven't been a good blogger lately in terms of posts and keeping up with Google Reader. Hopefully I will be back in full force in January. I hope you all have a wonderful New Year's!

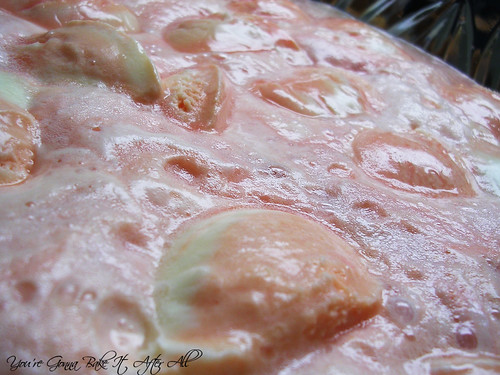
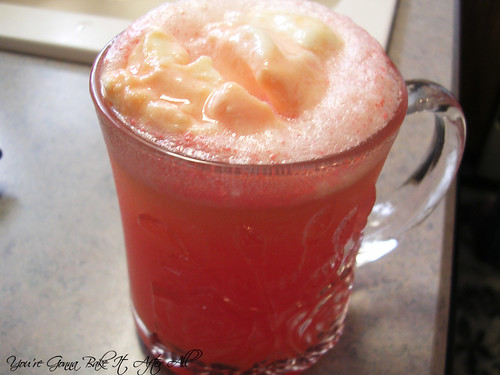
Christmas Punch


Each year we always make this punch on Christmas Eve, and we have the leftover punch with brunch on Christmas morning. In respect of the kids, this punch is always kept non-alcoholic, although each individual is welcome to add some alcohol to his/her own cup (this year my cousins' used Amaretto and thought it was a great combination!)

Christmas Punch is always a favorite, and everyone looks forward to it. It is super sweet, but absolutely delicious. Kids love it - why wouldn't they, it has about 5 pounds of sugar! But it's Christmas so it's ok! You can even try playing around with the amount of extra sugar added - the recipe calls for 1 cup, but I'm sure you could reduce it (or even eliminate it altogether) because of all the other fruit juice sugars.

Ingredients:
1 package cherry Koolaid
1 cup sugar
1/2 large can (~6 ounces) frozen orange juice
1/2 large can (~23 ounces) pineapple juice
3 ounces lemonade concentrate
2 quarts (8 cups) water
7 ounces ginger ale
1/2 quart orange sherbet

Directions:
1. Combine the first 6 ingredients in a punch bowl.

2. Scoop the orange sherbet, and plop onto the punch.

3. Pour the ginger ale over the sherbet to make a nice, bubbly foam.

4. Serve and enjoy!

Source: My parents' friend Jeanette A.

Stuffed Strawberries


I've seen these on several blogs, and I know they are a popular party snack. I started doing them the way that the recipe and comments on Allrecipes suggest, then my mom showed me how to stuff them from the stem side, which is how she's seen them before - I actually thought these looked better! I did both for the platter to give a variety. These were a big hit!

Ingredients:
1 quart fresh strawberries
8 ounces cream cheese, softened
1/2 cup powdered sugar

Directions:
1. Beat together cream cheese and powdered sugar with electric mixer or by hand.

2. Wash and dry the strawberries. Either make a criss-cross cut down each strawberry starting at the pointed end and ending shortly before the stem, OR hull the strawberry and use a paring knife to make small hole in the strawberry where the stem was.

3. Add the cream cheese mixture to a piping bag with a star tip. Pipe into each strawberry. Serve on a platter.

Source: Adapted from Allrecipes.com

Dill Dip in Rye Bread Round

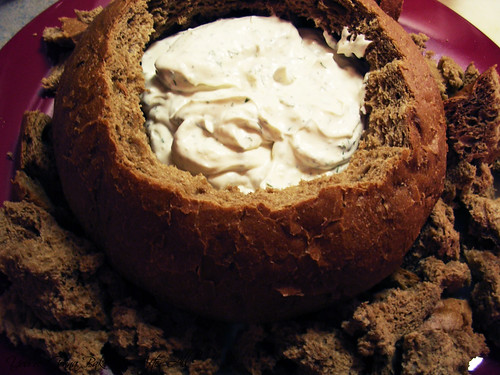
This is a popular recipe but always a must for us on Christmas Eve - it's soooo delicious! This year I had some leftover fresh dill, and it was a nice touch. Not necessarily much different than dried dill though, so use what's more convenient. If you've never had this dip, you must try it!

Ingredients:
3/4 cup mayonnaise (regular or light)
3/4 cup sour cream (regular or light)
1 teaspoon dried parsley
1 teaspoon onion flakes
1 teaspoon beau monde
1 teaspoon dried dill weed (or 1 Tablespoon fresh)

1 round of rye bread

Directions:
1. Combine all dip ingredients in a bowl and chill for at least 1 hour.

2. Cut a whole in a round of rye. Fill the opening with the dip and break or cut the removed bread into chunks for dipping.

Cocktail [Turkey] Meatballs
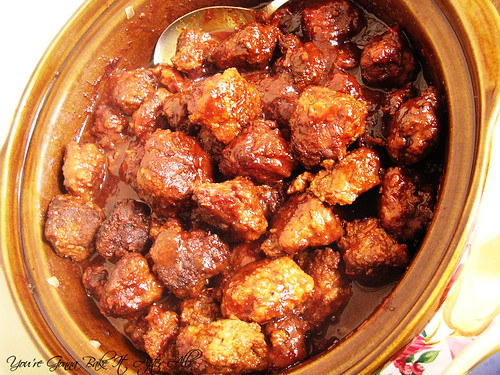
I've made these meatballs for many years. The fam always forgets they are made of turkey, and I don't remind them. I find that people have preconceived notions about turkey and that affects how much they like the meatballs. So I just labeled them "Cocktail Meatballs." They loved these this year, and I revealed at the end of the night that they were turkey - they were surprised that they didn't know the difference! I do find that you don't get nicely round ball shapes with ground turkey, so if you are going for presentation, ground beef is probably the way to go. You can even buy frozen meatballs at the store and make the sauce at home - no one will know but you! :)

Ingredients:
1/2 cup dry bread crumbs
1/2 cup minced onion
1/4 cup milk
1 egg
1 Tablespoon snipped parsley (or 1 teaspoon dried parsley)
1 teaspoon salt
1/8 teaspoon pepper
1/2 teaspoon Worcestershire sauce
1 pound ground beef or turkey
extra-virgin olive oil
1 12-ounce jar chili sauce
10-ounces grape jelly

Directions:
1. Combine first 8 ingredients and mix well. Add meat and mix until evenly incorporated.

2. Form 1-inch meatballs, and place on waxed paper-lined plates.

3. Heat oil in a skillet and fry the meatballs until browned on the outside but not cooked through. Drain on paper towels for a few minutes and transfer to a slow cooker.

4. In a saucepan over medium-high heat, combine chili sauce and grape jelly, and stir frequently until jelly has melted completely.

5. Pour sauce over meatballs and cook on low for at least 3-4 but up to 8-10 hours. Stir occasionally. Alternatively, add the meatballs to the saucepan, stir to coat, and simmer uncovered for 30 minutes.

Source: Adapted from the Betty Crocker Cookbook

Hot Artichoke Dip
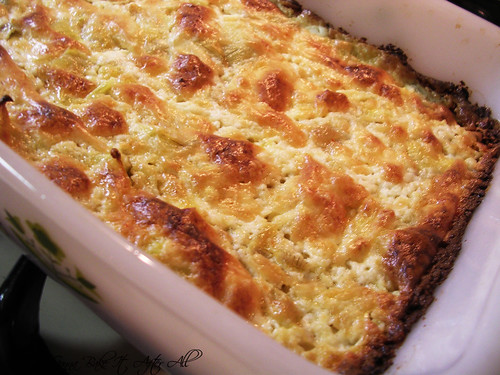
My mom found this recipe this year in a cookbook she recently acquired. Typically homemade artichoke dips that I've made have been very greasy, but this one was less so, probably because it's predominantly cream cheese rather than mayonnaise. We used light cream cheese and regular mayo, but I'm sure it's be great with light mayo as well. I love artichokes so I knew I'd enjoy this - it was a very tasty dip!

Ingredients:
8 ounces cream cheese, softened
1 14-ounce can artichoke hearts, drained and chopped
1/2 cup mayonnaise
1/2 cup grated Parmesan cheese
1 clove garlic, minced

Directions:
1. Mix all ingredients with an electric mixer on medium speed until well blended. Spoon into 9-inch pie plate or quiche dish.

2. Bake for 20 - 25 minutes or until very lightly browned.

3. Serve with tortilla chips, crackers, pita chips, or vegetables.

Source: Philadelphia Cream Cheese Classic Recipes cookbook

Buffalo Chicken Dip - one of the favorites of the night!

Double Tomato Bruschetta - another favorite that ended up being my mom and my dad's choice for top appetizer of the night!

Ro-tel Dip - I think most people have had or at least heard of this dip - you just mix 1 can of Ro-tel tomatoes with 1 package of Velveeta. We keep it in a small crockpot when we serve it because the warmth helps maintain the right consistency. I'm not sure how I feel about Velveeta in general, but this dip is just plain good!

Monday, December 21, 2009

12 Days of Christmas: Day 12

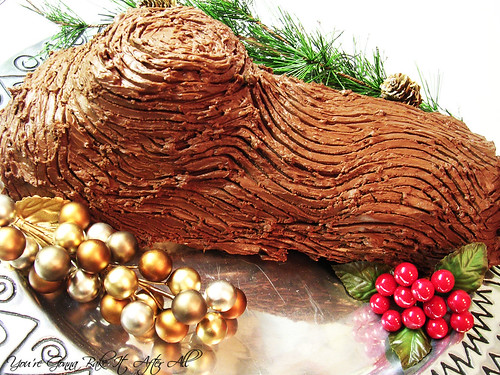
I've saved something special for the final post of my 12 Days of Christmas. I took French in high school and each year we were given extra credit for making a classic French Christmas dessert and bringing it to our in-class holiday party. I always made Buche de Noel, a traditional yule log cake. This must have made quite an impression on me because to this day, when I hear "Jingle Bells," I start singing the French version!

My lab had a holiday potluck lunch this year, and I signed up to bring a dessert. I thought a Buche de Noel would be perfect. I was so upset to learn that my beloved recipe from high school French had accidentally been thrown out by my parents!

As it turns out, this may have been for the best, because it forced me to hunt down a new recipe, and of course one of my favorite cookbooks, Rose Levy Beranbaum's The Cake Bible, came to the rescue. If you've never seen this book, I highly recommend it. There are SO many amazing cakes I'd love to make, but this is actually the first one I've made from it! They are so impressive-looking but usually multi-step, as you can see. This cake can be made over the course of a few days, or all in one night (which is what I had to do). I found the recipe simple to follow, and I think it turned out pretty well!

I am in St. Louis for Christmas now and this will be my last post until after the 25th, so I wish all of my readers a wonderful holiday!!!!!!!

Buche de Noel

Cake components:
Chocolate Cloud Roll
Perfect Whipped Cream
Dark Chocolate Ganache Frosting

To assemble cake:
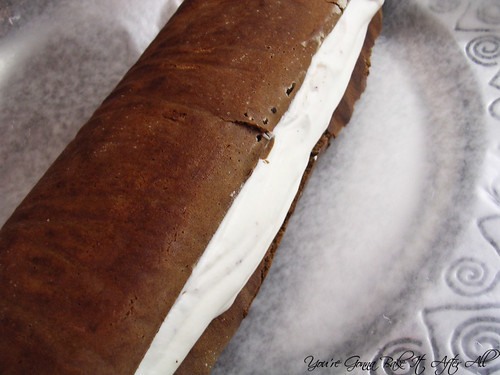
1. Fill Chocolate Cloud Roll with the Perfect Whipped Cream.
2. Chill for at least 1 hour.

3. Cut a diagonal slice from one end of the roll and place on top to form a knot.


4. Spread the ganache frosting over the log and use the tines of a fork to make lines resembling bark. Make a few round swirls with the fork on the top of the knot.

5. Decorate as desired. Traditional decor includes meringue mushrooms, pistachio marzipan ivy leaves, green tea pine needles, small appropriate figures such as porcelain elves or trumpeters. I took the easy route and got my decorations at Michael's and then used flaked coconut and powdered sugar for snow.

6. Refrigerate until 1 hour before serving.

Note: Cake can be assembled and refrigerated 2 days ahead.


Chocolate Cloud Roll

Ingredients:
1/4 cup + 2 Tablespoons sugar
6 large eggs, separated yolks and white, at room temperature
4 ounces bittersweet chocolate, melted and cooled to room temperature
3/4 teaspoon cream of tartar
1 Tablespoon unsweetened cocoa

Directions:
Preheat oven to 350F and prepare a 17- x 12-inch jelly roll pan as follows: grease, line bottom with parchment or foil, extending slightly over sides, and then grease again and flour.
1. In a mixing bowl, beat 1/4 cup sugar and the egg yolks for 5 minutes or until light and fluffy. Add the chocolate and beat until incorporated, scarping down the sides of the bowl.

2. In a large mixing bowl, beat the egg whites until foamy, add the cream of tartar, and beat until soft peaks form when the beater is raised. Gradually beat in the remaining 2 Tablespoons sugar, beating until still peaks form when the beater is raised slowly.

3. With a large balloon whisk, slotted skimmer, or rubber spatula, fold 1/4 of the whites into the chocolate mixture to lighten it. Then gently fold in remaining egg whites.

4. Pour into the prepared pan, spreading evenly with a spatula, and bake 16 minutes. The cake will have puffed and lost its shine and will spring back when lightly pressed with a finger.

5. Meanwhile, wet a clean dish towel and wring it out well. Remove the cake from the oven and leave it in the pan. Dust with the cocoa powder and cover immediately with the damp towel. Allow the cake to cool.

6. Remove the towel and, lifting the parchment or foil overhang, gently slide the cake from the pan to a flat surface.

7. Spread the Perfect Whipped Cream on top and roll up, using the parchment or foil for support and gently peeling it away as you go (sort of like a bamboo mat when making sushi).


Perfect Whipped Cream

Ingredients:
1 cup heavy cream
1 Tablespoon sugar
1/2 teaspoon vanilla

Directions:
1. Place all ingredients in a large mixing bowl and refrigerate (along with beater or whisk attachment) for at least 15 minutes.

2. Beat until soft peaks form when the beater is raised.


Dark Chocolate Ganache Frosting

Ingredients:
12 ounces bittersweet chocolate (I used Ghiradelli)
1 2/3 cups heavy cream (I added an extra ~1/4 cup, see note below)
2 Tablespoons Cognac (I added framboise liqueur)

Directions:
1. Break the chocolate into pieces and process in a food processor until very fine.

2. Heat the cream to the boiling point and, with the processor motor running, pour it through the feed tube in a steady stream.

3. Process a few seconds until smooth. *Note: the book states that if you use chocolate >53% you will have to add more cream for a smooth ganache. I just added about 1/4 cup extra boiling cream, and it turned out great.

4. Transfer to a bowl and cool completely. Gently stir in Cognac or framboise liqueur.

5. Allow to cool for several hours until of frosting consistency. (I put it near a cold sliding-glass door to speed up the process!)


Source: Adapted from The Cake Bible

Sunday, December 20, 2009

12 Days of Christmas: Day 11

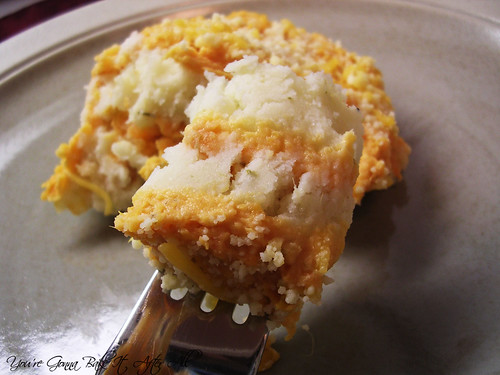
Being the holiday season, I decided to post this incredible recipe for a mashed potato casserole. You may be thinking to yourself 'great, another potato casserole recipe,' but this casserole has something special - the perfect balance of white potatoes and sweet potatoes. This will satisfy your craving for sweet and savory - all in one dish.

My mom used to make this for our Christmas Day dinner at my aunt's house every year, until the family got so big we required two casserole dishes of it, which is more work that she was willing to put in on Christmas afternoon! The great thing is that the Kraft website (linked below) states that you can assemble the casserole days in advance and bake it later - a perfect solution!

Mashed Potato Layer Bake

Ingredients:
4 large white potatoes, peeled, chopped, and cooked
2 large sweet potatoes, peeled, chopped, and cooked
8 ounces chive and onion cream cheese, divided
1/2 cup sour cream, divided
1/4 teaspoon each salt and black pepper
1/4 cup Parmesan cheese, grated
1/4 cup shredded cheddar cheese, divided

Directions:
Preheat oven to 375F.
1. Place white and sweet potatoes in separate bowls. Add half each of the cream cheese and sour cream to the potatoes in each bowl; season with salt and pepper. Mash with potato masher or fork until creamy.

2. Stir half of the Parmesan cheese into the bowl of white potatoes. Stir half of the cheddar cheese into the bowl of sweet potatoes.

3. Alternately layer half each of the white potato mixture and sweet potato mixture in a 2-quart clear glass casserole dish. Repeat layers.

4. Bake 15 minutes. Sprinkle with remaining cheese and continue baking 5 minutes or until cheeses are melted.

Makes 14 servings, 1/2 cup each.

Source: Kraft Follow the link to check out their "Make Ahead" tip, which will be very useful for me when trying to coordinate a multi-course dinner!

Saturday, December 19, 2009

12 Days of Christmas: Day 10

In college, my roommate and good friend Kathleen and I would bake Christmas cookies and give them out to our friends. She introduced me to this recipe for Chocolate Butter Spritz Cookies, and I loved them. You see, in my family there really are no chocolate cookies on Christmas. We have our oatmeal, sugar, and butter, and a few other variations of the butter - including some rolled in chopped nuts and topped with jam - but no chocolate. I was pleasantly surprised to find out how much I love chocolate butter cookies!

This recipe is a little different than my Grandma's butter cookies, in that it just has flour - no salt or baking powder. I was a little concerned about the lack of salt, because one of my favorite things about the butter cookies is their balance of salt and butteriness, but I actually like it. It's a bit different but still great.

This year I really over-extended myself on my baking - I was very ambitious and bit off a little more than I could chew (no pun intended). Thankfully, my wonderful husband came to the rescue! I had made the batches of dough days before and stored them in the freezer/fridge, so as I worked on other baking and assembled other treats, Bob pressed these cookies and decorated them. I think he did a great job! His coloring of my Grandma's Butter Cookies is so vibrant, and he decorated them very creatively.

For the press cookies, I usually do half topped with crushed peppermint (seriously SO good!) and half with just red hots, colored sugar, sprinkles, etc. Some of the cookies that got the finely crushed peppermint, which was like a powder, don't even look like they have peppermint because it baked in - it's such a great flavor.

Chocolate Butter Spritz

My Grandma's Butter Cookies

Chocolate Butter Spritz Cookies

Ingredients:
1 cup (2 sticks) butter, at room temperature
1/2 cup confectioners/powdered sugar
1/2 cup packed brown sugar
1/4 cup unsweetened cocoa powder
1 egg yolk
2 Tablespoons creme de cacao or milk
1 teaspoon vanilla extract
2 1/3 cups all-purpose flour
optional decorations: sprinkles, crushed peppermint, etc.

Directions:
Preheat oven to 375.
1. Beat butter with a stand or electric mixer on medium-high for 30 seconds. Add sugars and cocoa powder until combined.

2. Beat in egg yolk, milk (or creme de cacao), and vanilla. Add flour.

3. Use a cookie press or roll dough in small balls and flatten slightly. Place 1-inch apart on ungreased baking sheets.

4. Decorate as desired. Bake for 8-10 minutes or until edges are firm but not brown (this sounds kind of odd since they are brown cookies, but you get the idea).

5. Remove from sheets and cool on a rack.

Source: Adapted from Kathleen K.

Friday, December 18, 2009

12 Days of Christmas: Day 9

I have loved coconut macaroons ever since I first tried them as a kid. Coconut is one of my favorite additions to baked goods. Macaroons come in many forms - some are more gooey, some more cakey. I've never really had a macaroon I didn't like. These are fairly heavy on the coconut so it really stands out as the star of the cookie. The holidays seem like a great time to break out these cookies, and they are so easy to whip up, which is great during this busy time of year :)

Coconut Macaroons

Ingredients:
Butter, for greasing the cookie sheet
1/3 cup unbleached all-purpose flour
2 1/2 cups shredded coconut
1/8 teaspoon salt
2/3 cup sweetened condensed milk
1 teaspoon vanilla extract

Directions:
1. Preheat oven to 350F and grease a cookie sheet well.

2. Mix the flour, coconut, and salt together in a bowl. Pour in the condensed milk and vanilla and stir well to make a thick batter.

3. Drop the batter by quarter-cupfuls onto the well-greased cookie sheet, allowing an inch of space between the cookies. Bake until golden brown, about 20 minutes. Remove from the pan at once and cool on racks.

Yield: About 1 1/2 dozen macaroons.

Source: The Silver Palate Cookbook

Thursday, December 17, 2009

12 Days of Christmas: Day 8

To be honest, I've never really liked marshmallows. Most kids just love them and will eat them out of the bag - not me. Don't get me wrong, I loved marshmallows in rice krispie treats and in fluff form, but keep them away from my hot chocolate please! On Girl Scout camping trips my s'mores consisted of a piece of chocolate on a graham cracker, that's it. So why in the world would I ever try making homemade marshmallows you ask? Well, last year a coworker made them and convinced me that I must try fresh, homemade marshmallows before I officially give up on marshmallows for good. I am SO glad because homemade marshmallows are amazing! They are so soft and virtually begin to melt into delicious gooeyness the minute they hit a hot cup of cocoa - nothing like the store bought kind. When I made these last year, Bob helped me since it takes about 10 minutes of beating with an electric mixer and we only had a handheld. When I got my stand mixer in October, one of the first things I thought was how easy it was going to be to make these marshmallows!

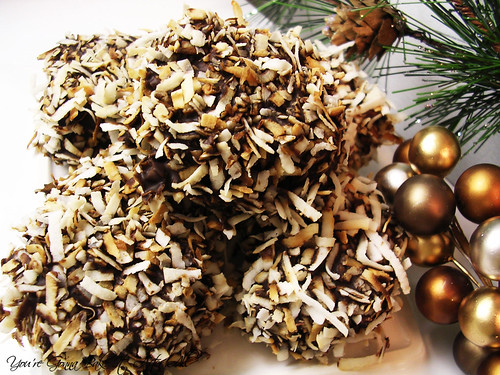
This year I decided to spruce up my marshmallows for my holiday gift packages by dipping them in chocolate and rolling them in toasted coconut - sort of to make a candy to stand alone rather than to serve as a drink topping. Wow! So delish. I only wish I had made more of those!

This recipe is so versatile - you can add any extract you want to "batter" - think peppermint, almond, etc. You can even color the marshmallows or add cocoa powder to make them chocolate. You can roll them in just about anything. Whatever you do, just make these!

Homemade Marshmallows

Ingredients:
4 envelopes unflavored gelatin
water
3 cups granulated sugar
1 1/4 cups light corn syrup
1/2 teaspoon salt
1 Tablespoon vanilla extract
powdered sugar for slicing

Directions:
1. In a large saucepan over medium-high heat, combine 3/4 cup water, sugar, corn syrup, and salt.

2. Meanwhile, in the bowl of a stand mixer (or in a large mixing bowl), place 3/4 cup water and sprinkle gelatin on top; let plump.

3. Insert candy thermometer into sugar mixture, making sure not to touch it to the sides or bottom of the pan. Bring sugar mixture to a boil and let keep rolling boil until mixture passes 235F, about 3-5 minutes.

4. With mixer on low, carefully pour sugar mixture into mixer bowl and slowly raise beater to high speed. Be careful at this step because if you go up too high the marshmallow mixture will start spraying everywhere. I only had to go up to setting 6 of 10 on my mixer - it's powerful!

5. Beat sugar mixture on high for 5 minutes and then add vanilla. (If you'd like to add other flavors here like peppermint, cocoa powder for chocolate, or color, add now).

6. Continue beating mixture an additional 5 minutes.

7. Meanwhile, oil a 13 x 9-inch pan for large marshmallows or two 10 x 10-inch pans for small marshmallows. I dusted the pan with powdered sugar at this point as well.

8. When done beating, pour sugar mixture into pan(s), smooth top and tap to release extra air.

9. Leave on counter for at least 3 hours or overnight to form.

10. Generously sprinkle working surface with powdered sugar, turn out marshmallow mixture, generously sprinkle with powdered sugar, and cut as desired, lightly coating marshmallow shapes with powdered sugar to avoid sticking.

My notes: I cannot stress the importance of powdered sugar here. Just like cornmeal is for pizza making, powdered sugar is a must for marshmallow making to avoid sticking. These things will stick like no other, and you may have a heck of time getting them out of the pan - that's normal (for me at least). I run a plastic knife or spatula around the edges of the pan first, then use a spatula to force the marshmallows (in an intact sheet) out of the pan, almost like scraping ice off a windshield. Have a big pile-o-powdered sugar waiting when it plops on your working surface, and have another pile ready when you start cutting them. Once they are cut, roll them in the sugar. I usually transfer them to a big wire strainer at this point and shake out the excess powdered sugar before packing them up.

11. If desired, dip the marshmallows first in melted chocolate and then into toasted coconut. Let harden in the fridge for a few hours or overnight.

Note: a 13 x 9-inch pan makes about 96 large marshmallows that can be store in a container for about a week.

Source: Adapted from Good Things Catered

Wednesday, December 16, 2009

12 Days of Christmas: Day 7

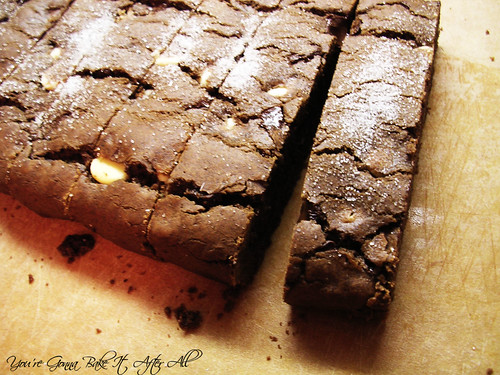
Biscotti is one of those things I've never really had because it usually contains nuts. In fact, the original recipe for this biscotti calls for nuts, but Chelle of Brown Eyed Baker substituted white chocolate - which I happen to think is a fantastic idea! I've been wanting to make these ever since I first saw them on her blog, so I thought they would go great in my holiday gift packages!

I had some trouble with the recipe, as noted below. The dough was so sticky; I thought I had done something wrong. Thankfully, just putting a little cooking spray on my hands made a huge difference, and I say thankfully because these biscotti are AMAZING! They are actually one of my favorite recipes I've made recently (and I've been making a LOT of things!) I love the combination of the bittersweet and white chocolate, and the slight espresso taste - which may not even be noticeable if you don't know it's in there but definitely elevates the chocolate flavor. The only thing I might change next time is to make them larger - they were smaller than the biscotti I've seen in coffee shops and bakeries.

This recipe is really very simple and I'm so glad it turned out so well because there are many more biscotti varieties I would love to try next!


Triple Chocolate Biscotti

Ingredients:
2 cups all-purpose flour
1/2 cup unsweetened cocoa powder
2 Tablespoons instant espresso powder (I used this kind, found in Italian specialty food store)
3/4 teaspoon baking soda
1/2 teaspoon baking powder
1 teaspoon salt
3/4 stick (6 Tablespoons) unsalted butter, at room temperature
1 cup sugar
2 large eggs, lightly beaten
1 teaspoon pure vanilla extract
1 cup white chocolate chips
4 ounces bittersweet chocolate, coarsely chopped
sugar, for dusting

Directions:
1. Center a rack in the oven and preheat to 350F.

2. Line a baking sheet with parchment or a silicone mat.

3. Sift together the flour, cocoa, espresso powder, baking soda, baking powder, and salt.

4. Working with a stand mixer, preferable fitted with a paddle attachment, or with a hand mixer in a large bowl, beat the butter and sugar together on medium speed until pale, about 2 minutes; the mixture may be crumbly.

5. Scrape down the sides of the bowl, add the eggs and vanilla and beat for another 2 minutes; don't worry if the mixture looks curdled.

6. Reduce the mixer speed to low and mix in the dry ingredients in 3 additions, mixing only until a dough forms. Scrape down the sides of the bowl.

7. Mix in the chocolates.

8. Turn the dough onto a work surface. At this point my dough was super sticky - I didn't see how I was going to possibly proceed with the recipe. I sprayed my hands with Crisco spray with flour, and suddenly the dough was very workable!

9. Knead in any dry ingredients that may have escaped mixing. Divide the dough in half. Rather than rolling out the dough in a 12-inch-long log and flattening to 2 inches across and 1/2 to 1 inch high as the original recipe suggests, I put the dough on the silpat and shaped it into 12-inches long, 2-3 inches wide and 1 inch tall. If you feel daring and prefer larger biscotti, try shaping them shorter and wider.

10. Sprinkle each log with a little sugar, and bake about 25 minutes, or until the logs are just slightly firm. The logs will spread and crack - and that's just fine. Remove the baking sheet from the oven, put it on a cooling rack, and allow the logs to cool for about 20 minutes, leaving oven on.

11. Working with one log at a time, using a long serrated knife, cut each log into slices between 1/2- and 3/4-inch thick. Stand the slices up on the baking sheet and bake the cookies again, this time for just 10 minutes.
12. Transfer the biscotti to a rack to cool.

Source: Adapted from Brown Eyed Baker, originally from Dorie Greenspan's Baking: From My Home to Yours

Tuesday, December 15, 2009

12 Days of Christmas: Day 6

I've only had Oreo Truffles one time before - it was a few years ago at work. A fellow graduate student brought in some Halloween-themed ones (decorated like eye balls!). They were incredible! I immediately started brainstorming the possibilities for decorating them - pink and red for Valentine's Day, red/white/blue for the 4th of July/Memorial/Labor Day, and of course red/green for the holidays. For some reason, I've never gotten around to making them. My group of girl friends had our annual holiday party this past weekend, and I decided it was finally time!

Instead of using semi-sweet chocolate as the recipe calls for, I decided to use Wilton Candy Melts (you can find them at Michael's). You also can just use white chocolate and dye it with red and green food coloring gel (and actually I did end up adding some green to the green melts because they weren't quite "green" enough!) One thing about the candy melts - once the truffles were in the fridge, they turned a little white (see the pics). This went away when the truffles were out at the party (reaching close to room temp). I had that problem last year when I used red/green swirl morsels to coat peppermint sticks . . .

These were a big hit at the party! Although I love the festivity of the red and green candy melts, taste-wise I would have preferred the semi-sweet chocolate, so perhaps next time I will use the red/green as the drizzle instead :)

Oreo Truffles

Ingredients:
1 package Oreo cookies, finely crushed, divided
1 8-ounce package cream cheese, softened
2 packages (8 squares each) Baker's semi-sweet baking chocolate, melted OR the equivalent of the chocolate of your choice (I used 1/2 package of red Wilton Candy Melts and 1/2 package of green Wilton Candy Melts)
white chocolate for drizzling, optional (I used about 1/2 cup of Nestle white chocolate chips)

Directions:
1. Reserve 1-2 Tablespoons Oreo crumbs and mix the rest with the cream cheese until well blended.

2. Shape the mixture into 42 1-inch balls. (I NEVER have as many as the recipe states with cookies for example, but for this I ended up with exactly 42!)

3. Dip the shaped balls in melted chocolate; place on a waxed-paper covered baking sheet. I added some green food coloring gel to the melted green "melts" and then added some vegetable shortening (as the package suggests) to achieve a "dip"able consistency.

NOTE: After the fact, I visited the Kraft website to see if they had any tips on how to prevent the chocolate from pooling at the bottom of the truffle - they have a great tip: add the balls to the bowl of chocolate and roll them around with forks. Remove the truffles with forks and allow excess chocolate to drip back into the bowl before placing truffle on prepared baking sheet.

4. Sprinkle with remaining cookie crumbs or drizzle with white chocolate. For the drizzle, I melted white chocolate carefully in the microwave, transfered it to a resealable sandwich bag, and snipped off the corner. You of course use a pastry bag, a parchment cone, or whatever works for you.

5. Refrigerate 1 hour or until firm. Store in a tightly covered container in the refrigerator.

Source: Adapted from Good Eats 'n Sweet Treats, originally from Kraft

Thursday, December 10, 2009

12 Days of Christmas: Day 5

My family first had Chocolate Cracker Candy at a family friend's house many years ago and fell in love with it. It's pretty simple but so delicious. I know there are several versions of this recipe around - some using graham crackers for example. I prefer the saltines because they really contribute to the salty/sweet aspects of the candy. And no one will ever guess they are saltines - seriously!

I've made a note below that you must use real, stick butter and margarine for this recipe for it to turn out right. I know some people prefer to avoid margarine, so if that's the case this might not be the recipe for you. I personally don't use margarine on a daily basis but will make an exception for exceptional recipes such as this :)

I make this candy every year during the holidays and give it away in decorative tins or wrapped up in small bags. When stored in the fridge, it lasts quite a long time. Another thing I love about this candy is that it's so versatile - you can top it with virtually anything (think candy, peppermint, toasted coconut, nuts) and even the chocolate can be personalized to suit your taste - white chocolate, colored chocolate, mint chocolate, raspberry chocolate, swirled, etc. I usually prefer straight up traditional (no topping, semi-sweet chocolate), but feel free to get creative. You will not be disappointed!

Last year I decorated with these red/green swirl morsels but could not find them this year :( I decided to use dark chocolate holiday M&M's instead.

I also decorated with toasted coconut this year for the first time.


Chocolate Cracker Candy

Ingredients:
saltine crackers, approximately 1 sleeve (salted)
1/2 cup (1 stick) salted butter*
1/2 cup (1 stick) margarine*
1/2 cup sugar
1 12-ounce bag semi-sweet chocolate chips
Optional toppings: red/green swirl morsels, M&M's, toasted coconut, crushed peppermint, chopped nuts (pecans or almonds)

*IMPORTANT NOTE: Use only stick butter and margarine - not soft or light. Must use the margarine so that the butter does not burn.

Directions:
Preheat oven to 400F.
1. Line a medium-sized (close to 10 1/2" x 15 1/2" x 1") jelly roll pan with foil.

2. Place one layer of saltine crackers edge to edge to cover the pan.

3. In a heavy saucepan, heat the butter, margarine, and sugar to a boil. Boil for 3 minutes, no stirring necessary.

4. Pour mixture over saltines and spread with a rubber spatula if necessary to distribute evenly over the crackers.

5. Bake about 6-10 minutes or until crackers are golden brown (the browner the crackers, the more toffee-tasting the candy will be).

6. Remove from oven and pour the chocolate chips over the crackers. Wait 1-2 minutes, then spread the chocolate to cover the entire surface. Optional: decorate with toppings of choice.

7. Refrigerate pan for 2 hours or longer. Break candy into pieces. Store in refrigerator for best results.

Source: Adapted from a family friend Margaret S.

Wednesday, December 9, 2009

12 Days of Christmas: Day 4

Here is another quick bread that I'm including in my holiday gift packages. My mom has been making Pineapple Carrot Bread for many years, and always around the holidays. As a kid, I hated carrots (and I still don't really like them that much), but I loved this bread - probably because of all the sugar and oil that covers them up! This bread has such a delicious flavor - the combination of the cinnamon and the pineapple is great. Like most breads of this nature, it tastes more like a cake than a bread, and actually is very similar to the Carrot Cake from the Silver Palate cookbook. Again, I made mini loaves and am freezing them until I'm ready to give them away. That's all for the quick breads in the 12 Days of Christmas - stay tuned for some other tasty treats!!!
Pineapple Carrot Bread

Ingredients:
3 eggs
3 cups sugar
1 cup vegetable or Canola oil
3 cups flour
1 teaspoon baking soda
1 teaspoon vanilla
1 teaspoon cinnamon
1 teaspoon salt
2 cups grated carrots
1 9-ounce can crushed pineapple (drained)
1 cup chopped pecans, optional

Directions:
Preheat oven to 350F.
1. Mix eggs and sugar, then add oil.

2. Add dry ingredients, carrots, pineapple, and nuts, if using. Add vanilla and mix.

3. Spoon into two greased and floured loaf pans and bake for 1 hour (or 6 mini loaf pans and bake for 45 minutes). Note: I used Crisco with flour spray instead of greasing and flouring, and the loaves slid out beautifully!

4. Remove loaves from pans when either warm (onto a cooling rack) or cool. To maintain a crispy top, wrap in aluminum foil and store at room temperature. To freeze, wrap each loaf in plastic wrap and aluminum foil and place in a freezer bag.

Source: Family friend Gayle W.

Tuesday, December 8, 2009

12 Days of Christmas: Day 3

My parents have lived in the same house since before I was born, and they've had the same next-door neighbor, Lois, the entire time. Lois is one of the sweetest women you'll ever meet, and occasionally she would bring us gifts - whether a craft that she made or a delicious treat like this amazing Poppy Seed Bread. Each year, a few days before Christmas we start expecting Lois to knock on the door with this bread in hand. She was kind enough to share the recipe with us several years ago, and it's one of my favorite quick breads. I make it every Christmas to give away as gifts. This year, I've used my mom's mini loaf pans and will include one in each of my holiday gift packages. The bread also freezes well, and since I have taken on a lot of baking this year, I have made my loaves early and frozen them, so they will still be fresh in two weeks when I've ready to give them as gifts. The only downfall of freezing the bread is that you lose the crispiness of the top.

I really can't tell you how good this bread is - it's so moist and flavorful - the almond extract adds such a delicious flavor. I don't recommend skipping the drizzle - it soaks into the bread and really adds moisture and sweetness. You will not be sorry if you make this!!!
Poppy Seed bread

Ingredients:
3 eggs, beaten
2 2/3 cups sugar
1 1/2 cups milk
1 1/2 cups oil
1 1/2 teaspoons vanilla extract
1 1/2 teaspoons butter extract
1 1/2 teaspoons almond extract
3 cups flour
1 1/2 teaspoon salt
1 1/2 teaspoon baking powder
1 1/2 Tablespoons poppy seeds

For the drizzle:
1/2 cup sugar
1/4 cup orange juice
1/2 teaspoon vanilla extract
1/2 teaspoon butter extract
1/2 teaspoon almond extract

Directions:
Preheat oven to 350F.
1. To the beaten eggs, add sugar, milk, oil, vanilla, and extracts, flour, salt, baking powder, and poppy seeds. Mix together.

2. Pour into 2 greased and floured loaf pans and bake for 50-60 minutes, or a little longer, until a wooden stick/toothpick inserted comes out clean (or use 6 mini loaf pans and bake for approximately 45 minutes). Note: I used Crisco with flour spray instead of greasing and flouring, and the loaves slid out beautifully!

3. Either remove loaves from pans now or you can wait. Prepare drizzle and pour over bread while warm. When cool, if you haven't already, remove loaves from pans. To maintain a crispy top, wrap in aluminum foil and store at room temperature. To freeze, wrap each loaf in plastic wrap and aluminum foil and place in a freezer bag.

Source: My parents' neighbor Lois W.

Friday, December 4, 2009

12 Days of Christmas: Day 2

Two of the most ubiquitous Christmas cookies in my family - butter and oatmeal - come from my paternal grandmother, Maw Maw. For many years, these oatmeal cookies have always been my favorite (although it's VERY close). These cookies are unlike any I've ever tasted - they are not your traditional chewy oatmeal cookie, although they can be made chewier by adding more oatmeal or raisins/nuts (or accidentally leaving out an ingredient - see below!) I just like them plain.

They are typically a crispier cookie, so sometimes I heat them for 2-5 seconds in the microwave and have them with a big glass of skim milk. This most recent time, they ended up chewy and soft on their own because I forgot the powdered sugar, but there's just something about them that sets them apart - maybe it's the thinness, or the fact that the edges taste almost like toffee - it's really just indescribable. It's amazing how taste and smell can retrieve memories, perhaps even better than any of our senses, and to me, these cookies taste like Christmas.

Since this is my favorite holiday recipe, I'm using it as my entry in Chelle's KitchenAid mixer giveaway!

For some reason, we always decorate them using these colored sprinkles. Occasionally you'll see them with red/green sprinkles, but that's pretty rare. Who knows!

Oatmeal Cookies

Ingredients:
1 cup (2 sticks) butter
2 eggs
1 cup dark brown sugar
1 cup sugar
1 teaspoon vanilla
1/4 cup powdered sugar***
1 teaspoon baking soda
1/2 teaspoon salt
1 teaspoon cinnamon
1 1/4 cups flour
3 or 4 cups oatmeal (old-fashioned)
nuts or raisins (or both) to taste (optional)

***Note: this last time I made them (as pictured), I accidentally forgot the powdered sugar; HOWEVER, the cookies ended up being really chewy, rather than crispy, and they stayed that way - I think this was a serendipidous discovery! I told my mom and she said that Maw Maw always told her that the powdered sugar makes them crispy - she was right!

Directions:
Preheat oven to 350F.
1. Using a stand or hand-held mixer, cream the butter, eggs, and sugars until well combined. (Omit powdered sugar for a chewier cookie). Add vanilla and mix until incorporated.

2. Sift together baking soda, salt, cinnamon, and flour. Add to butter mixture until completely incorporated.

3. Add 3 cups of oatmeal to the mixture. If it is too gooey to work with, add more until it can be rolled into balls. Add the nuts or raisins if using.

4. Place small balls of dough on a slightly greased cookie sheet and flatten slightly before baking. Sprinkle with decorations, if desired. Make sure to leave enough space between cookies as they spread quite a bit. If you omit the powdered sugar, leave even more space!

5. Bake for 8-10 minutes. They will spread and be flat and crispy (adding more oatmeal and raisins/nuts will make them thicker and chewier). Remove from cookie sheet to a cooling rack immediately or they will stick.

Thursday, December 3, 2009

Meet Kerstin

Several weeks ago, I had the honor of meeting up with Kerstin of Cake, Batter, and Bowl! She was in Chicago for a wedding and was nice enough to set aside time for brunch with me at Yolk. I'm sure most (if not all) of you have read - and therefore love - her blog. This was my first time meeting Kerstin in person, actually my first time meeting any cooking/food blogger, but I feel like I've known her for a long time. Kerstin and I met when she stumbled upon my young blog back in March and left such a kind, genuine comment. First of all, I was excited to see that I had a comment at all :), but ecstatic that she had actually read through all of my ramblings of "About Me" and "Blog Beginnings," and that we had so much in common. She had recently started her blog too. Since then, I have looked forward to each and every post of hers; Kerstin develops her own unique, delicious, thoughtful, nutritionally-conscious recipes, and she's even participated in the Pillsbury Bake Off! How cool is that?!

Over a scrumptious brunch at Yolk - where we both ordered savory breakfasts and upgraded our toast to pumpkin pancakes :) - we chatted about our jobs (we're both postdocs in cancer research labs), about blogging, and about our futures. She is as kind and funny as you'd expect from reading her blog, and I had such a great time with her. A few days later she even posted a recipe with my favorite ingredients! I had planned to recreate the skillet breakfast I had there in a big post, but I just couldn't wait any longer to tell you about our brunch, so the skillet will have to wait. UPDATE: Anytime Skillet

Outside Yolk in River North
I'm "average" height - she's really that tall :) :) :)

So you may be wondering if that means no recipe today, right? True, but instead I'm alerting you to an awesome CHOCOLATE giveaway Kerstin's having right now from Hotel Chocolat. I'm an obvious chocoholic so this is my kind of giveaway! With the holidays coming up, no one can have too much chocolate! You have until Sat. Dec. 5 to get your entries in so get over there! :)

Stay tuned for Day 2 of the 12 Days of Christmas tomorrow!!!

Tuesday, December 1, 2009

Buffalo Chicken Meatballs

I'm having a hard time gearing up for my holiday baking - I guess that's what happens when you leave town for 5+ days! My fridge is void of food and my Google Reader is about to burst at the seams with unread posts :) Here's a post until I can get myself organized!

About a month ago, I had this great idea pop into my head - why not toss chicken meatballs in chicken wing sauce for a different spin on buffalo wings?! I got really excited and decided to google it first to make sure no one has done this before (ok so maybe I'm really naive). Of course, Rachael Ray has! It makes me wonder how many [simple] original ideas are left with teams of people just brainstorming all day about recipes :) Anyway, I decided to just follow her recipe. I have to say, her chicken meatballs aren't anything special, but I love the concept of this recipe, so I thought I'd share. Any meatball recipe will do (and any ground meat for that matter). Another different spin on buffalo wings that are much easier and cleaner to eat!

Yes, that's an Eiffel Tower toothpick - I have a slight obsession with Paris :)

Buffalo Chicken Meatballs

Ingredients:
1 pound ground white meat chicken
1/2 small onion, grated
2 cloves garlic, grated
1/2 cup parsley, chopped (or 2 Tablespoons dried)
Salt and freshly ground black pepper
Extra-virgin olive oil for drizzling
2 Tablespoons butter
1/2 cup buffalo wing sauce
3 scallions, green and white parts, thinly sliced, optional
Bleu cheese or ranch dressing, optional
Celery and carrots sticks, optional

Directions:
Preheat oven to 400F.
1. In a large mixing bowl, combine the ground chicken with the onion, garlic, and parsley, and season with salt and pepper.

2. Fatten out the meat in the bowl and divide it into 4 portions. Shape each portion into 4 meatballs - for a total of 16.

3. Arrange the meatballs on a nonstick sheet pan and drizzle with olive oil. Place in the oven and bake until the meatballs are cooked through and golden brown, about 10-12 minutes.

4. Meanwhile, melt the butter in a large skillet over medium heat. Add the hot sauce and whisk to combine. Toss the baked meatballs in the hot sauce to coat. Serve with dressing(s) and optional veggies to dip.

Source: Adapted from Rachael Ray

  © Blogger template Brownium by Ourblogtemplates.com 2009

Back to TOP