Search This Blog

Wednesday, October 14, 2015

Mocha Cream Cake

DSC_0211_ed

DSC_0196_ed

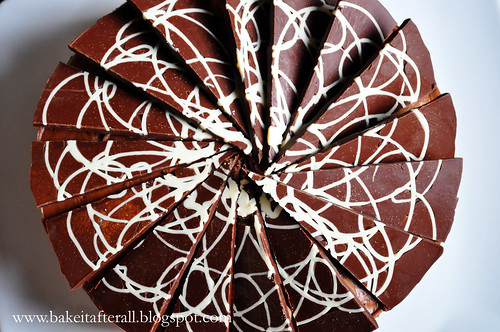
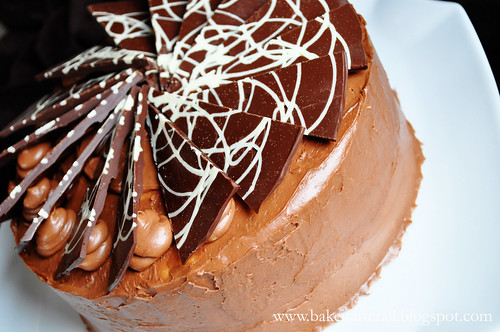
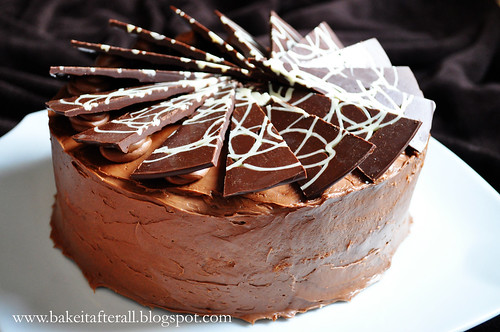
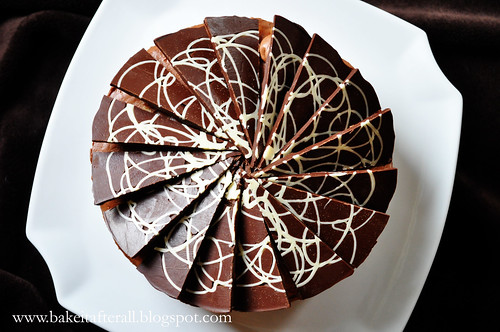
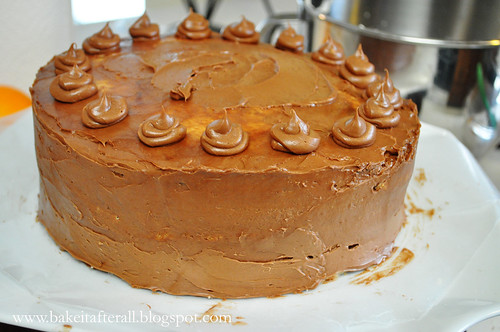
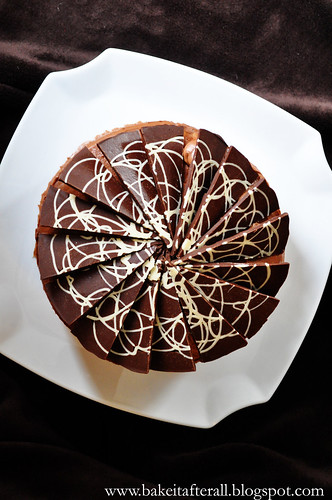
I made this cake for my mom's birthday a few years ago. She found it in a magazine years ago and thought it looked neat so she saved the clipping. When I asked her what she wanted for her birthday dessert, this came to her mind. I was a little worried that mine wouldn't turn out like the picture, but it actually did, and this was a very impressive-looking dessert but actually not difficult.

I almost always prefer chocolate cake over white or yellow, so if I were to make this again, I would use a chocolate cake as the base. The cream filling was really good, as was the ganache, so I would keep the rest of the recipe as is.

Mocha Cream Cake

Makes 16 servings

Ingredients:

1 package (18.25 ounces) white cake mix

Filling:
1 teaspoon unflavored gelatin
1 tablespoon cold water
1 1/4 cups heavy whipping cream
1/4 cup powdered sugar
2 tablespoons kahlua or other coffee-flavored liqueur
1/2 teaspoon vanilla extract

Ganche:
2 cups (11.5 ounces) milk chocolate chips
3/4 cup heavy whipping cream
1/4 cup butter
2 tablespoons kahlua or other coffee-flavored liqueur

Chocolate Triangles (see recipe below)

Directions:
1. Prepare cake batter according to package directions; bake in two 9-inch round pans as directed. Cool completely on wire racks.

2. For the filling: In a small bowl, combine gelatin and water; let stand for 2 minutes. Microwave on high for 10 seconds. Stir until gelatin is dissolved; set aside. In a large mixer bowl, combine the 1 1/4 cups cream, powdered sugar, kahlua, and vanilla. Beat at medium speed while slowly drizzling in gelatin mixture. Beat util stiff peaks form. Chill for several hours or overnight until ready to assemble.

3. For the ganache: In a small bowl, combine the milk chocolate chips, the 3/4 cup cream, and butter. Microwave for 3 minutes on medium-high (~70% power), stirring halfway through cooking time. Stir in kahlua. Chill for 45 to 60 minutes until thickened but still pourable. Beat with an electric mixer until spreadable, about 1 to 2 minutes.

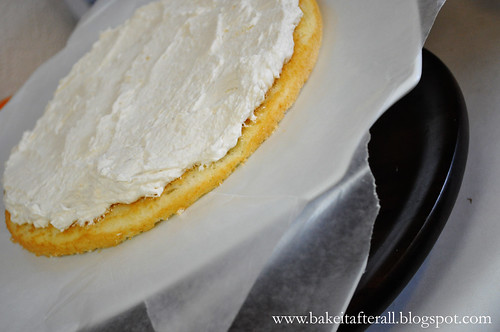
4. To assemble the cake: Split cooled cakes horizontally. Place one layer on serving plate. Spread half of the filling over the top.
DSC_0182_ed

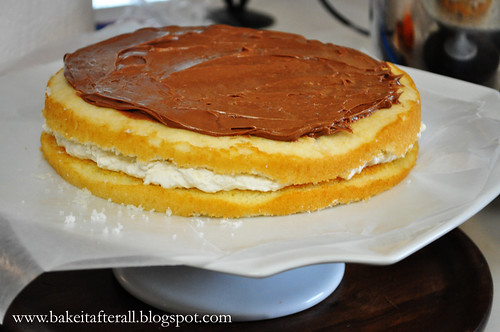
Top with the second cake layer. Spread about 1/2 cup of the ganache over the second layer.
DSC_0183_ed

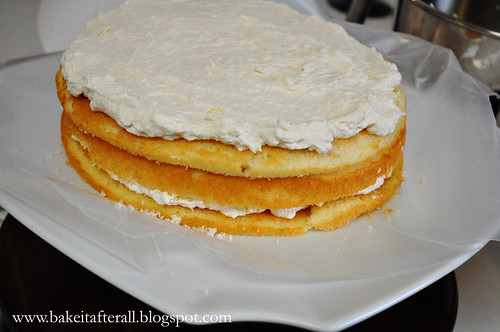
Top with the third cake layer and spread remaining filling over top.
DSC_0184_ed

Reserve about 1/2 cup of the ganache. Spread remaining ganache over top and sides of cake. Use reserved ganache to make 16 evenly spaced dollops around top outer edge of cake.
DSC_0186_ed

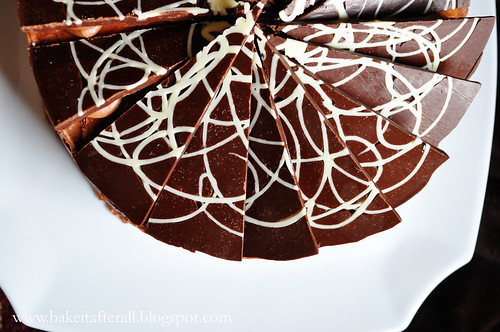
Place Chocolate Triangles on top of cake, resting one edge on ganache dollop. Store in refrigerator. Let cake stand at room temperature for 10 to 15 minutes before serving.

DSC_0206_ed

DSC_0217_ed


DSC_0200_ed

Chocolate Triangles

Makes 16 triangles

Ingredients:
1 cup (6 ounces) semi-sweet chocolate chips
2 tablespoons solid shortening
1 1/2 squares (1 1/2 ounces) white chocolate

Directions:
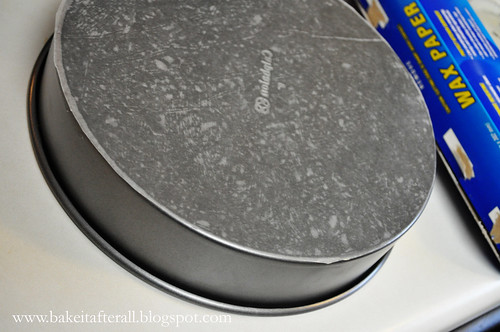
1. Cut a circle of waxed paper to fit the bottom of a 9-inch round cake pan. Lightly coat the outside bottom of the pan with butter (to keep the paper from moving); place waxed paper circle on bottom of pan.
DSC_0174_ed

2. Place semi-sweet chocolate and shortening in microwave-safe bowl. Microwave for 30 seconds on medium-high (~70% power); stir. Continue to microwave and stir in 30-second intervals until chocolate can be stirred smooth. Set aside to cool to room temperature.

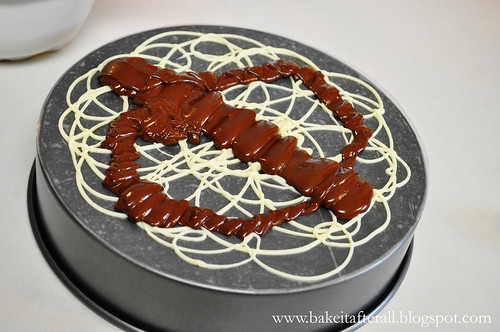
3. Melt white chocolate in a similar manner to the chocolate in step 2. Transfer to a piping bag with a small tip or a resealable plastic bag with a corner cut off. Make a squiggly design of white chocolate over the surface of the waxed paper. Chill on the pan until firm, about 5 minutes.
DSC_0178_ed

4. Spread the cooled chocolate in a smooth, even layer over the white chocolate squiggles. Chill for 15 to 25 minutes.

5. Transfer the chocolate disc to a cutting board. Using a large sharp knife, cut the chocolate into 16 wedges. Chill until ready to assemble cake. Remove waxed paper before arranging triangles with squiggle side up on cake.
DSC_0197_ed

Source: Dierberg's Markets "Everybody Cooks" Magazine

Sunday, October 11, 2015

Onion Strings

DSC_0088_OnionStrings2

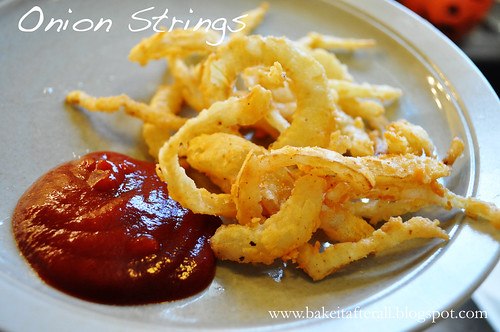
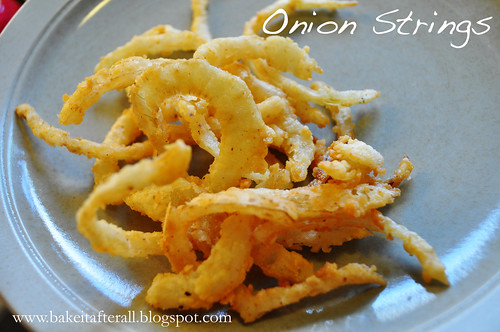
Each year, my sister and her husband join us for an Apple Cider Doughnut making day.  It's one of my favorite days of the fall.  In the last few years, we've decided that we may as well put the hot oil to good use and fry something else!  We now follow up the doughnuts with these Onion Strings from the Pioneer Woman.  They are so good, they may even beat the doughnuts...no seriously, they are that good! We only deep fry once a year, so you better bet we are getting the most out of it and making these. If you ever find yourself with a pot of hot oil, try these. They will not disappoint!

Onion Strings

Ingredients:
1 whole large onion, sliced very thin
2 cups buttermilk
2 cups all-purpose flour
1 scant tablespoon table salt
1/4 - 1/2 teaspoon cayenne pepper
1 - 2 quarts Canola oil
Salt and freshly ground black pepper to taste

Directions: 

1. Place sliced onions in a baking dish, cover with buttermilk, and soak for at least an hour.

2. Combine dry ingredients and set aside.

3. Heat oil to 375F in a Dutch oven. Grab a handful of onions, throw into the flour mixture, tap to shake off excess, and plunge into hot oil. Fry for a few minutes and remove as soon as golden brown. Season with salt and pepper as desired and serve immediately.

4. Repeat with remaining onions.

DSC_0084_OnionStrings1

Source: Pioneer Woman

Wednesday, October 7, 2015

Cauliflower Crust Pizza

DSC_0985_ed_CauliflowerPizza

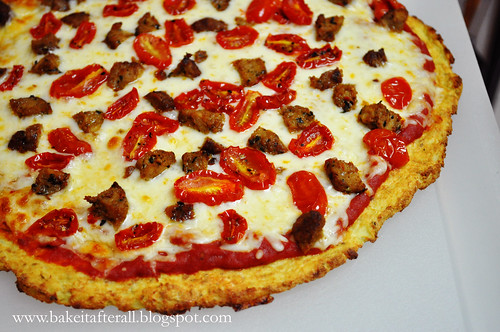
Cauliflower Pizza Crust is all over Pinterest and has piqued my interest on multiple occasions. I actually made this over two years ago and found the image file when hunting through some old files. This crust turned out really well. I find making cauliflower rice and squeezing out the water to be bit labor intensive, but it actually isn't that bad. Make sure you immediately rinse the towel you use to squeeze the moisture out of the cauliflower. I set mine aside and forgot about it and it smelled awful the next morning! I topped my Cauliflower Pizza Crust with pizza sauce, mozzarella, turkey sausage, and Oven-Dried Tomatoes.  Delish!

Cauliflower Pizza Crust

Ingredients:
2 pounds cauliflower florets, riced
1 egg, beaten
1/3 cup shredded mozzarella
1 teaspoon dried oregano
pinch of salt

Directions:
Preheat oven to 400F.

1. To make the cauliflower rice, pulse batches of raw cauliflower florets in a food processor, until a rice-like texture is achieved.

2. Fill a large pot with about an inch of water, and bring to a boil. Add the "rice" and cover; let cook for about about 4 - 5 minutes. Drain into a fine-mesh strainer.

3. This is the secret: Once you've strained the rice, transfer it to a clean, thin dishtowel. Wrap up the steamed rice in the dishtowel, twist it up, then squeeze all the excess moisture out.

4. In a large bowl, mix up your strained rice, beaten egg, mozzarella cheese, and spices. It will not be the consistency of typical pizza dough.

5. Press the dough out onto a baking sheet lined with parchment paper. (It's important that it's lined with parchment paper, or it will stick.) Keep the dough about 1/3-inch thick, and make the edges a little higher for the crust. Bake for 35 - 40 minutes. The crust should be firm and golden brown when finished.

6. Top crust as desired. Return the pizza to the oven, and bake an additional 5 - 10 minutes, until the cheese is hot and bubbly. Slice and serve immediately.

Time-Saving Tip: make a double-batch of cauliflower pizza crusts and save one for later. After baking the crusts, wrap up the extra pizza crust in foil, and freeze it for later use.  Simply add toppings and bake at 400F, until the cheese is hot and bubbly.

Source: Adapted from Detoxinista

Sunday, October 4, 2015

Garlic-Braised Chicken Thighs with Roasted Carrots


DSC_0126_GarlicChickenRoastedCarrots

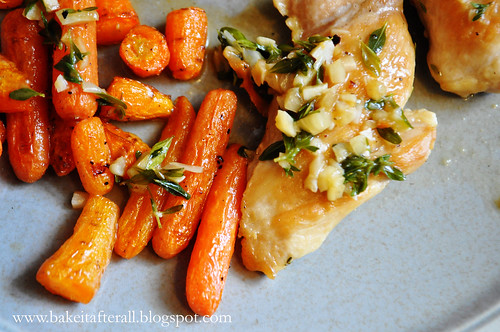
I found this recipe on Pinterest when searching for ways to use the carrots in our garden. This recipe was actually a meal from a Whole30 plan.  While a Whole30 is not exactly my style, I do appreciate some of the Whole30-friendly recipes. The whole family eats this dinner every time I make it. The girls LOVE these carrots! They typically will not eat carrots, but they can't get enough of these. We did compare the grocery store baby carrots to those we grew in our garden, and the ones from our garden do taste better, but any carrot will do. The garlic thyme pan sauce here really elevates the dish, so don't skip that part!

Braised Chicken Thighs with Garlic Pan Sauce and Roasted Carrots

Ingredients:
olive oil
1 - 1 1/2 pounds boneless, skinless chicken thighs
salt and pepper to taste
bunch of fresh thyme, leaves removed and coarsely chopped
3 cloves of garlic, chopped fine
1 1/2 cups chicken stock/broth, divided
1 pound baby carrots or 5 whole carrots, peeled and cut into small pieces
olive oil
salt and pepper to taste

Directions:
Preheat oven to 350F.

1. Heat olive oil in a large saucepan or skillet that has a lid (set the lid aside for now).

2. Line a baking sheet with foil and place carrots on the foil. Toss with olive oil and season with salt and pepper. Bake the carrots for 20 - 25 minutes, turning and mixing them every 5 - 10 minutes so they brown evenly.

3. Meanwhile, place chicken “pretty side” down in hot skillet, sprinkle with salt and pepper, and sauté for 5 - 8 minutes, until browned on one side. Flip chicken and cook until brown on the other side, then add 1 cup of the chicken stock/broth to the pan.  Reduce the heat to medium-low and place the lid on the pan to allow the chicken to cook through. The stock will begin to reduce.

4. When chicken is cooked thoroughly (registers at least 165F with an instant-read thermometer/Thermapen), remove to a plate and set in a warm place (I put mine in the microwave NOT turned on!).

5. Add thyme, garlic, and remaining 1/2 cup chicken stock/broth to pan sauce, turning heat to high. Cook uncovered for about 5 minutes, or until the liquid thickens into a gravy.

6. Add the cooked chicken thighs back to the pan with the sauce.  Spoon sauce over the chicken.

7. To serve, pour sauce over both chicken and carrots. Sprinkle extra fresh thyme if desired.

Source: Adapted from Eat the cookie!

Wednesday, September 30, 2015

Cheddar Bay Biscuits

IMG_0432_CheddarBayBiscuits

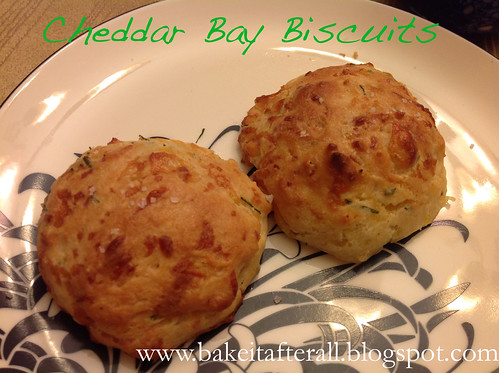
As I mentioned in the last post, I used to love the Sonoma Chicken Stew at Panera. It was served with Dry Jack Cheese Biscuits, which I thought were amazing. They had a delicious, peppery flavor. In fact, on the way to the hospital when I was in labor with Ava, I had Bob stop at Panera so I could get a biscuit since I knew once I got to the hospital I would be strictly confined to clear liquids.

When my sister and I decided to recreate the Sonoma Chicken Stew, she suggested we try these Cheddar Bay Biscuits, since we like the ones at Red Lobster. I am happy to report that these are even better than the biscuits at Red Lobster! The fresh shredded Parmesan forms little pockets of cheese in the biscuits and really transforms these into some of the best biscuits we've ever had.  They really are best warm, so if possible aim to serve them that way.

Cheddar Bay Biscuits

Makes 12 biscuits

Ingredients:
2 cups Bisquick, store bought or homemade
2/3 cup milk (2%)
2/3 cup shredded cheddar cheese
1/3 cup freshly shredded (not grated) Parmesan cheese
1/4 tsp garlic powder
1/2 tsp Old Bay Seasoning
1/4 cup sour cream
2 tablespoons fresh chives, chopped
4 tablespoons melted butter

Directions:
1. Heat oven to 450F.

2. Mix all ingredients except for butter.

3. Drop onto ungreased baking sheet by spoonful.

4. Bake for 8 - 12 minutes or until golden brown.

5. Brush with melted butter, then bake an additional 1 - 2 minutes. Serve warm.

Optional: finish with sprinkle of fleur de sel (flaky sea salt)


Sunday, September 27, 2015

Sonoma Chicken Stew

DSC_0102_ChickenSonomaStew

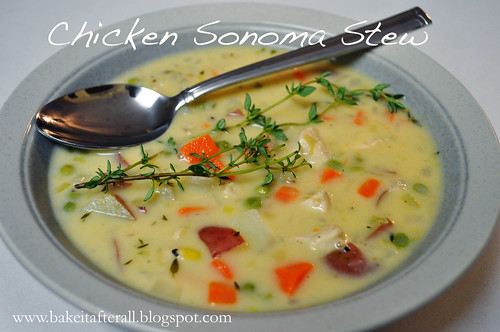
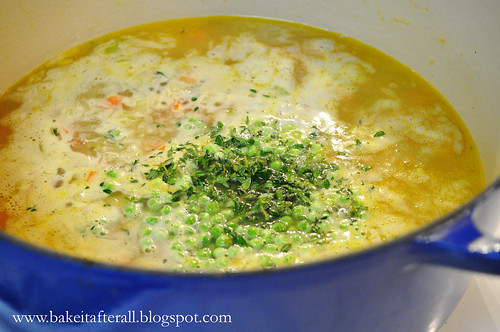
In the fall of 2011, Panera Bread featured a Sonoma Chicken Stew. It was pricier than their typical soups, but it was served with Dry Jack Cheese Biscuits on top. This stew was very similar to their cream of chicken and wild rice soup, which has been one of my favorites since I was in high school. It is a creamy base with chicken and vegetables, but perhaps my favorite part was these small round carrots. I was completely baffled by them. They were so tasty and has a perfect texture. Each had a marking where a stem would be, so it wasn't just small pieces of carrot that were rolled around to form balls. I did some research and found that they are actually called thumbelina carrots and are sometimes grown in Sonoma, California.

I loved this stew so much that Bob and I often went to Panera while I was pregnant with Ava just to get this stew. Sadly, in the fall of 2012, the stew did not return to the fall menu! I was crushed and knew I had to come up with a way to recreate this stew.  My sister Lisa and I set out to do just that. We pulled components from recipes for Chicken & Dumplings, and added in what I remembered being in the Sonoma Chicken Stew. Of course, I couldn't find thumbelina carrots anywhere, so we made do with regular carrots. The stew turned out amazing!  Funny thing, shortly after we made the stew, I found "Parisian Carrots" in the freezer section of Trader Joe's- and they are the same little round carrot balls!  I stocked up!  

Sonoma Chicken Stew

Serves 4-6 dinner-sized portions

Ingredients:
2 tablespoons unsalted butter
1.25 - 1.5 lbs chicken breast, cut into small pieces
3 carrots, peeled and chopped (or thumbelina or Parisian carrots if you can find them!)
1 leek, quartered and sliced thin
1 yellow onion, chopped
2 tablespoons all-purpose flour
4 cups chicken broth
1 pound red potatoes, skin-on, diced small
1/2 cup baby peas (or more)
Fresh thyme, several sprigs
1/2 - 2/3 cup heavy cream

Directions:
1. Melt butter over medium high heat in a large Dutch oven. Season chicken with salt and pepper. Add chicken and cook until browned or opaque and cooked through, about 4-6 minutes. Remove chicken and keep warm.

2. Add carrots, onion, and leek to the Dutch oven. Season with salt and pepper and cook until vegetables begin to soften, 4 - 5 minutes. Add flour and cook for 2 minutes.

3. Add chicken broth slowly and bring to a boil.

4. Add potatoes, peas, and thyme, reduce heat and simmer uncovered until cooked through. If stew is getting too thick, cover while continuing to simmer. Add cooked chicken back to the Dutch oven and cook just until warmed.

DSC_0099_ChickenSonomaStew2

5. Add heavy cream. Season with salt and pepper to taste, if necessary.

Source: Lisa & Meghan Original Recipe :-)


Wednesday, September 23, 2015

Cheddar Dill Scones

DSC_0347_CheddarDillScones


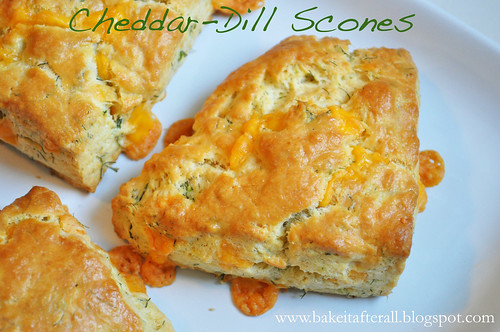
In my spare time, I love to watch episodes of Barefoot Contessa. Ava shares my love of cooking, and she absolutely adores Ina!  She will often ask to watch "Barefoot" as she calls her. One particular episode of the Barefoot Contessa titled "Ladies Who Lunch" featured chicken salad and Cheddar-Dill Scones. I served these scones with Harvest Chicken Salad.  We all really loved them; I don't think I've ever made one of Ina's recipes that we didn't like!

Cheddar Dill Scones

Ingredients:
4 cups plus 1 tablespoon all-purpose flour, divided
2 tablespoons baking powder
2 teaspoons salt
3/4 pound cold unsalted butter, diced
4 extra-large eggs, beaten lightly
1 cup cold heavy cream
1/2 pound extra-sharp yellow Cheddar, small-diced
1 cup minced fresh dill
1 egg beaten with 1 tablespoon water or milk, for egg wash

Directions:
Preheat the oven to 400F.

1. Combine 4 cups of flour, the baking powder, and salt in the bowl of an electric mixer fitted with a paddle attachment.

2. Add the butter and mix on low speed until the butter is in pea-sized pieces. Mix the eggs and heavy cream and quickly add them to the flour-and-butter mixture. Combine until just blended.

3. Toss together the Cheddar, dill, and 1 tablespoon of flour and add them to the dough. Mix until they are almost incorporated.

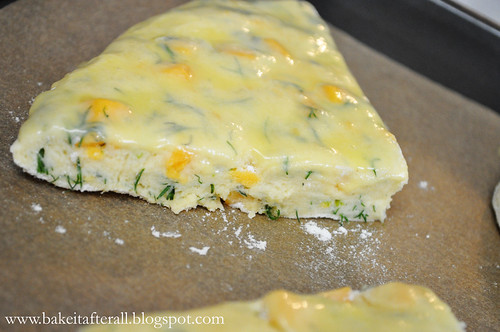
4. Dump the dough onto a well-floured surface and knead it for 1 minute, until the Cheddar and dill are well distributed. Roll the dough 3/4-inch thick. Cut into 4-inch squares and then in half diagonally to make triangles. Brush the tops with egg wash.

DSC_0325_CheddarDillScones1

5. Bake on a baking sheet lined with parchment paper for 20 to 25 minutes, until the outside is crusty and the inside is fully baked.

Source: Barefoot Contessa


  © Blogger template Brownium by Ourblogtemplates.com 2009

Back to TOP