Search This Blog

Friday, November 27, 2009

12 Days of Christmas: Day 1

I know, I know, it's not even December yet, but in my book, the Christmas season starts immediately after Thanksgiving :) Thus begins my installment of the 12 Days of Christmas - 12 posts between now and Christmas Eve celebrating recipes that represent Christmas to me. To kick it off, I'm posting one of my favorite appetizers, Buffalo Chicken Dip.

On Christmas Eve, my family all gets together to exchange gifts and spend time together. For many years we've had an appetizer party, where some of the best party food is served. I really love appetizers, much more than dinner, so it's one of my favorite times to break out the tried and true recipes and to experiment with new ones. My mom got this recipe several years back from a family friend, and it has since become very popular with us. I've made it for parties that Bob and I have hosted, and it always goes quickly. It's actually the ultimate football food in my opinion, so it's perfect for Superbowl as well. It's buffalo wings without the mess, plus any dip you can scoop up with a tortilla chip is a winner! I'm sure there are a lot of versions of this recipe floating around, but this is the first and only one I've tried, and I think I'll stick with it!

I didn't get a good picture of it baked because I took it to a party and baked it there, but here's what it looks like right before going in the oven. The final product isn't very photogenic anyway, but SO tasty!


Buffalo Chicken Dip

Ingredients:
5 chicken breast halves, cooked and cubed or shredded (about 3 cups of cut-up cooked chicken) *I usually get a grocery store pre-cooked rotisserie chicken and shred all of the meat from it - white and dark
8 ounces hot wing sauce
8 ounces ranch dressing (I use light)
8 ounces cream cheese, cut in cubes (I use light)
2 cups shredded cheese (cheddar, Monterey jack, or combo; 2% cheese is fine)

Directions:
Preheat oven to 350F.
1. Layer all ingredients in a 13 x 9 baking dish.

2. Bake for about 30 minutes, until cheese is melted and bubbly.

3. Serve with tortilla chips, like Tostitos Scoops (or anything else you'd like to dip in there!)

Alternately, assemble the layers WITHOUT the cheese and bake for 15 minutes, then stir the dip and top with shredded cheese. Finish baking for another 15 minutes.

My mom's notes: You can make a 1/2 recipe in an 8-inch pan, or divide the whole recipe between 2 8-inch pans - use one and freeze the other.

Source: My mom's friend Margaret S.

Wednesday, November 25, 2009

Black Bottom Caramel Pumpkin Cheesecake Bites

I've been wanting to make these ever since the day Jenny posted them - they were just so cute! They're actually one of the reasons I finally got the mini cheesecake pan. These were really fantastic! The Oreo crust, the creamy cheesecake, the caramel topping - a winning combination! I asked Bob to compare these to the Pumpkin Spice Magic Bar Mini's; he said he actually liked these better, but said if these were topped with coconut, they'd be over the top! :)

Instead of topping them with Pumpkin Spice Kisses, I decided to make chocolate pumpkins. I used the technique that Annie posted, where you pipe chocolate onto waxed paper and then simply peel it off. It's so much fun, and I can't wait to make all of the other fun shapes I've though of. I highly recommend these cheesecake bites!!!

I should be in St. Louis for the holiday weekend by the time this posts, and I probably won't be near a computer for the next few days. Everyone please have a safe and wonderful Thanksgiving!!! See you soon with my first annual "12 Days of Christmas" installment! :)


This really is a pumpkin shape, although Bob said "What is this? A moose?" Figures!

Black Bottom Caramel Pumpkin Cheesecake Bites

Ingredients:
8 whole Oreos, finely ground in food processor
1 1/2 Tablespoons melted butter
8 ounces softened cream cheese (I used light)
1/2 cup granulated sugar
1/2 cup pumpkin puree
1 large egg
1 teaspoon vanilla
1/2 teaspoon cinnamon
1/4 teaspoon ground nutmeg
sprinkling of pumpkin pie spice
Caramel dip or fat free caramel sundae topping
1 ounce semi-sweet chocolate

Directions:
Preheat oven to 350F.
1. Combine the ground Oreos and melted butter into a bowl until well combined. Spoon into 12 mini cheesecake cups that have been sprayed with cooking spray (I didn't spray them and had no problem getting them out). Press into the bottom of each cup so the crust is flat. (If you have a cup or container small enough that works well.) Partially bake for 10 minutes then remove from oven.

2. With a handheld or stand mixer, beat the cream cheese, sugar, and pumpkin until smooth. Beat in egg, vanilla, and spices until combined.

3. Pour batter evenly into the 12 cups filling about 3/4 way full. (I found it was easiest to pour the batter into a pourable measuring cup and then pour into the cups). Carefully put about a teaspoon of caramel on the top of each filled cup and gently swirl with a toothpick.
4. Bake for 25-28 minutes until cheesecake is cooked through. At this point I used a plastic knife to loosen the edges of each cheesecake.

5. After the cheesecakes have cooled, remove them from the pan and top them with more caramel. Refrigerate.
6. Make the chocolate decorations: Draw desired shape(s) on a piece of paper and trace it onto waxed paper 12 times using a sharpie or pen. Flip waxed paper over and place on a flat surface.

7. Melt 1 ounce of semi-sweet chocolate in a bowl in the microwave until just melted. Add to a small sandwich bag and cut off very tip.

8. Pipe chocolate onto waxed paper, tracing the shapes made by the sharpie. Slip the sheet of waxed paper into the fridge. When set, carefully remove the shapes from the waxed paper and decorate the cheesecakes.

Source: Adapted from Picky Palate

Monday, November 23, 2009

Leek and Potato Soup

The first time I tried Leek and Potato Soup was at a California Pizza Kitchen. I was in junior high, and I had never even heard of a leek! I was glad that I went ahead and tried it because it was such a delicious soup! My sister sent me this Julia Child recipe several weeks ago after she made it. This was fantastic! It's the first Julia Child recipe I've ever made and hopefully not the last! It has surprisingly little butter for a Julia Child recipe, and many options so you can personalize the soup to your taste.

Leek and Potato Soup

Makes 6-8 servings

Ingredients:
3 Tablespoons butter
3 cups sliced or minced leeks (white parts only), or onions, or a combination of both
3 Tablespoons flour
2 quarts hot water (or 4 to 6 cups water plus milk added at end of cooking)
1 Tablespoon salt, pepper to taste
Optional: a cup or so of tender green part of the leeks, sliced or minced
4 cups (about 1 1/2) potatoes, peeled, and roughly chopped
1/3 to 1/2 cup heavy cream or sour cream (I used light sour cream)
2 to 3 Tablespoons butter, optional (I omitted)
2 to 3 Tablespoon minced fresh parsley and/or chives

Directions:
1. Melt butter over moderate heat in a 3- to 4-quart heavy-bottomed saucepan. Stir in the leeks and/or onions, cover pan, and cook slowly for 5 minutes without browning.

2. Blend in the flour, and stir over moderate heat for 2 minutes to cook the flour without browning. Remove from heat, let cool a moment, and gradually beat in a cup of hot water. Blend thoroughly with the flour and vegetables, then stir in the rest of the water. Note: If you want to use milk, add it at the end of the cooking - it will curdle if you add it now.) I used 6 cups water now and 2 cups milk at the end.

3. Stir in the salt and pepper, optional green of leeks, and the potatoes. Bring to a boil, and simmer partially covered for 40 minutes, or until vegetables are thoroughly tender.

4. For a peasant-type soup, mash the vegetables in the pan with a mixing fork or potato masher. For a smoother texture, put through medium blade of a food mill. I used an immersion blender and it worked perfectly.

5. "Final enrichments": To serve the soup, stir in the milk if using, and blend in as much of the cream/sour cream as you wish. Add salt and pepper to taste. Off heat, stir in the extra butter if desired. Decorate each serving with more cream/sour cream and a sprinkling of herbs.

Source: Julia Child's Kitchen

Friday, November 20, 2009

Roasted Acorn Squash

I've never cooked with acorn squash before, or ever eaten it for that matter, but every year I see these adorable squash in the grocery store produce section, so this year I decided to try one. This recipe for Roasted Acorn Squash calls for one half of the squash to be filled with butter and brown sugar, and the other half to sit on top. I decided to fill each half with the good stuff so that Bob and I could each have our own. Unfortunately Bob didn't like his. I guess he just doesn't like acorn squash. I really liked mine, until the butter/sugar mixture ran out . . . then I didn't see a need to eat any further! If you like acorn squash, I'm sure you'll love this recipe!

Don't mind those little fork marks - it's where I tested for softness . . .

Roasted Acorn Squash

Serves 2 or more

Ingredients:
1 medium acorn squash, halved and seeded
2 Tablespoons butter
4 Tablespoons brown sugar

Directions:
Preheat oven to 350F.
1. Turn acorn squash upside down (skin side up) onto an aluminum foil-lined baking sheet. Bake until squash begins to soften, approximately 30 to 45 minutes.

2. Remove squash from the oven and turn over so that the flesh is facing up. Place 1 Tablespoon butter and 2 Tablespoons brown sugar into each squash half.

3. Bake another 30 minutes.

4. To serve, you can scoop out the insides and place in a dish, or just eat it right out of the squash (which is what we did!)

Source: Adapted from Allrecipes.com

Wednesday, November 18, 2009

Caramel Popcorn Balls

There's nothing quite as Fall-ish to me as popcorn balls, maybe because one of our neighbors always handed them out for treats on Halloween night. (But they are great year round if you ask me!) Unfortunately, I don't have that recipe, but when I took Home-Ec in 8th grade, we made these Caramel Popcorn Balls and OMG they are amazing! Thankfully I have a mom who saves recipes, because we kept this one.

See - the original copy that she scanned to send to me:
(I love how it has a hint at the bottom of how to measure out 3/4 cup - guess I forget what it's like to be around junior high kids!) I've made these several times, and finally figured out the trick. They must be wrapped in waxed paper immediately after being formed, otherwise they will harden and stay that way! For the best, chewy texture ever, they can't sit out to cool without being wrapped. This time, I remembered to wrap them right away and they stayed chewy. However, a new problem arose - they stuck to the waxed paper. I think spraying the waxed paper with cooking spray (butter flavored might be good) before wrapping the popcorn balls might be a good idea, so I've written it into the recipe. Haven't tried it yet, but no one wants to be picking off little pieces of waxed paper to get to the yummy caramel inside! But if they do happen to stick, you can pop them in the microwave for a few seconds to loosen the paper :)


Caramel Popcorn Balls

Ingredients:
8 cups of popped corn (1/2 cup unpopped corn)
*I just used 1 package of butterless microwave popcorn and it was exactly 8 cups.
waxed paper squares
cooking spray

Sauce:
3/4 cup granulated sugar
3/4 cup brown sugar
1/2 cup light corn syrup
1/2 cup water
1 teaspoon white vinegar
1/4 teaspoon salt
3/4 cup (1 1/2 sticks) butter

Directions:
1. Pop corn and place in a large bowl.

2. In a saucepan, combine sugars, corn syrup, water, vinegar, and salt. Attach a candy thermometer to the side of the pan; heat to boiling over medium-high heat, stirring all of the time. Cook until mixture reaches 260F.

Recognize this picture? I accidentally posted it under Pumpkin Seed Brittle! That's what happens when you make 2 candy recipes in 1 weekend!

3. Reduce heat to low; stir in butter until melted. Pour syrup over corn in a thin stream. Stir until well coated. Cool slightly.

4. While the caramel corn is cooling, cut squares of waxed paper and spray them with cooking spray. (Note: I've never tried this but I think it's a good idea. Even though the caramel corn has so much butter in it, it still sticks to the waxed paper - TRUST ME on this one! haha)

5. Butter your hands. Scoop a small handful of popcorn mixture and form into a 3" ball. Place on a square of waxed paper, twist and turn paper to close. *It is key to seal up the popcorn balls at this point. Do NOT let them cool before you do this or they will harden and turn into rocks. Again, TRUST ME - I have done this before too!

Yield: 16 popcorn balls

Source: My 8th grade Home Economics teacher!

Monday, November 16, 2009

Chicken Mexican Pizzas

I have a confession: I like Taco Bell. I know some people think it's gross or the Mexican food equivalent of McDonald's, but I've always really liked it. One of my favorite things to order there is the Chicken Mexican Pizza. Yes, it's greasy and unhealthy, but it's soooo good. I never even thought to try making it at home. When I saw this recipe for Chicken Mexican Pizzas, it hit me how great of an idea this is. The ingredients are simple; there's no reason this can't be made at home - and modified to be much healthier.

Bob and I LOVED this dinner. I will make it again and again - it was great! I just diced up the chicken this time (even though the recipe called for shredded), but next time I will try the shredded. Other than that it was perfect!!! The best part is that you can customize it for picky eaters - I left off the beans on mine and Bob left off the olives on his. Great for a picky household like ours :)


Chicken Mexican Pizzas

Serves 2

Ingredients:
1 large or 2 small chicken breasts, diced into small pieces
Olive oil
Taco or fajita seasoning or your own blend of spices (such as chili powder, onion powder, garlic powder, cumin, and salt and pepper)
4 medium-large flour tortillas
Cooking spray
1/2 can refried beans or jalapeno bean dip
1 tomato, seeds and juice removed, diced
1 small jar taco sauce (recommended: Taco Bell brand)
Mexican blend cheese, shredded
Small bunch of green onions, thinly sliced
1 small can sliced black olives

Directions:
Preheat oven to 350F.
1. Heat some olive oil in a skillet. Add chicken and taco or fajita seasoning (or just shake in some chili powder, onion powder, garlic powder, cumin, and salt and pepper). Add a little water if necessary to dissolve the spices. Alternatively, add precooked shredded or diced chicken to the pan without oil and add spices and water to season meat.

2. Spray both sides of each tortilla with cooking spray and place them on the middle rack of the oven. Bake for 3 minutes, then flip and bake for about 3 more minutes until golden brown and crispy. (Make sure to watch them closely because they can burn easily).

3. Remove tortillas from oven and turn oven up to 400F.

4. Heat refried beans/bean dip in a small bowl, if desired.

5. To assemble the pizzas: spread beans on top of one of the tortillas, then add the chicken, top with second tortilla, spread taco sauce evenly on top, add cheese, tomatoes, green onion, and olives.

6. Bake for 5 minutes or until cheese is melted. Cut each pizza into 4 slices using a pizza cutter.

Source: Adapted from Macaroni and Cheesecake

Friday, November 13, 2009

Butter Cookies

My grandma's butter cookies are famous in our family. We all absolutely love them, and it seems like anyone else who tries them does too. They are a staple at Christmas time, and no cookie tray is complete without them, in my opinion. To sum it up, they are bite-sized morsels of buttery goodness. I believe they are very similar to a traditional Spritz Cookie, although I can't say for sure.

All of my aunts have at least one (if not multiple) cookie press(es), specifically for these. Growing up, these cookies were strictly for holidays. However, years ago when I was in college, my mom used this recipe to make pink heart-shaped cookies and sent them to me in a Valentine's Day care package. I have to admit, I was a little thrown off - butter cookies in February?!? Well, my roommates and I devoured them in a few days, and I realized that this recipe is good for any time of year.

When I got my own cookie press as a wedding gift, I noticed that I had a shape I'd never seen before - a pumpkin! (You may have noticed how much I love pumpkins and Fall). So, I decided that little orange pumpkin-shaped butter cookies would be a new fall tradition, and I've made them each year since!

P.S. It's Friday the 13th! I need to find a scary movie to watch or something :)

Butter Cookies

Ingredients:
2 1/4 scant cups flour
1/2 teaspoon baking powder
1/2 teaspoon salt
1 cup (2 sticks) butter, softened
1/2 cup granulated sugar
1/2 cup powdered sugar
1 egg yolk
1 teaspoon vanilla extract
2 teaspoons milk
food coloring/gel (orange or a combination of red and yellow)

Directions:
Preheat oven to 375F.
1. Sift flour, baking powder, and salt together in a medium bowl, and set aside.

2. In the bowl of a stand mixer or in a large bowl using a hand mixer, cream the butter. Add the sugars until well blended. Add the yolk and vanilla and mix until well combined.

3. Add the dry ingredients to the wet ingredients alternately with the milk (I typically add half the dry, then 1 teaspoon of milk, and repeat).

4. Stir in food coloring/gel and mix to achieve desired color. I used 9 drops of yellow and 9 of red for these. You can premix the food coloring, or just add one color on top of the dough, dropwise, then add the second color in drops on top the first before mixing.

5. Add the dough to the barrel of a cookie press fitted with your disk shape of choice and press the cookies onto ungreased cookie sheets. Bake for 6-10 minutes, depending on how brown you prefer them.

Source: My Grandma

Wednesday, November 11, 2009

Pumpkin Seed Brittle

There are a lot of things I've never had before because of my peanut/tree nut allergy. Peanut brittle is one of them. Luckily, these days it seems like people are coming up with alternative ideas to traditional recipes, many of which use sunflower or pumpkin seeds instead of nuts. When I saw Martha Stewart on the Today show a while back, she featured Pumpkin Seed Brittle, which I found very exciting. I've since seen in around a lot - even at Williams-Sonoma! I thought this recipe was really good, although I can't compare/contrast it to peanut brittle obviously. I took this to a party and people seemed to like it. The one comparison I heard was that it's not quite as hard as traditional peanut brittle (maybe because of the honey). This recipe was so simple to prepare, especially since I had already roasted pumpkin seeds the week before (using THIS method).

Pumpkin Seed Brittle

Ingredients:
1/4 cup (1/2 stick) unsalted butter, plus more for baking sheet or dish
1/2 cup packed light-brown sugar
1/4 cup honey
1 cup fresh pumpkin seeds, toasted as desired

Directions:
1. Butter an 11 x 17-inch rimmed baking sheet or Pyrex dish. Set aside.

2. Melt butter in a small saucepan over medium heat. Stir in sugar and honey. Bring to a boil. Cook, without stirring, until mixture is medium amber and a candy thermometer registers 280F, about 6 minutes.

3. Stir in the pumpkin seeds. Cook until mixture reaches 300F, about 2 minutes.

4. Pour into prepared pan. Let cool completely. Break into pieces.

Source: Adapted from Martha Stewart

Monday, November 9, 2009

Butternut Squash and Apple Soup

One of my favorite things about Fall is the wonderful fruits and vegetables that are at their peak. The cooler weather means that it's officially soup season (although some of us enjoy soup year round with the a/c cranked up!) I initially made this soup last year. It was my first time working with butternut squash, so I was a little intimidated, but it's really not difficult. The hardest part is cutting the squash open! This recipe does require a lot of peeling and chopping, but it's definitely worth it. Considering this is Ina Garten's recipe, it should come as no surprise that it's AMAZING!!! Bob and I LOVE this soup and highly, highly, highly recommend it! It makes a LOT, so be prepared for leftovers!

Butternut Squash and Apple Soup

Ingredients:
2 Tablespoons unsalted butter
2 Tablespoons olive oil
4 cups chopped yellow onions (3 large)
2 Tablespoons mild curry powder
5 pounds butternut squash (2 large)
1 1/2 pounds sweet apples (4)
2 teaspoons kosher salt
1/2 teaspoon freshly ground black pepper
2 cups water
2 cups good apple cider or juice

Directions:
1. Warm the butter, olive oil, onions, and curry powder in a large stockpot uncovered over low heat for 15 to 20 minutes, until the onions are tender. Stir occasionally, scraping the bottom of the pot.

2. Peel the squash, cut in half, and remove the seeds. Cut the squash into chunks. Peel, quarter, and core the apples. Cut into chunks.

3. Add the squash, apples, salt, pepper, and 2 cups of water to the pot. Bring to a boil, cover, and cook over low heat for 30 to 40 minutes, until the squash and apples are very soft. (This takes a bit longer for me).

4. Process the soup through a food mill fitted with a large blade, or puree it coarsely in the food processor fitted with a steel blade. (You may also use an immersion blender, which I did - much easier!)

5. Pour the soup back into the pot. Add the apple cider or juice and enough water to make the soup the consistency you like; it should be slightly sweet and quite thick. Season with salt and pepper if desired and serve hot.

Source: Adapted from the Barefoot Contessa Ina Garten

Friday, November 6, 2009

Pumpkin Latte

One of my favorite things about fall is the Pumpkin Spice Latte. I first noticed them at Starbuck's years ago, and now it seems like every major coffee place carries a version of this delicious drink. As good as they are, I find it hard to shell out almost $5 for a drink, so last year I found this Pumpkin Latte recipe. I really enjoyed! Bob has a bit of a problem with the texture of the drink (it has pure pumpkin puree in it so it's not quite as smooth as the more artificial drinks out there). What I like is that you can make this recipe any way you want (kind of like at Starbuck's!) - decaf, half caf, lower sugar, etc. It's a nice alternative that allows you to stay in your warm cozy home and save a little money for the upcoming holiday season! :)

Pumpkin Latte

Serves 2 (8-ounce servings)

Ingredients:
1 cup strong coffee
2/3 cup (5-ounce can) evaporated fat free milk
1/4 cup pure pumpkin puree
1 to 2 teaspoons granulated sugar (or sweetener of your choice)
1/8 teaspoon pumpkin pie spice or ground cinnamon

Optional toppings:
whipped cream
sprinkling of pumpkin pie spice or ground cinnamon

Directions:
1. Combine coffee, evaporated milk, pumpkin, sugar, and pumpkin pie spice in a 2-cup microwave-safe glass measure or small saucepan. Heat until very hot. If using stove, use medium-low heat and stir occasionally.

2. Carefully pour into mugs. Top as desired.

Tip: To make a foamy top to your latte, prepare as above and carefully transfer the mixture to a blender. Cover with lid, hold lid down with folded towel or potholder. Blend for 1 minute, then serve.

Source: Adapted from CooksRecipes.com

Wednesday, November 4, 2009

Fluffy Pumpkin Dip with Cinnamon Tortilla Cutouts

Here is another recipe I had made for Thanksgiving brunch last year. I just thought it was so adorable when I saw it on Leslie's blog, The Hungry Housewife. I'm really into using food as serving dishes, so this was right up my ally. Plus, the Cinnamon Tortilla Cutouts are so ridiculously cute! I have a bunch of fall-themed cookie cutters that I knew would be perfect for this sort of thing. My family really liked the dip, and especially liked the Cinnamon Tortillas. I may just make this again at our Thanksgiving Day brunch this year. I recommend this recipe for any fall-themed party!
(Pictures taken by my Dad last year!)

Fluffy Pumpkin Dip

Ingredients:
1 16-ounce container of cool whip, thawed
1 5-ounce packet of instant vanilla pudding
1 15-ounce can pure pumpkin puree
1 1/2 teaspoons pumpkin pie spice
1/2 teaspoon vanilla extract
1 pie pumpkin, hollowed, for serving (if desired)

Directions:
1. In a large bowl, mix together the pudding, pumpkin, pumpkin pie spice, and vanilla. Gently stir in the cool whip. This will take about 5 minutes to get a smooth texture.

2. Add dip to the hollowed pumpkin and serve with fruit and Cinnamon Sugar Tortillas (see below).

Cinnamon Sugar Tortilla Cutouts

Ingredients:
Flour tortillas
Cinnamon sugar
Butter flavored cooking spray

Directions:
Preheat oven to 350F.
1. Use cookie cutters or cut tortillas into desired shapes. Place them on a lined baking sheet.

2. Spray tortillas with butter flavored spray and sprinkle with cinnamon sugar as desired. Spray again to make sure the cinnamon sugar adheres.

3. Bake for 10 minutes or until lightly browned.

Monday, November 2, 2009

Pumpkin Spice Magic Bar Mini's!

Happy November!!! Thanksgiving month is here! The pumpkin recipes will continue throughout the month :)

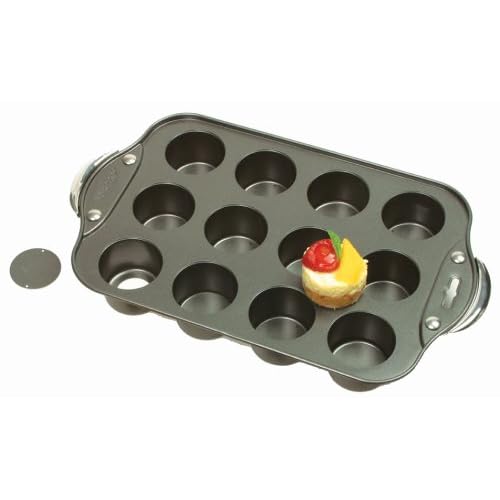
Mini-cheesecakes are so popular in the food blogging world (especially on Jenny's blog Picky Palate), and I've been wanting a mini-cheesecake pan for a long time. For my birthday, I decided to buy myself two pans.
I added them to my Amazon shopping cart but waited until the next day to purchase, and wouldn't you know it - the price went up $3 per pan! Shows me not to hesitate!

I'm so excited for all the possibilities! These pans are great for not just cheesecakes but any little dessert. Mini-sizes are so convenient for parties, the workplace, and even just to have at home. I made these Pumpkin Spice Magic Bar Mini's for Bob to take in to the hospital, and he said they were a big success! We think they taste better cold, so I suggest you store them in the fridge.


Pumpkin Spice Magic Bar Mini's

I doubled the recipe for 24 mini's, so please see the original source for the 12-portion recipe.

Ingredients:
1/2 cup melted butter
1 1/2 cups graham cracker crumbs
4 ounces cream cheese, softened
1 1/2 cups pumpkin puree
6 Tablespoons sugar
1/2 teaspoon cinnamon
1 cup chocolate chips
1 cup cashews, coarsely chopped (I omitted)
1 1/2 cups sweetened shredded coconut
1 cup sweetened condensed milk
Caramel ice cream topping to drizzle

Directions:
Preheat oven to 350F.
1. Place melted butter and graham cracker crumbs in a large bowl, then mix to combine. Press into the bottom of mini-cheesecake cups. Bake for 8 minutes then remove from oven.

2. In another large bowl, beat the pumpkin, cream cheese, sugar, and cinnamon until smooth. Spoon evenly over each graham cracker crust, about 2 small spoonfuls. Next layer the chocolate chips evenly over the pumpkin layer, followed by the cashews (if using), coconut, and condensed milk.

3. Bake for 22-25 minutes or until the top is golden brown. Remove and let cool. **Before bars cool completely, use a plastic knife to run around the edges to loosen.

4. Once cooled, carefully remove the bars from the cups and arrange on a serving tray. Drizzle with warm caramel and serve. Alternatively, chill until ready to serve.

Source: Picky Palate

  © Blogger template Brownium by Ourblogtemplates.com 2009

Back to TOP