Search This Blog

Monday, August 31, 2015

Apple Crumble Pizza Pie

DSC_0894_ed


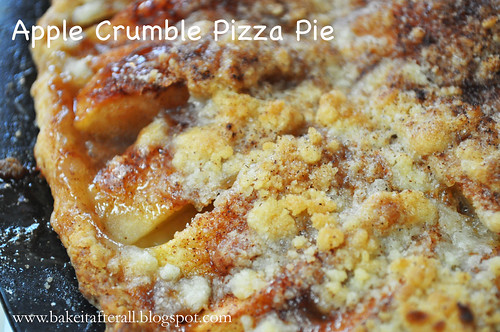
Let's kick off September with an apple recipe, shall we?  This recipe is a family favorite from my mom's old Betty Crocker Cookbook. Interestingly, it has been omitted from the new Betty Crocker Cookbook, as the one I received as a wedding gift does not have this recipe!  I was really surprised to discover this considering how much my family loves this dessert.  It's so simple, especially if you use a store bought pie crust, but it looks impressive and tastes just like apple pie, but possibly better!


Apple Crumble Pizza Pie

Makes 8 to 10 servings

Ingredients:
Pastry for 8- or 9-inch two-crust pie, store-bought or homemade (see recipe below)
6 to 7 tart apples, peeled and cut into 1/2-inch thick slices
1/2 cup sugar
1 teaspoon cinnamon
1/4 teaspoon nutmeg
Crumble topping (see below)

Preheat oven to 450F.

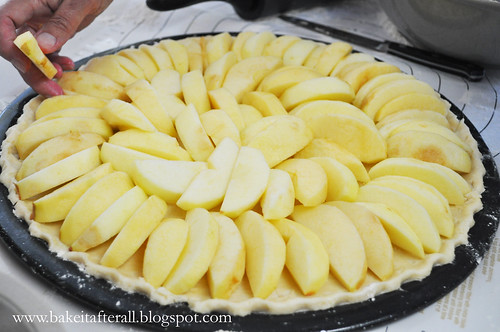
1. Prepare pastry as directed except roll 1 inch larger than 12- or 13-inch pizza pan. Ease into pizza pan and flute edge. (Alternatively, roll the dough into a 13- or 14-inch circle and place on an ungreased baking sheet and flute).

2. Beginning at the ends of the crust and overlapping the slices, cover the crust with apples.

DSC_0884_ed

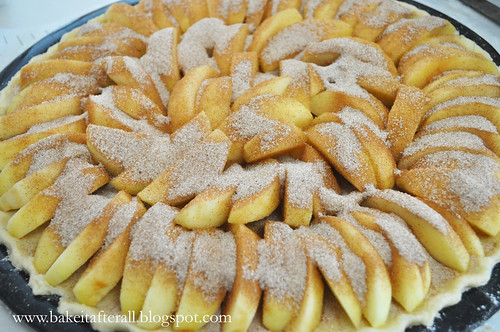
3. Stir together the sugar, cinnamon, and nutmeg. Sprinkle the mixture over the apple slices. Top with Crumble Topping.

DSC_0887_ed

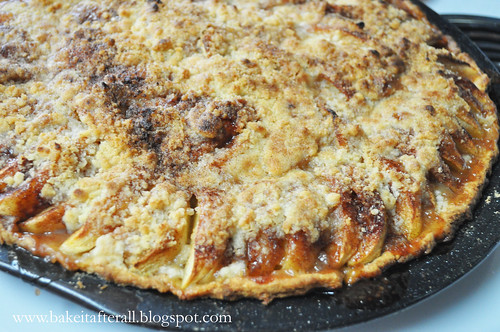
4. Bake 30 to 40 minutes or until edge is golden brown and apples are tender. Best served warm and, if desired, topped with vanilla or cinnamon ice cream!


Crumble Topping

Ingredients:
3/4 cup all purpose flour
1/2 cup sugar
1/2 cup firm butter

Directions:
Mix until crumbly.

DSC_0891_ed

Source: The Betty Crocker Cookbook

This is my go-to pie dough recipe:

All-Butter Double-Crust Pie Dough

Ingredients:
1/3 cup ice water, plus extra as needed
3 tablespoons sour cream
2 1/2 cups (12 1/2 ounces) unbleached all-purpose flour, plus extra for the work surface
1 tablespoon sugar
1 teaspoon table salt
16 tablespoons (2 sticks) unsalted butter, cut into 1/4-inch pieces and frozen for 10 to 15 minutes

Directions:
1. Mix 1/3 cup of the ice water and the sour cream in a small bowl until combined. Process the flour, sugar, and salt together in a food processor until combined. Scatter the butter pieces over the top and pulse the mixture until the butter is the size of large peas, about 10 pulses.

2. Pour half of the sour cream mixture over the flour mixture and pulse until incorporated, about 3 pulses. Repeat with the remaining sour cream mixture. Pinch the dough with your fingers, if the dough feels dry and does not hold together, sprinkle 1 to 2 tablespoons more ice water over the mixture and pulse until he dough forms large clumps and no dry flour remains, 3 to 5 pulses.

3. If using for Apple Crumble Pizza Pie, refrigerate dough until it is a consistency suitable for rolling. If using for a pie, divide the dough into 2 even pieces and wrap in plastic wrap, forming into 4-inch disks before refrigerating.

Source: America's Test Kitchen

Wednesday, August 26, 2015

Baked Jalapeño Poppers

IMG_1490_JalapenoPoppers


One of my favorite things about summer is the seasonal vegetables and fruit, especially if it's from our or our friends' gardens. Our neighbors gave us a bunch of their homegrown jalapeños.  All of my recipes that call for jalapeños usually only use 1 or 2, not 11! My mom suggested I make jalapeño poppers, so I found this recipe via Pinterest and was excited to try it. These were so, so good.  Everyone loved them, even Ava.  She was really sad that she only got 1 and talked about them for a long time after.  Bob and I decided that we need to serve them at our annual Halloween party and call them "Halloweeño Poppers" :-)

Baked Jalapeño Poppers

Ingredients:
1 tablespoon olive oil
1/2 cup Panko breadcrumbs
4 ounces cream cheese, softened
1/2 cup sharp cheddar cheese
1/2 teaspoon garlic powder
1/4 teaspoon onion powder
kosher salt and freshly ground black pepper, to taste,
6 jalapeños, halved lengthwise, seeds sand membranes removed (I always use disposable kitchen gloves when I do this) Note: my jalapeños were homegrown from a neighbor and pretty small so I ended up using 11 of them.

Directions:
Preheat oven to 350F.

1. Line a baking sheet with foil or parchment paper.

2. Heat olive oil in a small skillet over medium-high heat. Add Panko and cook until browned, stirring frequently, about 3 minutes. Transfer to a bowl and set aside.

3. In a medium bowl, cream together cream cheese, cheddar, garlic and onion powders, salt and pepper.

4. Spoon the filling into each jalapeño cavity. Place on prepared baking sheet, filled side up, and bake until the filling is runny and golden, about 15 - 20 minutes.

5. Sprinkle with the toasted Panko and serve immediately.

Source: Adapted from Damn Delicious

Sunday, August 23, 2015

Brownie Sundaes with Cherry-Port Sauce


Bob and my dad both LOVE cherries, so for Father's Day several years ago, I made these Roasted Cherry Brownie Sundaes with a Cherry-Port Sauce.  We all thought they were great, especially the Cherry-Port Sauce. I didn't save the recipe because I knew the source, but as I went back to the blog to retrieve it (years later at this point) the ingredient list is missing. I hunted around and found a similar recipe that I've included below.  The amounts sound familiar so I'm going with it. I'm glad I remembered this recipe because it needs to be made again soon!

Roasted Cherry Brownies

Ingredients:
1/2 pound fresh cherries, stems and pits removed, cut in half or quartered
1/4 cup port wine

Your favorite brownie mix (such as Ghiradelli Dark Chocolate Brownies)
Ingredients to prepare brownie mix according to package directions (oil, eggs, water, etc.)

Directions:
Preheat oven to 425F.

1. Place cherries in a small baking dish with the port. Roast for 30 minutes, until the cherries are very soft and the port has slightly reduced (you'll have 2 - 3 tablespoons of liquid). Set the cherries aside to cool.

2. Meanwhile, prepare brownies according to package directions, reducing oven heat according to your brownie recipe.

3. As the last step in making the brownie batter, stir in the cherries and accumulated juices and then transfer to the baking pan. Bake until a knife inserted in the center of the brownies comes out with moist crumbs attached.

Source: Confections of a Foodie Bride (now called The Brewer and the Baker)


Brownie Sundaes with Cherry-Port Sauce

Ingredients:
1 pound fresh cherries, stems and pits removed, and coarsely chopped
1 cup port wine
3/4 cup sugar

Brownies - from a homemade recipe or boxed mix (such as the Roasted Cherry Brownies above)
Vanilla ice cream - homemade or store bought

Directions:

1. Add the cherries to a small saucepan with the port and sugar, cooking over medium-high until it begins to boil.

2. Reduce heat to medium and simmer for 35-40 minutes, until very thick and syrupy.

3. Serve brownies topped with a scoop of ice cream and a spoonful of warm cherry-port sauce.

Leftover sauce will keep in the fridge for several days, serve rewarmed.

Source: Confections of a Foodie Bride (now called The Brewer and the Baker) and The Gilded Fork

Thursday, August 20, 2015

Bruschetta Grilled Cheese Sandwiches

DSC_0061_BruschettaGrilledCheese


There are many versions of Caprese Grilled Cheese out there, where you sandwich fresh mozzarella, tomato, and basil between 2 slices of bread, but I decided to use my favorite bruschetta mixture instead. This sandwich reminded me of the Tomato & Mozzarella Panini that Panera used to serve (although it is no longer on the menu!!)  I loved that sandwich and was thrilled to make a version at home.

Initially I used butter for the bread like a typical grilled cheese, but Bob and I agreed that olive oil works better in fitting with the bruschetta aspect. This sandwich was a little tricky to flip so I troubleshooted it and came up with a way to avoid flipping the sandwich - grilling each piece of bread separately and only flipping the cheese side when the cheese has started to melt and adhere to the bread. The result is one of our new favorite dinners!

Bruschetta Grilled Cheese Sandwiches

Makes at least 4 large sandwiches, likely more

Ingredients:
6 Roma (plum) tomatoes (or 2 large tomatoes), chopped
1/2 cup sun-dried tomatoes, packed in oil
2 cloves minced garlic
1 tablespoon olive oil
2 tablespoons balsamic vinegar
1/4 cup fresh basil, stems removed
1/4 teaspoon salt
1/4 teaspoon ground black pepper
1/2 loaf good quality bakery bread, sliced
olive oil, for spreading on bread
8 ounces fresh mozzarella, cut into slices

Directions:

1. Combine fresh and sun-dried tomatoes, garlic, olive oil, vinegar, basil, salt and pepper in a medium bowl and set aside for 10 minutes.

2. Drizzle slices of bread with olive oil on one side and use a pastry brush to distribute evenly.

3. Place one slide of bread, oil side down, in a sauté or pancake pan that has been heated to medium. Add slices of mozzarella to the top of this slice.

4. After the cheese slice has cooked for about a minute, add the second slice of bread to the pan, oil side down. Top with bruschetta mixture (use slotted spoon to avoid transferring too much liquid).

DSC_0063_BruschettaGrilledCheese

5. Once the cheese has started to melt and that slice of bread is golden, flip this slice over on top of the bread with the bruschetta on it to make a sandwich.  Continue to grill until cheese is melty bread is golden and toasty.

6. Serve warm!
BruschettaGrilledCheese

Tuesday, August 18, 2015

Zucchini Bread


DSC_0140_ZucchiniBread

This recipe has been in our family for years.  I am sure it is the typical recipe for Zucchini Bread that you can find in cookbooks and around the internet.  It's a simple quick-bread recipe without any bells or whistles - just shredded zucchini and the usual suspects of a quick-bread - sugar, flour, oil, eggs, etc. My favorite part of these types of bread is the crispy top that forms on the top of the loaf- it's the best!  My girls absolutely loved this bread - no surprise since it's essentially a cake!

Zucchini Bread

Makes 2 large loaves

Ingredients:
3 eggs, beaten
1 cup vegetable or Canola oil
2 cups sugar
2 cups grated zucchini (skin on, not squeezed of moisture)
2 teaspoons vanilla extract
3 cups flour
1 teaspoon baking soda
1/2 teaspoon baking powder
1 teaspoon salt
1 teaspoon cinnamon
1/2 cup chopped nuts (pecans) - I omit due to allergy

Directions:
Preheat oven to 325F.

1. Grease and flour 2 loaf pans (I use Pam for Baking spray). 

2. Combine beaten eggs, oil, sugar, zucchini and vanilla.

3. Into a large bowl, sift together the flour, baking soda, baking powder, cinnamon, and salt. 

4. Blend dry ingredients into the batter. Add nuts if using. 

5. Divide batter between 2 loaf pans and bake 50 - 60 minutes (I use the toothpick trick).

Note: For chocolate zucchini bread, add 1/2 cup cocoa powder to dry ingredients.

Source: my mom's recipe card :-)

DSC_0143_ZucchiniBread

Sunday, August 16, 2015

Summer Vegetable Pasta

DSC_0136_SummerVegetablePasta

My mom developed this recipe years ago when she would get fresh Chinese noodles from a client at the office where she worked. My sister and I loved it so much. When she stopped receiving the noodles, she started making the dish with linguine. I haven't had this pasta in years and was reminded of it when a neighbor gave us a HUGE zucchini and yellow squash from her sister's farm.  Just to give you an idea of how big this zucchini was, I used 1/3 of it in this pasta, 1/3 to make 2 big loaves of zucchini bread, and the 1/3 for other recipes!  Here's a picture- keep in mind those bananas are the scale bar and they are average-sized bananas!


I'm so glad I've rediscovered this recipe. The girls were a little leery of the veggies but actually tried them. Pasta is always a hit with them!

Summer Vegetable Pasta

Ingredients:
1 tablespoon butter
1 tablespoon olive oil
1 clove garlic, minced
1 onion, cut in half and then thinly sliced
1 - 2 large yellow squash, cut in half lengthwise, seeds scooped and discarded, cut into 1/4-inch slices
1 - 2 zucchini, cut in half lengthwise then cut into 1/4-inch slices
Italian or Greek seasoning
Dill weed
Salt and pepper to taste
2 tomatoes, peeled, seeded and chopped
1 pound spaghetti or linguine
lots of Parmesan cheese (1/2 cup to 1 cup or more if you desire), plus extra for serving

Directions:

1. Bring a large pot of water to a boil.

2. Melt the butter in a large saucepan and add the olive oil.  Add minced garlic. Sauté for 30 seconds, then add onion, squash and zucchini. Season with Italian or Greek seasoning, dill, salt and pepper.

3. Cook, stirring occasionally, until vegetables soften. May need to put a lid on top of the veggies after a while to allow the steam to help soften.

4. Meanwhile, cook pasta in salted water according to package directions.

5. After vegetables have softened and started to brown, add the chopped tomatoes and cook for 1 minute.  Add the hot, drained pasta to the pan and stir to combine.  Add the grated Parmesan cheese. Taste to check if salt is needed.

6. Serve with extra Parmesan on top.

Source: my mom :-)

Thursday, August 13, 2015

Oven-Dried Tomato Bruschetta


DSC_0072_ed


One of my favorite appetizers is this Double Tomato Bruschetta. It combines fresh and sun-dried tomatoes with the usual bruschetta ingredients and is topped with mozzarella cheese prior to baking. When I had some leftover Oven-Dried Tomatoes in the fridge, I decided to turn them into bruschetta.  The result was amazing!  We served it with Parmesan Basil Orzo and Grilled Shrimp.  Delicious!

Oven-Dried Tomato Bruschetta

Ingredients:
~2 cups Oven-Dried Tomatoes
1 clove minced garlic
1 tablespoon olive oil
2 tablespoons balsamic vinegar
1/4 cup fresh basil, stems removed
Salt and pepper to taste
1 French baguette
shredded mozzarella cheese (depends on the number of bruschetta you make, approx. 2 cups for a full loaf of bread)

 Directions:
Preheat oven on broiler setting.

1. In a large bowl, combine the tomatoes, garlic, olive oil, vinegar, basil, salt, and pepper. Allow the mixture to sit for 10 minutes.

 2. Meanwhile, cut the baguette into 3/4-inch slices. On a jelly roll pan covered in foil, drizzle olive oil and spread evenly with a pastry brush. Place the baguette slices on top, then drizzled them with olive oil and spread evenly with a pastry brush.

3. Broil the bread slices until crispy, turning halfway through (a few minutes on each side- watch closely as things can burn quickly under the broiler).

4. Using a slotted spoon to leave behind excess liquid, divide the tomato mixture evenly over the baguette slices. Top the slices with mozzarella cheese.

5. Broil for 5 minutes, or until the cheese is melted.


Tuesday, August 11, 2015

Ultimate Chicken Fingers

DSC_0974_ed

I found this recipe on Pinterest and while making it, I realized the recipe was on the back of the Bisquick box!  I don't often use mixes like Bisquick, but this sounded too good to pass up. I've seen recipes for homemade Bisquick before that I would like to try.

We really loved these chicken fingers.  The girls couldn't get enough, and I started making them almost weekly for a while because it was a sure-fire way to get them to eat some protein!  I've even doubled the recipe before and just made sure to use two separate resealable bags, otherwise the dry mix starts to get too sticky from the egg-coated chicken.

Ultimate Chicken Fingers

Serves 4

Ingredients:
3 boneless, skinless chicken breasts (about 1 pound), cut crosswise into 1/2-inch strips
2/3 cup original Bisquick mix (store bought or homemade)
1/2 cup grated Parmesan cheese
1/2 teaspoon salt or garlic salt
1/2 teaspoon paprika (I used Sweet Hungarian Paprika)
1 egg, slightly beaten
3 tablespoons butter, melted

Directions:
Preheat oven to 450F.

1. Line a jelly roll pan with foil, spray with nonstick cooking spray.

2. In a gallon-sized resealable plastic bag, mix Bisquick, cheese, salt, and paprika.

3. Dip half the chicken strips into the egg and place in the bag. Seal bag and shake to coat chicken. Place the chicken on the baking sheet. Repeat with remaining chicken.

4. Drizzle melted butter over chicken.

5. Bake 12 - 14 minutes, turning halfway through bake time, until chicken is thoroughly cooked (I use my Thermapen and make sure they are at least 165F; they usually end up around 170-180 but are still juicy).
DSC_0972_ed

Source: Bisquick box

Sunday, August 9, 2015

Oven-Dried Tomatoes

Have you tried Oven-Dried Tomatoes before? It's this cool method of drying tomatoes that doesn't require the sun, but essentially the end result is something that tastes similar to a sun-dried tomato. The "drying" process removes moisture and concentrates the tomato flavor. In the next week or so, I will be posting a few recipes that use Oven-Dried Tomatoes.  They are great on salads, in pastas, on pizzas, etc. 

Oven-Dried Tomatoes

Ingredients:
Cherry or grape tomatoes, halved
Olive oil
Pinch of sugar
Salt and pepper

Directions:
Preheat oven to 225F.

1. Place the tomatoes in a single layer on a baking sheet lined with foil, with the cut side facing up.

DSC_0967_ed_OvenDriedTomatoes

2. Drizzle with olive oil and season with salt, pepper, and a pinch of sugar.

3. Bake tomatoes for about 3 hours, or until they are shriveled.

DSC_0971_ed_OvenDriedTomatoes

4. Cool and refrigerate until ready to use.

Source: Annie's Eats

Thursday, August 6, 2015

Parmesan Potatoes

My aunt and my mom have been making these Parmesan Potatoes for as long as I can remember. They are the perfect side dish for BBQ.  I like mine with ketchup but some prefer them plain. One of my favorite summer meals is BBQ'd chicken, Parmesan Potatoes, and Garlic Bread!

DSC_0871_ed


Parmesan Potatoes

Ingredients:
6 large potatoes, peeled, cut lengthwise into sixths (cut potato in half lengthwise then each half into thirds)
1/2 cup (1 stick) of butter
1/2 cup flour
1/2 cup Parmesan cheese
Salt and pepper to taste

Directions:
Preheat oven to 375F.

1. Add the butter to a shallow baking pan and place in the oven to melt.

2. Add the cut potatoes to a bowl of water to soak for a few minutes.

3. In a resealable gallon-sized bag, add the flour, Parmesan cheese, and salt and pepper to taste.

4. Add cut potatoes to the bag a few at a time and shake. The moisture from the water soak will help the coating stick. Remove potatoes and lay them on a flat side in the pan with the melted butter. Repeat with remaining potato wedges.

5. Bake potatoes for 20 - 25 minutes, then turn them to the other flat side and bake an additional 20 - 25, or until golden brown.

Source: family friend Jeanette


Tuesday, August 4, 2015

Ice Cream Cake - Dairy Queen Copycat

DSC_0680_ed2_IceCreamCake

DSC_0675_ed_IceCreamCake

One of my and my sister's favorite cakes growing up was the Dairy Queen Ice Cream Cake. We often requested it for our birthdays. I thought it would be fun to try this homemade version. You can make this with homemade ice cream if you like, but I chose to go the easy route and use store bought. We really loved this homemade version of the DQ ice cream cake - in fact, we think it's even better than the store bought version!

DSC_0687_ed_IceCreamCake
 

Ice Cream Cake (Dairy Queen Copycat)

Ingredients:
For the crust:
2 1/2 cups crushed Oreo cookies
1/2 cup (1 stick) melted butter
1/2 cup sugar

1/4 - 1/2 gallon chocolate ice cream, slightly softened (or homemade ice cream)
1/4 - 1/2 gallon vanilla ice cream, slightly softened (or homemade ice cream)
8 ounces Cool Whip

For the Hot Fudge Sauce:
2 cups powdered sugar
2/3 cup semisweet chocolate chips
12 ounce can evaporated milk
1 stick butter
1 teaspoon vanilla

Directions:

1. Combine 2 cups crushed Oreos with melted butter and sugar. Press into a 13x9 pan or two 9-inch round springform pans. Freeze for 15 minutes.

2. Spread a layer of each ice cream on top and freeze for 3 hours.

3. Combine first 4 ingredients of hot fudge sauce in a a saucepan and bring to a boil for 8 minutes. Remove from heat and stir in vanilla.  Cool to room temperature.

4. Spoon sauce on ice cream and freeze until firm.

5. Spread Cool Whip on top and sprinkle with Oreo crumbs or colored sprinkles. Freeze for 3 hours.

DSC_0696_ed_IceCreamCake

Source: Adapted from relative taste

  © Blogger template Brownium by Ourblogtemplates.com 2009

Back to TOP