Search This Blog

Monday, June 29, 2009

Chicken Parmesan Burgers

I'm a little embarrassed to admit this, but I just discovered my broiler. I don't know what the heck I thought it was - a really hot drawer under my oven? Seriously, I just ignored it the last 4 years I've lived in this apartment. When a recipe calls for broiling, I just turn the dial to broil and stick the food in the oven. Anyway, when I read Elly's post about how great the broiler is for indoor cooking, I thought maybe I should get down on my kitchen floor and explore that mysterious drawer a bit. I am convinced that what I found will change the way I cook from now on. The broiler is like a little inverted barbeque pit! There's real flames! I've always been bummed that we can't have propane grills on our balconies, but now I no longer have to sulk in the hot summer months when everyone else is barbecuing because I have another option. Sure, you might argue I could have made these burgers on my gas range, but have you ever tried making burgers without an exhaust fan near an over-active smoke detector? I cannot even tell you the number of times I've had to jump up and down waving a kitchen towel to silence the shrill sound. This is when all of you out there with nice, well-equipped kitchens should realize how lucky you are! :)  Hopefully some day . . . 

Although this recipe is for Chicken Parmesan Burgers, I didn't have any hamburger buns, and sometimes Bob and I just like to have meat and salad for dinner, so we just had these without buns. They were great! We both gave this recipe two thumbs up and will make them again.

Chicken Parmesan Burgers

Ingredients:
1 pound ground chicken
1/4 cup Italian-style breadcrumbs
1/4 cup grated Parmesan cheese
1 Tablespoon dried parsley
1 clove garlic, grated
1 shallot, minced
salt and pepper 

spaghetti sauce
shredded mozzarella cheese

Directions:
1. Mix burger ingredients. Form into 4 patties, wrap in plastic wrap, and refrigerate for 30 minutes to allow flavors to blend. 

2. Preheat the broiler and cover a broiler pan with aluminum foil lightly coated with olive oil or cooking spray. 

3. Broil the burgers until browned on top, then flip and brown other side. The length of time will depend on your broiler. Elly recommended 4 minutes on the first side and 3 on the other. For me, it took more like 8 minutes per side. 

4. After burgers are cooked through, top with sauce and cheese and place under broiler for about a minute until cheese is melted. 

Source: Adapted from Elly Says Opa!

Friday, June 26, 2009

Whole Food's Spinach Artichoke Dip

Spinach artichoke dip is probably my favorite appetizer. It's usually served hot and bubbly with tons of cheese - not this dip! It can be served cold and is quite a bit healthier than your typical s/a dip, but just as good. I first found this dip at Whole Foods many years ago. I was amazed by how good it was, but it's SOOO expensive - I'm talking about $7 for a tiny container. It's so expensive that I can't even rationalize buying it . . . ever. So on our Whole Food's trip over Easter, I decided to inconspicuously write down the ingredients listed on the package and try making my own. I was pretty proud because the taste is spot on. Although their version is a bit chunkier, I pureed mine to make it easier. Same taste, different texture. The next time I make this I'll probably try the chunkier version just to compare.
Spinach Artichoke Dip

Ingredients:
1 10-ounce package frozen chopped spinach, thawed and water completely removed
1 14.5-ounce can artichoke hearts, all liquid removed
1 large or 2 small pieces of fire-roasted red peppers (from a jar is fine)
1 bunch green onions, white and light green parts
~3/4 cup light mayonnaise
~3 Tablespoons grated Parmesan cheese
1 jalapeno, seeded and chopped
juice of 1/2 lemon
Pinch of sea or kosher salt
Pepper to taste

Directions:
1. Add all ingredients to a food processor and blend until smooth. Alternatively, roughly chop artichoke hearts, red peppers, green onions, and finely chop jalapeno. Stir well to combine all ingredients in a bowl.

2. Refrigerate dip until ready to serve. Great with crackers or veggies!

Source: Inspired by Whole Food's dip

Wednesday, June 24, 2009

Magic Brownies - Two ways

What did you think I meant? No not that! When I lived in the sorority house my sophomore year of college, our house mom made the most amazing brownies EVER! They were topped with coconut, chocolate chips, and butterscotch chips....sooooo good. I never got the recipe because I didn't really bake back then, but have since searched high and low for something similar. About the closest I could come was the recipes for Magic Cookie Bars - which are apparently pretty popular . . . popular enough that Eagle Brand even sells a boxed kit for them. Well, I decided to try making my own version of the brownies using the Magic Cookie Bar recipe as a template. I also found a recipe that called for a butter-brown sugar-coconut mixture, so I decided to try both and see which was closest to what I remember. When my mom and sister came to visit, I served both brownies and labeled them A and B, then we voted. Results below!

Magic Brownies - A

Ingredients:
1 package brownie mix (plus ingredients to make them)
1 14-ounce can sweetened condensed milk
1 cup shredded coconut
1 cup butterscotch chips
1 cup chocolate chips

Directions:
1. Preheat oven to 350F. Grease two 9-inch round cake pans or a 13x9 pan.

2. Prepare brownies according to package directions, and pour into 13x9 pan or evenly divided between the two 9-inch round pans.

3. In a large bowl, mix together the sweetened condensed milk, coconut, butterscotch chips, and chocolate chips. Drop in spoonfuls onto the brownie mix and spread out as much as possible to cover brownie mix.

4. Bake 35-45 minutes or until a toothpick inserted comes out clean.


Magic Brownies - B

Ingredients:
1 package brownie mix (plus ingredients to make them)
1 cup brown sugar, firmly packed
1/2 cup butter, melted
1 cup shredded coconut
1 cup butterscotch chips
1 cup chocolate chips

Directions:
1. Grease two 9-inch round cake pans or a 13x9 pan. Prepare brownie mix, and bake according to package directions.

2. Meanwhile, in a large bowl stir together the melted butter, brown sugar, coconut, butterscotch chips, and chocolate chips.

3. Remove brownies from oven when a toothpick comes out clean. Preheat broiler. Top brownies with spoonfuls of coconut mixture, spreading as evenly as possible to cover brownies.

4. Broil for 2-3 minutes or until top is crispy and melted.

Source: Adapted from Cooks.com

AND NOW FOR THE RESULTS YOU'VE ALL BEEN WAITING FOR:

My mom and I voted for Magic Brownies A, while Bob and my sister voted for Magic Brownies B. However, after taste testing more extensively, my sister changed her vote to A. Although Bob still maintains his vote for B, but has moved more to the middle. I'm convinced he voted for B because it's his first initial.

In my opinion, the topping of B is too sweet. The sweetness of A is perfect, and the brownies were more fudgey because everything cooks together. While too sweet, the topping of B was nice because it had a crispness from broiling. You really can't go wrong with either one, but I think I will stick to recipe A from now on.

If you'd like to have a bake off of your own, you can simply prepare 1 brownie mix and use half for A and half for B using 1 9-inch round pan for each, which is what I did for this contest. In that case, reduce the amount of 'topping' listed above by half for each recipe.

Monday, June 22, 2009

Chicken [Sausage] Florentine Soup

As I've said before, Bob and I love soup. Kerstin's recipe for Chicken Florentine Soup looked so delicious that I couldn't wait to try it. She takes a normally cream-filled soup and thickens it with potato - brilliant! This soup calls for chicken breasts, but I didn't feel like thawing any on this particular evening, so I threw in some chicken sausages. We loved this meal. It's a very tasty, satisfying soup that tastes like it's made with butter and cream, but is actually very healthy!
Chicken [Sausage] Florentine Soup

Ingredients:
1 Tablespoon olive oil
2 leeks, chopped
3 garlic cloves, minced
3 cups chicken stock
3 red potatoes, peeled and chopped
2 cups (4 ounces) fresh spinach, chopped
3 chicken sausages, diced
1 cup skim milk
2 Tablespoons flour
1 teaspoon salt
grated Parmesan cheese

Directions:
1. In a large stockpot, heat the oil over medium heat and saute the leeks 5 minutes or until tender. Add garlic and saute for 1 additional minute.

2. Add chicken stock and potatoes to the pot and bring to a boil. Reduce heat and simmer for 10 minutes, or until potatoes are tender. Remove from  heat and use an immersion blender to puree the mixture until smooth and creamy. Alternatively, transfer the soup to a food processor or blender and puree, then return soup to pot.

3. Add the chicken sausage and spinach to the soup and simmer for a few minutes until the spinach is wilted and the sausage heated through.

4. In a small bowl, whisk the flour and salt into the milk until smooth. Gradually add the milk mixture to the soup. Bring to a boil; cook and stir for 2 additional minutes. 

5. Reduce heat to low until ready to serve. Top with grated Parmesan cheese, if desired.

Source: Adapted from Cake, Batter, and Bowl

Friday, June 19, 2009

Monkey Bread Muffins

Monkey Bread is something I never had until a few years ago. My mom found a recipe and made it for Christmas Day breakfast, and man was it good! I loved Maria's idea to make these into muffins, especially because it allows you to scale down the recipe for just two people. I made these for Bob and I for Easter breakfast. They are so delicious! Unless you're serving a huge crowd who can finish off a big bundt pan of Monkey Bread, these muffins are the way to go!

A little lop-sided but good nonetheless!

Monkey Bread Muffins

Yield: 4 muffins

Ingredients:
1 can of refrigerated biscuits (I bought a pack of 4 cans of biscuits, with each can containing 8 very small biscuits - so I used just 1 can, which made 4 Monkey Bread Muffins)
cinnamon
sugar
1/4 stick butter
1/4 cup brown sugar

Directions:
1. Preheat oven to 350F. Grease a muffin tin with oil or cooking spray.

2. Divide each biscuit in half and roll the dough into little balls. 

3. Combine the cinnamon and sugar to your liking. Roll the dough balls in the cinnamon-sugar mixture. 

4. Place four balls in each muffin cup.

5. Melt the butter and brown sugar in a small pot on the stove. Stir until melted and bubbly.

6. Pour the sauce over the muffins.

7. Bake for 10-12 minutes.

8. Allow muffins to cool in pan for 1 minute. Remove muffins from pan.

Source: Adapted from Two Peas and Their Pod

Wednesday, June 17, 2009

Ale-braised Sausages and Peppers

Another orzo recipe?!? Yep, but you can use any pasta shape you want, or omit the pasta and serve alongside mashed potatoes, as the original recipe suggests.  The first time I made this, I served it with sliced new potatoes sauteed with onion. More recently, I tossed in some orzo, which was really delicious. If you prefer to serve with potatoes, just omit the pasta from the recipe below. I adapted the recipe for 3-4 servings and used Trader Joe's chicken sausage. I only buy chicken sausage that is 'skinless' (i.e. no casing), so I'm a bit limited on flavors. The jalapeno chicken sausages I used have a strong flavor, but we liked it. 

Ale-braised Sausage and Peppers

Ingredients:
3 skinless chicken sausage links, sliced
1 Tablespoon extra virgin olive oil
1 medium yellow onion, sliced
1 red bell pepper, sliced
1 1/2 Tablespoons flour, divided
3/4 cup ale
3/4 cup chicken broth
1 1/2 Tablespoons dried chopped thyme
1 cup uncooked orzo pasta

Directions:
1. Heat a pot of water to boiling for the pasta.

2. Heat sausage slices in a pan over medium-high heat for a few minutes until lightly browned. Transfer to a plate, set aside and keep warm.

2. Heat the olive oil in the same pan and add the onion and pepper. Cook until golden, around 5 minutes. Meanwhile, cook the orzo.

3. Stir in 1 Tablespoon flour and cook 1-2 minutes. Whisk in ale until mixture is smooth and bubbly. Add the thyme and broth, whisking to blend and bring to a simmer. Reduce heat to medium-low and cover for 15 minutes, stirring occasionally.

4. Return the sausage to the pot. Add orzo, and season with salt and pepper.

Source: Adapted from Good Things Catered and Williams-Sonoma

Monday, June 15, 2009

Ricotta Pancakes - Two Ways

A couple years ago Bob's parents saw a recipe for ricotta pancakes on Food Network. They made them for us when we were visiting, and they were so good. Several weeks ago I decided I wanted to make some ricotta pancakes. Not sure exactly which recipe they used, I went to the Food Network website. I found this one by Bobby Flay and this one by Giada de Laurentiis. Not able to decide between them, I decided to have a face off between the two recipes. I didn't make them on the same day, but I've included my review of each recipe below. For the Lemon Ricotta pancakes, I made a blackberry syrup, given the recent sales on blackberries. Giada's Blueberry Ricotta Pancakes come with a recipe for honey syrup, so I made that. While these recipes are quite different, their common ingredient ricotta cheese makes for a nice, airy pancake. I really don't like dense, heavy pancakes, so this was a big plus in my book. And both pancakes are great served with some delicious Oscar Mayer turkey bacon!

Lemon Ricotta Pancakes
Ingredients:
3/4 cup all-purpose flour
1 Tablespoon baking powder
1/2 teaspoon ground nutmeg
1/4 teaspoon salt
2 Tablespoons sugar
1 cup ricotta cheese
2 eggs
2/3 cup milk
1 lemon, zested and juiced
Butter, for griddle

Directions:
1. Preheat a nonstick griddle.

2. Combine flour, baking powder, nutmeg, salt, and sugar in a small bowl. Whisk together the cheese, eggs, milk, and lemon juice and zest in a large bowl.

3. Whisk the flour mixture into the wet ingredients until just combined.

4. Brush the hot griddle with butter. For each pancake, pour approximately 1/4 cup measure of the batter on the griddle and cook until light and golden. Repeat until no batter remains.

Review: These pancakes cook up light and fluffy. We liked the taste, although the lemon flavor may be a bit too prominent. I knew when I saw nutmeg in this recipe that I should have just omitted it. Nutmeg is fine in apple pie, and I think it's cute when Bob says to me "You're a nut, Meg," but I tend to find it odd in other food. For these pancakes the nutmeg is a bit too over-powering. Maybe cinnamon might have been better, or nothing at all. Overall, we liked these pancakes and I think this recipe has real promise, with a few minor adjustments to suit our preference. To be fair, I did not serve them with the lemon curd and fresh raspberries as Bobby suggests but rather a blackberry syrup (see below).

Source: Bobby Flay

Blackberry Syrup

Ingredients:
Original recipe:
3 cups fresh blackberries
3/4 cup sugar
1 1/2 teaspoons grated lemon zest
1/3 cup water

Scaled down:
3/4 cup fresh blackberries
3 Tablespoon sugar
1/2 teaspoon grated lemon zest
1 1/2 Tablespoons water

Directions:
1. In a heavy saucepan, combine blackberries, sugar, lemon zest, and water. Mix gently. Cook over medium heat, stirring constantly, until sugar dissolves.

2. Bring to a boil over medium-high heat. Reduce heat and simmer uncovered for 8 minutes, stirring occasionally until fruit is soft.

3. While cooking 2-3 minutes more, gently mash fruit against sides of pan with a wooden spoon or a spatula.

4. Cool to lukewarm. If desired, strain syrup by pressing through a fine-mesh sieve. Original recipe reportedly yields 2 cups with pulp, or 1 cup strained syrup.

Review: This syrup was absolutely delicious, but from 3/4 cup fresh blackberries, all I got was what is shown in the picture - about a tablespoon of syrup! This is because I strained out the seeds through a fine-mesh strainer. I think it might be worthwhile to puree the blackberries before heating them up because so much of the possible syrup is lost during straining. Also, I probably could have thinned the syrup with a little more water. It was more like a jam in the end.

Source: Adapted from Cooks.com

Blueberry Ricotta Pancakes

Ingredients:
For the honey syrup:
1/3 cup water
1/3 cup sugar
1/3 cup honey

For the pancakes:
1 2/3 cups water
1 1/2 teaspoons vanilla extract
2 cups pancake and waffle mix (Giada recommends Krusteaz; I like Aunt Jemima)
1 cup whole milk ricotta cheese (I used part skim b/c I'm a rebel!)
2/3 cup frozen blueberries
Melted butter

Directions:
Make the honey syrup: Stir 1/3 cup water and sugar in a small saucepan over medium heat until the sugar dissolves, about 5 minutes. Stir in the honey. Set aside and keep the honey syrup warm.

Make the pancakes:
1. Using a rubber spatula, stir 1 2/3 cups water and vanilla in a large bowl. Add the pancake mix and stir until just moistened but still lumpy.

2. Stir in the ricotta to gently incorporate but maintain a lumpy batter. Fold in the blueberries.

3. Heat a griddle over medium heat. Brush with the melted butter. Working in batches, spoon 1/4 cup of batter onto the griddle for each pancake (I use a 1/4 cup measuring cup).

4. Cook until golden brown, about 3 minutes per side.

5. Serve with the honey syrup.

Review: I made these for my mom, sister, Bob, and myself, and we all really liked them! Again the ricotta makes for a light and airy pancake (which I love!). If you've never had a ricotta pancake before and worry that you will taste cheese, don't, because you probably would never know there was ricotta in there unless someone told you. All of us thought the honey syrup was a nice change from the typical maple. The blueberries were delicious too. While these pancakes are more 'semi-homemade' because of the mix, they take less time to make, which is always a good a thing! Giada recommended Krusteaz mix, so I went with her suggestion. For straight up pancakes and waffles, I like Aunt Jemima's complete mix because it's more airy than say Hungry Jack or Bisquick, but I thought that it might end up being too light mixed with the ricotta. I think the important thing is just to use a complete pancake/waffle mix, rather than one that requires other add-ins like eggs.

Source: Giada De Laurentiis

To summarize, although both recipes put up a good fight, we have to declare Giada's as the winner!!!

Friday, June 12, 2009

Bacon Stuffed Cherry Tomato Appetizers

Bob and I were invited to our friends Eric and Kathleen's house for Labor Day last year. Kathleen is such an amazing hostess - she made a huge spread of Italian delicacies - all from scratch and all by herself! As I recall, she had assorted cheeses, breads, olives, and grapes as appetizers, a dinner of Chicken Marsala, Spinach-Stuffed Shells, Italian Sausages, and a salad with awesome homemade croutons, and dessert consisting of Pizzelles, homemade iced coffee, chocolate dipped macaroons, and homemade gelato. Can you believe it?! Needless to say, the food was fabulous. One of Bob's favorite things was a stuffed cherry tomato appetizer she made. The tomatoes were stuffed with green onions and bacon - Bob was on cloud 9!

I made these last Thanksgiving using real bacon, and recently I prepared them with Oscar Mayer turkey bacon, so it was the first time I actually got to try them. They're awesome! It's like a little BLT, but with green onions instead of lettuce, so I guess you could call it a BOT :) This appetizer is perfect for all of the upcoming summer parties and picnics!

In these pictures, I really over-stuffed the tomatoes because I wanted to use up all the filling. No one seemed to mind!


Bacon Stuffed Cherry Tomato Appetizers

Ingredients:
1 pound bacon* or 1 package turkey bacon (recommended: Oscar Mayer)
1/2 cup chopped green onions
1/2 cup mayonnaise
~24 cherry tomatoes

Note: I used thick-cut bacon because Bob prefers it.

Directions:
1. Place tomatoes stem side down and cut a thin slice off of the top. With a small spoon, scoop out the pulp. Invert tomatoes on paper towels 30 minutes to drain. 

2. Cut bacon into pieces (~1/4 inch) and fry until crisp. If using turkey bacon, you can just cook up the strips and then crumble afterwards. Let cool. 

3. In a bowl, mix bacon, green onions, and mayo. 

4. Fill tomatoes with bacon mixture. Refrigerate several hours or overnight.

Source: Adapted from a recipe by Kathleen O.

Thursday, June 11, 2009

Spicy Roasted Chicken

Bob and I spent Easter alone in Chicago this year. Since I don't eat ham, I decided to make a roasted chicken for dinner. I thought this recipe looked special enough for a holiday, and it definitely was. We loved the spices, and I honestly forgot how amazing a chicken baking in the oven smells! This recipe was perfect for a lazy day at home, since it takes nearly 4 hours to cook. This would be a great dish to serve to company because I think the colorful spices make for a nice presentation. I still have to post what we had with the chicken and for brunch that morning - coming soon!

Spicy Roasted Chicken

Ingredients:
1 4.5-5 pound whole chicken
1 medium onion, quartered
6-8 cloves of garlic, peeled
2 teaspoons salt
2 teaspoons dried thyme
3 teaspoons paprika
2 teaspoons garlic powder
1 teaspoon onion powder
1 teaspoon black pepper
Cooking spray

Directions:
1. Preheat oven to 275F.

2. Rinse chicken. Place onions and garlic inside chicken cavity.

3. Mix all seasonings in a bowl and rub evenly over the bird. Spray the bird with cooking spray.

4. Place the chicken in a roasting pan. Insert a meat thermometer into the thigh making sure not to touch bone.

5. Roast uncovered for 3 1/2 - 4 hours until the thermometer reads 170F. After 2 hours, baste the bird and repeat every half hour until done. (For a crispy skin, do not baste for the last hour of cooking).

6. Remove chicken from oven when finished and let rest for at least 10 minutes prior to carving.

Source: For the love of cooking

Wednesday, June 10, 2009

Chocolate Overdose Cake

I saw this cake a long time ago, and immediately saved the recipe, knowing I would make it for a special occasion. I finally decided that my sister's birthday was the perfect opportunity. We both love chocolate, and you can't get much more chocolate than this cake! Bob and I were in St. Louis for his spring break in March because there are so many birthdays in my family that week (
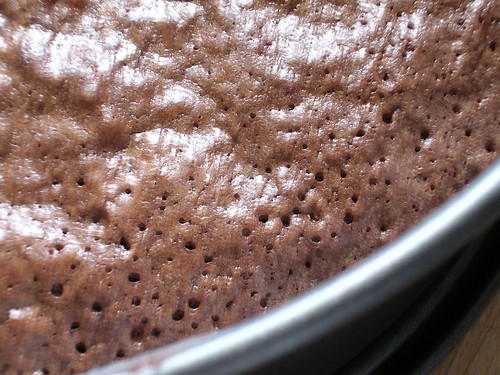
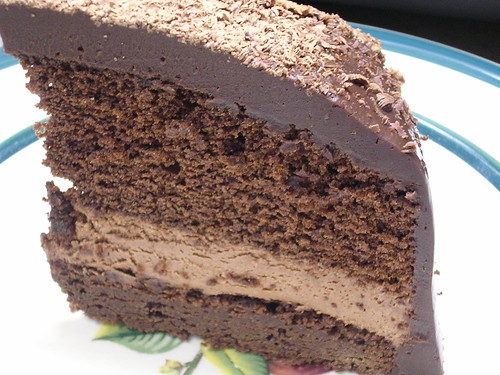
remember this?). I wanted to try this cake not only because it sounds so delicious, but also because it seemed like a challenge - multiple layers and steps - I thought it would be a fun project. Everyone loved the cake. My only complaint was that the actual cake layer was dry. I am very sensitive to dry cake - I really bothers me. I typically don't like bakery/wedding cakes for this reason . . . they are almost always dry in my opinion. For this cake, the dryness of that layer wasn't devastating because it's flanked by mousse and ganache, so my family thought as long as you ate a bite of cake with ganache, it was fine. Here are some possible explanations for the dryness in this cake (the scientist in me is compelled to troubleshoot!):

1) Was the cake cooked too long? This is highly doubtful because I set the timer for the lower end of time and checked the cake at this point with a toothpick and it was very soupy. Five minutes later the toothpick came out clean, and I took it out.

2) The recipe calls for Dutch processed cocoa powder. I wasn't able to find this in my store, so I considered making a different cake recipe, knowing that Dutch processed and natural unsweetened cocoa powder are not interchangeable. However, I found this on the Joy of Baking.com that explains the differences between Dutch processed and natural. It says that because Dutch processed is neutral (the acid has been treated with an alkali, or base, to neutralize), it will not react with baking soda and therefore must be used in recipes calling for baking powder. Well, this recipe calls for baking soda, so I thought perhaps there was a mistake and it was actually supposed to be natural cocoa. I started thinking later that buttermilk might be the acid in the recipe, and therefore the Dutch processed cocoa powder is there to be neutral, which means my cake may have risen more than it should have and attributed to the dryness. Perhaps my substitution is to blame? But then again, the double chocolate layer cake calls for natural cocoa powder and also has buttermilk...

3) Is this just a recipe for a drier cake because of the richness of the rest of the dessert? That's possible. Or maybe other people don't take such offense to a little dryness? Like I said above, I considered making the cake layer from the recipe for Double Chocolate Layer Cake (now that cake is moist!!!)

As far the rest of the cake, the mousse was outstanding, the ganache was great, and the brownie was good, but no better than a really good brownie mix. Overall, I was just a bit disappointed, probably because of all the time it took to make this. I have no problem making something from scratch as long as it turns out better than a boxed mix, and I did not feel this was the case for the cake or brownie layers.

I think the idea of this cake is fabulous, and it has real potential for the future. If you think this looks like a good cake but don't want to spend this much time making everything from scratch, I recommend trying a boxed brownie and cake mix and using this mousse and ganache. Or if you have Dutch processed cocoa laying around, give it a try and let me know it goes!!!

Chocolate Overdose Cake

Ingredients:
Brownie base:
5/8 cup (1/2 cup + 2 Tablespoons) cake flour
1/4 teaspoon salt
1/2 teaspoon baking powder
3 ounces unsweetened chocolate, chopped fine
6 Tablespoons unsalted butter, cut into 6 pieces
1 1/8 cups sugar
2 large eggs, at room temperature
2 teaspoons vanilla extract

Chocolate mousse filling:
6 ounces semisweet chocolate, broken into 1/2-ounce pieces
1 7/8 cups heavy cream
1 Tablespoon granulated sugar

Chocolate cake:
6 Tablespoons unsalted butter, soft
7/8 cups unbleached all-purpose flour
2 ounces unsweetened chocolate, coarsely chopped
1/8 cup Dutch-processed cocoa
1/4 cup hot water
7/8 cups sugar
3/4 teaspoon baking soda
1/2 teaspoon salt
1/2 cup buttermilk
1 teaspoon vanilla extract
2 large eggs
1 large egg yolk

Ganache:
1 1/2 cups heavy cream
2 Tablespoons unsalted butter
18 ounces semisweet chocolate, chopped into 1/2-ounce pieces

Directions:
To make the brownie base:
1. Adjust oven rack to middle position; heat oven to 325F. Cut parchment paper to fit the bottom and line the sides of a 9-inch springform pan. Spray lined pan with nonstick cooking spray.

2. Whisk to combine flour, salt, and baking powder in medium bowl; set aside.

3. Melt chocolate and butter in large heatproof bowl set over saucepan of almost-simmering water (or top of a double boiler), stirring occasionally, until smooth. (Alternatively, in microwave, heat butter and chocolate in large microwave-safe bowl on high for 45 seconds, then stir and heat for 30 seconds more. Stir again, if necessary, repeat in 15-second increments; do not let chocolate burn.)

4. When chocolate mixture is completely smooth, remove bowl from saucepan and gradually whisk in sugar. Add eggs one at a time, whisking after each addition until thoroughly combined. Whisk in vanilla. Add flour mixture in two additions, folding with rubber spatula until batter is completely smooth and homogenous.

5. Transfer batter to prepared pan; using a small off-set spatula or bench scraper, spread batter evenly and smooth the surface. Bake until toothpick or wooden skewer inserted into center of brownies comes out with few moist crumbs attached, 25-30 minutes. Cool on wire rack to room temperature, about 1 hour (do not remove the springform ring or parchment collar).

To make the cake:
1. Adjust oven rack to middle position; heat oven to 325F. Line the bottom of a 9-inch round cake pan (or springform pan) with parchment and spray bottom and sides with baking spray.

2. Combine chocolate, cocoa powder, and hot water in medium heatproof bowl; set bowl over saucepan containing 1 inch of simmering water and stir with rubber spatula until chocolate is melted, about 2 minutes. Add 1/4 cup sugar to chocolate mixture and stir until thick and glossy, 1 to 2 minutes. Remove bowl from heat and set aside to cool.

3. Whisk flour, baking soda, and salt in medium bowl. Set aside. Combine buttermilk and vanilla in small bowl and set aside.

4. In bowl of stand mixer fitted with whisk attachment, whisk eggs and yolks on medium-low speed until combined, about 10 seconds. Add remaining sugar, increase speed to high, and whisk until fluffy and lightened in color, 2 to 3 minutes. Replace whisk with paddle attachment.

5. Add cooled chocolate mixture to egg/sugar mixture and mix on medium speed until thoroughly incorporated, 30 to 45 seconds, pausing to scrape down sides of bowl with rubber spatula as needed. Add softened butter one tablespoon at a time, mixing about 10 seconds after each addition. Add about one-third of flour mixture followed by half of the buttermilk mixture, mixing until incorporated after each addition (about 15 seconds).

6. Repeat using half of remaining flour mixture and all of remaining buttermilk mixture (batter may appear separated). Scrape down sides of bowl and add remaining flour mixture; mix at medium-low speed until batter is thoroughly combined, about 15 seconds. Remove bowl from mixer and fold batter once or twice with rubber spatula to incorporate any remaining flour. Pour into prepared pan; smooth batter to edges of pan with an offset spatula.

7. Bake until toothpick inserted into center comes out with a few crumbs attached, about 30 minutes. Cool cake in pan 15 minutes, then invert onto wire rack and cool completely.

To make the chocolate mousse filling:
1. Place stand mixer bowl and whisk attachment in the freezer or fridge.

2. Heat 1-inch of water in the bottom half of a doubler boiler over medium heat. Place the semisweet chocolate in the top half of the double boiler. Tightly cover the top with firm wrap and allow to heat for 8 to 10 minutes. Remove from the heat and stir until smooth. Transfer the melted chocolate to a stainless steel bowl and set aside until needed.

3. Place heavy cream and sugar in the well-chilled bowl of an electric mixer fitted with a well-chilled whisk attachment. Whisk on high until stiff peaks form, about 1 1/2 minutes. Remove the bowl from the mixer.

4. By hand, whisk to combine 1/4 of the whipped cream into the melted chocolate until smooth and completely incorporated. Add the combined whipped cream and chocolate to the remaining whipped cream and use a rubber spatula to fold together.

To make the ganache:
1. Heat the heavy cream and the butter in a 3-quart saucepan over medium high heat. Bring to a boil.

2. Place the semisweet chocolate in a 3-quart stainless steel bowl. Pour the boiling cream over the chocolate and allow to stand for 5 minutes. Stir until smooth. Chill 1 cup of ganache for 1 hour. Remaining ganache should be brought to room temperature (about 40 minutes).

To assemble the dessert:
1. Spread mousse over top of the brownie base evenly. Use an offset spatula or bench scraper to smooth the top.

2. Place cake round over mousse, pressing down lightly. Chill for 1 hour.

3. Remove springform ring and parchment collar. I removed the springform ring in step 1 before I spread the mousse. Use a spatula to smooth the room temperature ganache over the cake top and sides, covering evenly.

4. If you decide to decorate: Place the chilled ganache into a piping bag fitted with a #18 tip and pipe a shell border around the base. Replace the tip #1M and pipe 12-16 rosettes around the top of the cake to indicate servings. Serve chilled and store leftovers in fridge. Cut the cake with a hot, dry knife.

Yields 12-16 servings

Source: Adapted from Confections of a Foodie Bride

Monday, June 8, 2009

Chicken with Dijon Mascarpone Marsala Sauce

I originally found this recipe on the Food Network website. It's by Giada De Laurentiis, and it's delicious!!! I tried this recipe first for Bob and I as a special dinner. We both loved it, so my sister and I made it for our mom and aunt on Mother's Day 2008. They all raved about it, and my mom has since made it for our family. Most recently, I prepared this for a small family dinner party of 6 when my mom and sister were visiting. It went over really well! This dish is very rich - not exactly typical weeknight fare, but if you're looking for special dinner, this is it.

I have always omitted the mushrooms until now. Let's take a step back with a confession: I am intimidated by certain foods, so much to the point that "Intimidated by Food" could be my Native American name. If I've never worked with it before, I'm afraid. I don't know why! It's usually types/cuts of meat or vegetables that cause the biggest fear. I'm trying to be better about it and force myself to expand my horizons. Case in point: mushrooms. I don't really like the texture of mushrooms, but in chicken marsala I don't mind them as much. However, given my inexperience working with them, I always made this dish sans mushrooms. My sister LOVES mushrooms, so I thought this would be a good time to try working with them. As she was my appointed 'sous chef' for this meal, I had her clean, slice, and saute them, but I now have the confidence to work with them on my own - thanks, Lisa! With or without the mushrooms, this dish is fantastic and I highly recommend it!

Chicken with Dijon Mascarpone Marsala Sauce

Serves 4-6 (I served 6)

Ingredients:
1 1/2 pounds boneless skinless chicken breasts, each breast cut crosswise into 3 pieces
Salt and freshly ground black pepper
2 Tablespoons olive oil
5 Tablespoons butter, divided
3/4 cup chopped onion
1 pound cremini mushrooms, sliced 
2 Tablespoons minced garlic
1 cup dry Marsala wine
1 cup (8 ounces) mascarpone cheese
2 Tablespoons Dijon mustard
2 Tablespoons chopped fresh Italian parsley leaves, plus whole sprigs, for garnish (I omit this)
12 ounces dried fettuccine (I used 8 ounces - 1 package - for 6 people)
Parmesan cheese, if desired

Directions:
1. Sprinkle the chicken with salt and pepper. (I cut my chicken breasts into strips and season with S&P at this point then leave them alone for the rest of the recipe simply because I prefer smaller pieces of chicken). Heat the oil in a heavy skillet over high heat. Add the chicken and cook just until brown, about 4 minutes per side. Transfer the chicken to a plate and cool slightly.

2. While the chicken cools, melt 2 Tablespoons of butter to the same skillet over medium-high heat, then add the onion and saute until tender, about 2 minutes. Add the mushrooms and garlic and saute until the mushrooms are tender and the juices evaporate, about 12 minutes. (When I omit the mushrooms, I let the garlic cook for 30 seconds to 1 minute in only 1 Tablespoon of butter, then proceeded to the next step.)

3. Add the wine and simmer until it is reduced by half, about 4 minutes. Stir in the mascarpone and mustard. Cut the chicken breasts crosswise into 1/3-inch-thick slices (or leave alone if already in strips). Return the chicken and any accumulated juices to the skillet. Simmer, uncovered, over medium-low heat until the chicken is just cooked through and the sauce thickens slightly, about 2 minutes. Stir in the chopped parsley (if using). Season the sauce, to taste, with salt and pepper.

4. Meanwhile, bring a large pot of salted water to a boil. Add the fettuccine and cook until al dente, stirring occasionally, about 8 minutes. Drain. Toss the fettuccine with 3 Tablespoons of butter* and season, to taste, with salt and pepper. Swirl the fettuccine onto serving plate. Spoon the chicken mixture over top. Garnish with parsley sprigs and parmesan cheese, if desired, and serve.

*I typically don't use the 3 T. butter with the fettuccine. I just keep it plain and serve it underneath the chicken and sauce. There is plenty of flavor and creaminess in the sauce (from the oil, butter, and mascarpone cheese), that the extra butter is not necessary in my opinion. However, when I made the dish this last time, I did use the butter because the pasta was sticking to itself and because I was serving it to guests so a little extra butter can't hurt (says Paula Deen at least!)

Friday, June 5, 2009

Double Tomato Bruschetta

Like I've said before, my sister's boyfriend Steve is a great cook. Once when they were visiting Bob and I in Chicago, he made these Double Tomato Bruschetta appetizers. They are a-mazing! No wonder they have a 5/5 rating on Allrecipes.com! My sister and I made them for my mom and aunt on Mother's Day 2008, and they raved about them, so I made them when my mom and sister recently visited. I really don't think you can go wrong with tomatoes and fresh basil, but the addition of sun-dried tomatoes elevates this bruschetta to a new level of yumminess. This is a must-try recipe!
Double Tomato Bruschetta

Ingredients:
6 Roma (plum) tomatoes, chopped
1/2 cup sun-dried tomatoes, packed in oil
3 cloves minced garlic
1/4 cup olive oil
2 Tablespoons balsamic vinegar
1/4 cup fresh basil, stems removed
1/4 teaspoon salt
1/4 teaspoon ground black pepper
1 French baguette
2 cups shredded mozzarella cheese

Directions:
1. Preheat oven on broiler setting. In a large bowl, combine the roma tomatoes, sun-dried tomatoes, garlic, olive oil, vinegar basil, salt, and pepper. Allow the mixture to sit for 10 minutes.

2. Cut the baguette into 3/4-inch slices. On a baking sheet, arrange the baguette slices in a single layer. Broil for 2 minutes, until slightly brown. UPDATE: On Christmas Eve, I drizzled a jelly roll pan with olive oil, then placed the baguette slices on top, then drizzled them with olive oil and broiled until they were crispy. Then I used half a garlic clove and rubbed over the top of each slice. I let them cool on a cooling rack before topping with the tomato mixture. These were even better than before!!!

3. Divide the tomato mixture evenly over the baguette slices. Top the slices with mozzarella cheese. Broil for 5 minutes, or until the cheese is melted.

Serves 12

Wednesday, June 3, 2009

Pizza Party: Homemade Pizza Crust

I've only tried making homemade pizza dough once, and it didn't turn out well. I used the wrong type of yeast, partly because I wasn't well versed in yeast, and partly because our store didn't sell instant yeast. (If you're new to yeast, check out this guide; I found it very helpful!) A lot of the pizza dough recipes out there call for a Kitchen Aid mixer to knead the dough, or knead by hand ((shudder)), but this one from Cook's Illustrated can be made in a food processor! I have an awesome Kitchen Aid food processor and was excited to try this out. We invited my BFF Kathleen over for a pizza party and movie night at the beginning of April (you may notice my posts are never in order!) The recipe makes 3 medium pizzas or 2 large pizzas. I just divided the dough into 3 portions, and each of us shaped and 'decorated' our own little pizzas. We had plenty leftover - this makes a lot of dough. But as Chelle suggested, you can freeze half of it for another time.

I am so happy with this recipe, and it really couldn't be simpler. Although Cook's Illustrated says it must be made in a food processor that holds 11 cups or more, it worked just fine in my 9-cup one. Apparently the bread flour is the key to this dough's crispy crust - although you may sub all-purpose for a less crisp crust. The dough is so nice and smooth and easy to press out. It bakes up crispy yet chewy and didn't stick to the pan. I highly recommend this recipe!

For our pizza party, we used browned sweet Italian turkey sausage, turkey pepperoni, chopped onions, 2% mozzarella cheese, and pizza seasoning. Yum!

Pizza Crust

Ingredients:
1/2 cup warm water (~110F)
1 envelope (~2 1/4 teaspoons) instant yeast (AKA Rapid Rise)
1 1/4 cups water, room temperature
2 Tablespoons extra virgin olive oil
4 cups (22 ounces) bread flour, plus more for dusting work surface and hands
1 1/2 teaspoons salt
olive oil or nonstick cooking spray for greasing bowl
corn meal, for dusting pan

Directions:
Make the dough:
1. Fill a 2-cup liquid measuring cup with warm water and sprinkle yeast on top. Allow to sit until yeast dissolves and swells - ~5 minutes. Meanwhile, add flour and salt to food processor and pulse a few times to combine.

2. Add room temperature water and oil to the yeast/water mixture, and stir to combine. While pulsing flour mixture, pour the liquid through the feed tube, reserving a few tablespoons. If the dough has not formed a ball, add the rest of the liquid and pulse. Process for ~30 seconds until the dough is smooth and elastic.

3. Turn dough out onto a lightly floured surface and knead by hand a few turns, shaping the dough into a smooth, round ball.

4. Place the dough ball into a deep, oiled bowl and cover with plastic wrap. Let rise until doubled in size, 1 1/2 to 2 hours.

Bake the crust:
Note: The original recipes calls for a pizza stone that is preheated to 500F for 30 minutes, and the pizza is then cooked at this temperature for 8-12 minutes. I don't have a pizza stone, so I had to wing this part. Here's what I did:

1. Preheat oven to 400F. Lightly grease a sheet pan with olive oil, dust with corn meal.

2. Press the dough to deflate it. Divide dough into desired portions, and place them back in the bowl, covered with a damp cloth to allow dough to rest for at least 10 but no more than 30 minutes.

3. Press dough out into desired shape. Brush lightly with extra virgin olive oil. Prebake crust for ~5-7 minutes.

4. Remove crust and top pizza as desired. Bake pizza for 5 minutes, then raise oven temperature to 500F for 3-5 minutes, or until crust is golden.

Source: Adapted from Brown Eyed Baker, originally from Cook's Illustrated

Monday, June 1, 2009

Chocolate Cheesecakes for Two

I was on the phone with my mom over Mother's Day weekend while she was going through her recipes trying to decide on a dessert to take to my grandma's. My mom is a perpetual recipe clipper - she has a collection of SOO many recipes from magazines and newspapers. Several years ago as a Christmas gift, I gave her a new recipe box and organized all of her recipes by mounting the clipped ones onto index cards. My mom has informed me that she never attempted to keep up with this, so you can imagine the state of her recipes now - some 5 years later. Anyway, she read me the title "Chocolate Cheesecakes for Two," and I immediately requested the recipe. I whipped up a lighter version a few hours later. I love these! Not the same texture but definitely the flavor of chocolate cheesecake (which is one of my all-time favorite desserts). If you love cheesecake but would never make a whole one just for yourself, this is a great, quick alternative!

Chocolate Cheesecake for Two

Ingredients:
2 ounces light cream cheese (1/4 pkg)
1 Tablespoon sugar
1 ounce (1 square) Baker's semi-sweet chocolate, melted
1/2 cup light cool-whip, thawed
2 Oreo cookies or Oreo crumbs
cocoa powder for decoration, optional

Directions:
1. Place two paper muffin liners in a muffin pan. Insert one Oreo cookie in the bottom of each cup, or evenly sprinkle about 1 tablespoon of Oreo crumbs in the bottom.

2. Beat cream cheese, sugar, and melted chocolate in a medium bowl with a wire whisk until blended. Add whipped topping and mix well.

3. Fill muffin liners evenly with cream cheese mixture. Top with Oreo crumbs or cocoa powder, if desired. Refrigerate for 2 hours or overnight.

Source: Adapted from recipe by Kraft/Philadelphia Cream Cheese

  © Blogger template Brownium by Ourblogtemplates.com 2009

Back to TOP