Search This Blog

Friday, May 29, 2009

Tomato, Zucchini, and Olive Orzo

I found this recipe quite a while ago on the Williams-Sonoma website. It's supposed to be "Chicken with Cherry Tomatoes, Zucchini, and Olives," but I didn't feel like thawing chicken the day I made this, so I decided to adapt it to a meatless pasta dish using orzo because 1) the recipe suggests to serve with either rice or orzo, and 2) I've been on a big orzo kick lately! This was delicious! I've made it several times now, and I love taking the leftovers for lunch.
Tomato, Zucchini, and Olive Orzo

Ingredients:
1 Tablespoon extra-virgin olive oil
1 zucchini, diced (I've also tried adding yellow squash as well)
1 shallot, finely chopped
1 package small tomatoes, such as grape or Sweet 100s
2 Tablespoons coarsely chopped black Mediterranean olives
1 teaspoon fresh or 1/4 teaspoon dry rosemary
salt and pepper to taste
1/4 cup white wine
1 cup orzo pasta

Note: I didn't feel the rosemary flavor was necessary, so you can omit it unless you love rosemary.

Directions:
1. Start a pot of water to boil for the pasta.

2. Add oil to a skillet and heat over medium-high. Add zucchini and cook, stirring occasionally, until lightly browned, about 6 minutes. Add the shallot and cook until softened, about 1 minute. Cook pasta.

3. Add the tomatoes, olives, and rosemary and cook, stirring occasionally, until the tomatoes are heated through but not collapsed, about 2 minutes. (I cooked longer because I prefer the tomatoes that way). Season with salt and pepper.

4. Add the white wine and cook for a few minutes until some evaporates and a nice sauce is left. Add the cooked orzo, stir to combine and remove from heat. Serve with Parmesan cheese if desired.

Source: Adapted from Williams-Sonoma

Wednesday, May 27, 2009

Orange Julius

When I saw this recipe for Homemade Orange Julius, I knew I had to try it. Orange Julius actually reminds me of going to mall in junior high! Orange Julius was fairly new to the mall at that time, and my friends and I loved it. I cut the original recipe in half. It might have been because of the oranges I used, but Bob and I thought an extra tablespoon of sugar was necessary, so I made the change below. Also, the vanilla flavor is a bit strong, so you might want to start with less at first. If you like Orange Julius, this is a great at-home recipe!

Homemade Orange Julius

Ingredients:

3/4 cup fresh orange juice
6 Tablespoons water
1 1/2 Tablespoons egg white substitute
1/2 teaspoon vanilla extract (or a little less)
3-4 Tablespoons sugar (to taste)
2 cups ice

Directions:

Combine all of the ingredients in a blender and blend on high speed 45-60 seconds, until mixture is very smooth and frothy. Use slightly less ice for a thinner consistency; use slightly more for a thicker shake-like consistency.

Serves 2

Source: Adapted from Baking Bites

Monday, May 25, 2009

Blueberry Crumb Bars

Happy Memorial Day! I first made these bars last August and have made them two additional times since then. They are really good! If I could change anything, I would alter the filling to crumb ratio. Although we love the crumb topping and crust, Bob and I agree that we would like more blueberry filling. Next time I make these, instead of using a 13x9 pan, I will make 1/2 the amount of crumbs and put it in an 8-inch square baking dish, but keep the amount of filling the same. One could just double the amount of filling and use a 13x9 pan, but 8 cups of blueberries would make for a pretty expensive dessert! The original recipe says to cut the butter and egg into the dry ingredients with a pastry blender. I decided to use my food processor to do this, following a method similar to my favorite pie dough. I think my crumbs come out much smaller because of this, and maybe they soak up the blueberriness? (I know that's not a word.)


Blueberry Crumb Bars

Ingredients:
3 cups all-purpose flour
1 teaspoon baking powder 
1/4 teaspoon salt
1 cup sugar
1 cup cold butter
1 egg
zest and juice of 1 lemon
4 cups fresh blueberries
1/2 cup sugar
4 teaspoons cornstarch

Directions:
1. Preheat oven to 375F. Grease a 9x13-inch pan.

2. In the bowl of a food processor, add flour, baking powder, salt, 1 cup sugar, and lemon zest, and pulse briefly to mix. Add cold butter (cut into tablespoon-sized chunks) and the egg, and pulse until the mixture is crumbly yet sticks together. Alternatively, cut the butter and egg into the dry ingredients using a fork or a pastry blender. Pat half the dough into the prepared pan for the bottom crust. 

3. In a medium bowl, stir together the sugar, cornstarch, and lemon juice. Gently mix in the blueberries. Sprinkle the blueberry mixture evenly over the crust.

4. Crumble the remaining dough on top of the blueberries.

5. Bake for 45 minutes or until top is slightly brown. Cool completely before cutting into squares. I typically cool the bars in the pan to room temperature then place the pan in the fridge overnight and cut them the next day. I think this is a bit easier.

Source: Adapted from Annie's Eats, originally from Smitten Kitchen and AllRecipes

Friday, May 22, 2009

Blackberry Vanilla Cupcakes

Anyone who knows me well - or to be honest, even just a little bit - knows that I love the color purple. I love purple clothes, candles, makeup, dishes, I could go on and on. Let's just say that my lab now has a lifetime supply of purple laboratory tape courtesy of me :) Even my wedding was purple-themed; I like to think it was done tastefully! Anyway, when I saw these Blackberry Vanilla Cupcakes, I knew I had to try them, if for nothing else their beautiful purple hue. I made these for our weekly lab meeting, which also happened to be right between the birthdays of our post-doc and my boss, so it was perfect timing. Plus I was taking advantage of the recent sales on blackberries! These cupcakes are really good. I love the flavor of the actual cake, and who doesn't love cream cheese frosting?!? It's quite a bit of work making the blackberry puree because it has to be strained, which sounds simple enough, but if you're using fresh berries like I did, getting a thick gloppy mixture through a fine-mesh metal strainer is a PITA. Good thing these cupcakes were worth the trouble! I think these would be perfect for a bridal shower or a bachelorette party, especially if the bride-to-be loves purple as much as I do!Blackberry Vanilla Cupcakes

Makes 12 cupcakes

Ingredients:
For the cupcakes:
1 cup flour
2 teaspoons baking powder
1 teaspoon salt
6 Tablespoons unsalted butter, at room temperature
1/2 cup vanilla sugar*
1/2 cup sugar
2 eggs, at room temperature
1/2 cup milk (I used skim)
1/2 cup blackberry puree**

*If you don't have vanilla sugar (which I don't), substitute an equal amount of regular sugar and add 1 teaspoon vanilla extract to the batter after the eggs.

**Fresh or frozen blackberries, pureed in a food processor or blender and strained through a fine mesh sieve. For me, this took two 5.6-ounce packages of fresh blackberries.

For the frosting:
8 ounces light or regular cream cheese, at room temperature
3 cups powdered sugar, sifted
5 Tablespoons blackberry puree***

***I used 3 1/2 Tablespoon (from fresh berries) and the frosting was a little soft. I suppose this will depend on the water content of the berries - or because I used light cream cheese. Either way, 3 1/2 T was plenty to achieve a purple color!

For decoration:
Fresh blackberries (optional)

Directions:
To make the cupcakes:
1.Preheat the oven to 350F. Line a cupcake pan with paper liners.

2. In a small bowl, stir together flour, baking powder, and salt. Set aside.

3. In another bowl or liquid measuring cup, whisk together the milk and blackberry puree. Set aside.

4. In (yet another) large mixing bowl, cream together the butter and sugars with an electric mixer on medium-high speed until light and fluffy.

5. Add the eggs one at a time, scraping down the bowl between additions. At this point, add the 1 teaspoon vanilla extract if not using vanilla sugar.

6. Add half of the dry ingredients to the large bowl and mix on low speed until just combined. Add the blackberry mixture, and mix on low until just combined. Mix in the remaining dry ingredients on low speed until just incorporated. Do not overmix.

7. Divide the batter evenly between the cupcakes.
8. Bake 12-15 minutes or until a toothpick inserted in the center comes out clean. Allow to cool in the pan 10-15 minutes. Transfer to a wire rack and allow to cool completely.
To make the frosting:
1. Combine the cream cheese, powdered sugar, and blackberry puree in a large mixing bowl. With an electric mixer, mix on medium speed until smooth and well blended.

2. Frost cooled cupcakes and garnish with fresh blackberries, if desired.

Source: Adapted from Annie's Eats, originally from Coconut & Lime

Purple flowers from our wedding:

Thursday, May 21, 2009

Black Bean Soup

This recipe of Kerstin's for Black Bean Soup reminded me of a soup I've had at one of my former favorite Chicago restaurants Nacional 27. The reason I say former is because each time Bob and I go there, the menu has changed and our favorite dishes are replaced with some not-so-great ones. I've read some restaurant reviews that corroborate our feelings, and I think it's because they have had at least one change in head chef. Regardless, I was super excited to try this soup, and I am SO glad I did, because guess what? It's even better than the soup at Nacional! This soup is so flavorful and delicious, plus it's easy to make. It would have been easier if I had an immersion blender, so I'm seriously considering getting one in the near future. Bob and I eat a lot of soups, and I'm realizing how much hassle it would save us. I made half a batch of this soup, and I'm kicking myself because we didn't have any leftovers - it was that good. I think I might just have to make it again very soon :) We had this with cornbread muffins; I had wanted to make jalapeno cornbread muffins but didn't have all the ingredients.


Black Bean Soup

Ingredients:
4 strips of turkey bacon
1/2 Tablespoon olive oil
1 large carrot, chopped
1/2 yellow onion, chopped
1 clove garlic, minced
3 cups chicken broth
1 can black beans (I used half of a very large can), drained and rinsed
1/2 Tablespoon ground cumin
1/2 teaspoon salt
1/2 teaspoon crushed red pepper flakes
1 1/2 Tablespoons red wine vinegar
1 teaspoon cornstarch

crumbled feta cheese, optional

Directions:
1. Cook bacon in a large stockpot over medium heat. Remove bacon and crumble.

2. In the same pot, heat olive oil and add carrots and onion. Cook until vegetables are soft. Add garlic and saute for about 1 minute, then add chicken broth, black beans, bacon, cumin, salt, and crushed red pepper flakes. Bring to a boil, then reduce heat, cover and let simmer for 20 minutes.

3. Use an immersion blender to puree soup to desired consistency (or transfer soup to a food processor to do the same, then add soup back to the pot.)

4. Combine red wine vinegar and cornstarch in a small bowl, then add this to the soup. Simmer 5 more minutes or until soup has reach preferred thickness.

If desired, top with crumbled feta cheese (or light sour cream might also be good!)

3 servings

Source: Adapted from Cake, Batter, and Bowl

Wednesday, May 20, 2009

Panzanella

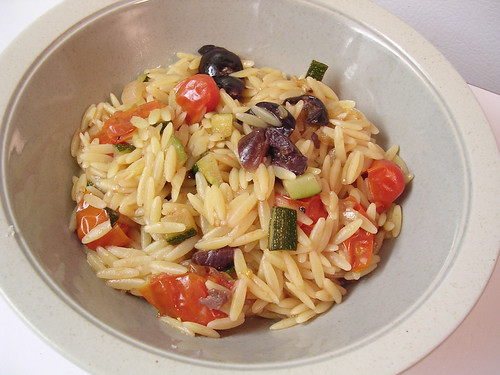
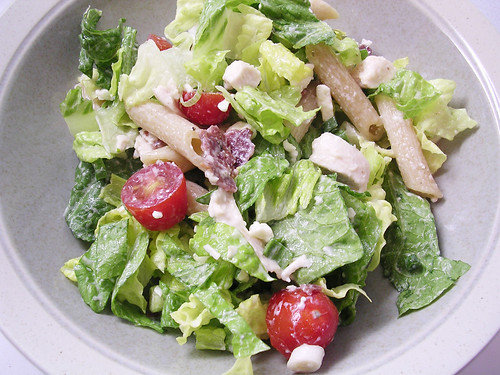
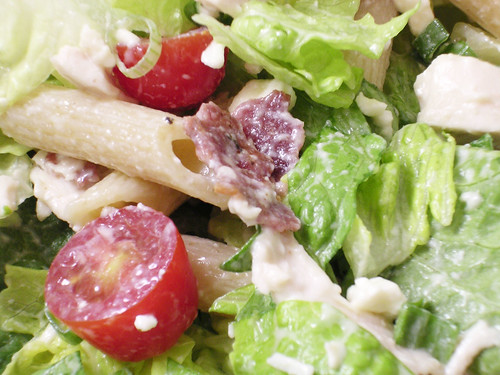
My boss served a wonderful Panzanella at a party several years ago, and I've always wanted to make it. She roughly followed a recipe she saw Giada De Laurentiis make, so I did the same. Giada's recipes are always great! I made this for a family dinner back in March, and it was a huge hit! Everyone LOVED it! We had it with grilled chicken, 
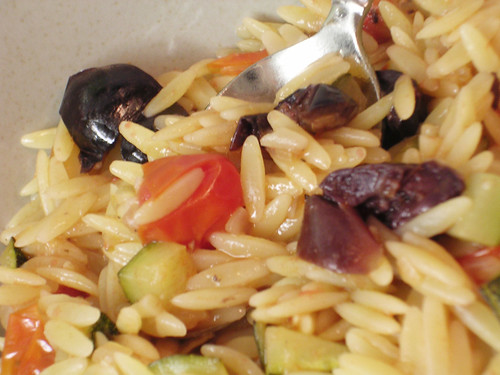
basil orzo, and grilled asparagus. It was such a delicious dinner and a great way to welcome spring!

Giada's recipe calls for kalamata olives and roasted red bell peppers, both of which I love, but I had to omit due to other family members' pickiness :) I also added some red onion because I thought it sounded good. See the original recipe linked below if the olives and peppers appeal to you!


Panzanella

Ingredients:
1/4 cup drained capers
2 Tablespoons plus 1/4 cup red wine vinegar
12 ounces dense crusty bread
2 1/4 pounds ripe tomatoes, scored on the bottom
2 Tablespoons plus 2/3 cup extra-virgin olive oil
1 garlic clove, grated
Salt and freshly ground black pepper
1/2 cup thinly sliced fresh basil leaves (or basil puree to taste)
1/4 of a red onion, thinly sliced
Fresh basil sprigs, for garnish

Directions:
1. Soak the capers in 2 tablespoons of vinegar in a small bowl for 10 minutes. Drain.

2. Cut the bottom crust off of the bread if it's tough. Cut bread into 2-inch slices, evenly brush the slices with 2 tablespoons olive oil, distributing the oil among the slices and on both sides. Grill both sides of the bread in a grill pan until golden. Transfer bread to plate to cool briefly. Cut bread into 1-inch cubes and set aside.

3. Submerge the tomatoes into a large saucepan of boiling water for 10 seconds. Using a slotted spoon, transfer the tomatoes to a bowl of ice water to cool slightly. Using a small sharp paring knife, peel off the tomato skins. If you have difficulty, place the tomato back in the boiling water briefly, then into ice water, and try again. Cut the tomatoes in half and scoop out the seeds. Cut the tomatoes into 1-inch cubes and set aside.

4. In a large bowl, whisk 2/3 cup of oil, 1/4 cup of vinegar, and garlic. Season with salt and pepper, to taste. Add the bread cubes, tomatoes, basil, capers, and red onion; toss to combine.

5. Cover the salad and let stand at room temperature for flavors to blend, at least 1 hour if possible.

Source: Adapted from a recipe by Giada De Laurentiis

Don't get me wrong, I'm a Giada fan - just thought this was funny!


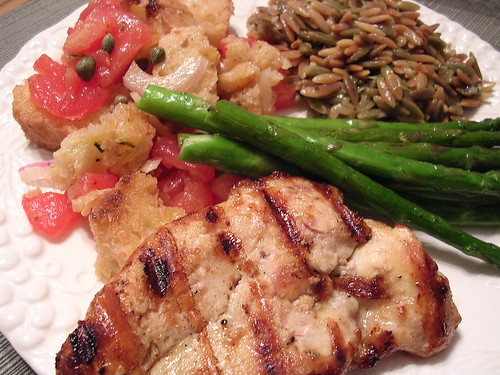
In case you're looking for an easy dinner idea, we thought the combination of the Panzanella, orzo, chicken, and asparagus was great. For super easy grilled chicken, marinate chicken breasts in fat-free or light Italian dressing for 8 hours in the fridge, then grill. (An article in Cook's Illustrated that I read recently does not recommend marinating in Italian dressing, but we like it!) You can brush on the extra marinade after boiling it for several minutes so it's safe to eat. One of my favorite ways to make asparagus is to lightly coat a grill pan in olive oil, place the cleaned spears in the pan, season with salt and pepper, then grill over medium-high heat for 5-10 minutes, or until asparagus has reached desired doneness.

Tuesday, May 19, 2009

Mango Salsa

A few weeks ago Bob had a week off to study for his big comprehensive exam. During that time, he made regular trips to our favorite produce market, and each time he came home with several mangoes. He couldn't resist the sales! I was reminded of a mango salsa we sampled at Whole Foods over Easter weekend which was really good. Then I saw this recipe, and decided it was time to use up some of those 10 mangoes lined up on the kitchen counter. I like sweet/salty combinations if they are subtle, but don't typically like something very sweet paired with very salty. This salsa was very sweet, which probably means our mangoes were perfectly ripe! I think it was a bit too sweet for my taste, but Bob really liked it. (He has no problem with sweet/salty extremes.) I'm not sure if mangoes are still on super sale anymore, but if you're looking for a way to use them up, this is fun recipe!


Mango Salsa

Ingredients:
2 large ripened mangoes, peeled and diced into 1/2-inch pieces
1 small jalapeno, seeded and diced extra fine
1/2 medium red onion, diced fine
1/2 large red bell pepper, seeded and diced small
juice of 1 lime
pinch of salt
sprinkle of cayenne, if desired for some heat

Directions:
1. Mix all ingredients in a bowl.

2. Serve with tortilla chips or alongside your favorite meat!

Source: Adapted from Good Things Catered

Monday, May 18, 2009

Chilli Coconut Chicken Soup

One of Bob's favorite type of food is soup. I always tease him that he likes "ladies lunch" food, because he's perfectly happy with a bowl of soup and a side salad. Sometimes I'll ask him if he'd like me to make watercress sandwiches with the crust cut off :) Of course I'm only kidding, and I'm glad that he likes soup so much because he doesn't mind if we have it for dinner quite often! This is another soup from my "Quick Short Chicken Recipes" cookbook. I've been making it for a few years now. We used to just eat it as a soup, then I started adding a little bit of Jasmine rice to the bowl before putting in the soup. It gives the dish a little more substance and a nice flavor. Adding rice noodles might be good too.

Chilli Coconut Chicken Soup

Original recipe ingredients:
1/4 cup oil
3/4-inch piece fresh ginger, peeled and grated
6 spring onions, sliced into 1 1/4-inch lengths
6 chicken breast fillets, thinly sliced
1/3 cup sweet chilli sauce
2 cups coconut milk
2 Tablespoons lime juice
a little fish sauce at the end for extra flavor, optional

My version ingredients:
1 Tablespoon extra virgin olive oil
3/4-inch piece fresh ginger, peeled and grated
1 bunch (5-6) spring onions, sliced into 1 1/4-inch lengths
1 chicken breast, thinly sliced
1/3 cup sweet chilli sauce
1 15-ounce can lite coconut milk, brought up to 2 cups with skim milk and a few drops of imitation coconut extract (just 'cause I have it around)
2 Tablespoons lime juice
brown (or white) Jasmine rice

Directions:
1. If desired, start cooking the Jasmine rice according to package directions.

2. Heat the oil in a saucepan over high heat, add the ginger and spring onions and cook for 1 minute. Add the chicken and cook for 2-3 minutes, or until golden. Add the sweet chilli sauce and cook for a further 1 minute.

2. Add 1 1/3 cups water and the coconut milk. Bring to a boil, then reduce heat and simmer for 4-5 minutes. Add the lime juice, season with salt and add a little more sweet chilli sauce, if desired. If using Jasmine rice, spoon into soup bowls, then top with the soup. Serve with lime wedges.

Source: Adapted from the Quick Short Chicken Recipes cookbook

Friday, May 15, 2009

Chicken and Spinach Quesadillas

These are seriously the best quesadillas - and I've had a lot of quesadillas! A chicken quesadilla is typically my stand-by order at restaurants when nothing else pops out at me. I've made quesadillas at home before, and they've been good, but these are better than good. And paired with THIS salsa - OMG! Bob said they were the best quesadillas he's ever had, and he doesn't just hand out compliments when it comes to my cooking because I urge him to be brutally honest.

I was having a spastic day in the kitchen the first time I made these. It was the night after I had frosted and decorated these and these, plus I had an 11-hour work day, so I was exhausted. I didn't start making them until 7pm, and when I saw the "marinate for at least 1 hour" bit, I was having none of that! I decided to cut the chicken into small pieces before marinating to speed up the process. I guess I ended up changing the recipe a bit, but the original is linked below, which includes button mushrooms, so check it out if you like mushrooms!

Chicken and Spinach Quesadillas

Ingredients:
For the marinade:
1 Tablespoon extra virgin olive oil, plus extra for sauteing/grilling
1/4 teaspoon red pepper flakes
Juice of 1 lime
1 large or 2 small chicken breasts, cut into small pieces

1 large clove garlic, grated
fajita seasoning to taste (~1/8-1/4 package, I prefer McCormick)
~1 cup shredded Monterey Jack cheese
1 1/2 cups fresh spinach leaves, torn
2-3 large flour tortillas

Directions:
1. Add marinade ingredients to a resealable plastic bag and squeeze to mix. Marinate in fridge for 30 minutes.

2. Heat a medium skillet over medium-high heat with a little olive oil. Add grated garlic and saute for 30 seconds. Add all of the contents of the plastic bag and sprinkle on fajita seasoning. Cook until chicken is done and moisture is absorbed. Toss in torn spinach and cook until wilted, remove from heat.

3. Heat a grill pan over medium-high heat and brush lightly with olive oil. Place a tortilla down on the pan, add some Monterey Jack cheese, then 1/2 or 1/3 of the chicken/spinach mixture (depending on how much you have), and top with more of the cheese. Fold over the tortilla and cook until tortilla is crispy and grill marks have formed. Flip to cook other side. Repeat with remaining quesadilla(s).

4. Cut quesadillas with a pizza cutter. Serve with salsa and light sour cream. Enjoy!!!

Source: Adapted from Annie's Eats

Wednesday, May 13, 2009

Chicken Caesar Salad

My mother in law passed along this Cooking Light recipe a few weeks ago. I thought it looked really good, and Bob and I love to have dinner salads in the spring and summer. I've been inspired by Kerstin's recipes using turkey bacon, so I thought I'd throw some of that in. I had tried turkey bacon a few times over the years, and I never thought it was that great - it didn't crisp up like traditional bacon. But Oscar Mayer brand turkey bacon was on sale this time, and it is SO good! It becomes crispy and has a very similar texture to bacon. I'm so excited to start substituting it in recipes that call for bacon and pancetta!

This salad is so delicious! We both loved it. I'm not sure how necessary the pasta is, so the second time I made it, I omitted the pasta, upped the amount of bacon, and used red onion instead of green since it was all we had. I think I like the green onion best though. I've included my changes below.
Chicken Caesar Salad

Ingredients:
1 chicken breast, diced (I used a rotisserie chicken)
2-4 slices of turkey bacon, cooked and crumbled
1 container grape tomatoes, halved
half a bunch of green onions, sliced
2 ounces feta cheese
1 bunch of Romaine lettuce
3 Tablespoons fat-free Caesar dressing (more or less to taste)
1 1/2 cups whole wheat penne (3 ounces uncooked)
1/2 garlic clove, minced
1/4 cup thinly sliced fresh basil (or a small amount of basil puree)
Freshly ground pepper to taste
Grated Parmesan cheese (optional)

Directions:
1. Combine all ingredients in a large bowl.

2. Top with freshly ground pepper and freshly grated Parmesan cheese, if desired.

Source: Adapted from Cooking Light

Monday, May 11, 2009

Creamy Tomato Basil and Italian Turkey Sausage Soup

One of my favorite soups from the hospital cafeteria across from my lab is Tomato Florentine. It's a basic tomato soup with spinach and pasta shells. I was reminded of this soup when I saw Jenny's recipe for Creamy Tomato Basil and Italian Sausage Soup. I loved that this recipe comes together in just 10 minutes! Of course my version takes a bit longer since I had to complicate it by adding some pasta and spinach, but it's still a super quick recipe, and it's delicious!
Creamy Tomato Basil and Italian Turkey Sausage Soup

Ingredients:
3 sweet Italian turkey links, casing removed
10 fresh basil leaves, chiffonade (or 1-2 teaspoons purchased basil puree)
1 26-ounce jar of pasta sauce
1 cup water
1 1/2 cups fat-free half-and-half
1 cup small whole wheat pasta (such as macaroni)
6 ounces fresh spinach, roughly chopped
Salt and pepper to taste
Parmesan cheese, if desired

Directions:
1. Boil a small pot of water. Cook pasta according to package directions; drain.

2. Meanwhile, heat a medium-sized dutch oven over medium heat. Brown sausage, breaking it into bite-sized pieces, or smaller. Drain grease (or use paper towels to squeeze out grease), if desired.

3. Stir in pasta sauce, basil leaves or puree, water, and half-and-half. Cook until warm then reduce heat to low.

4. Add cooked pasta and season soup with salt and pepper to taste. Toss in the fresh spinach and simmer until wilted. Serve with grated Parmesan cheese, if desired.

Source: Adapted from Picky Palate

Thursday, May 7, 2009

Chicken Sausage and Penne in a Pumpkin Cream Sauce

From the title, and even the picture, you may think this a rich dinner made with heavy cream. I'm delighted to say that's not the case - but it tastes like it is! I saw this recipe on Cara's Cravings last year and have made it several times. Cara ingeniously came up with the idea to make a puree using skim milk, canned pumpkin, and - get this - 1% lowfat cottage cheese! I was skeptical when I first made it, and a little worried when I added this 'cream sauce' to the pan and saw tiny bits of cottage cheese peppering the pan. But then, the most amazing thing happened: the tiny bits melted and created this creamy, slightly cheesy, sauce. I really want to use this trick to make this Giada recipe again, because it was far too creamy for me the first time. This idea can also be adapted for other sauces, like a butternut squash cream sauce - mmm.

Bob and I both really like this recipe. I've made it using different kinds of chicken sausage, but the combo of the apple sausage and the pumpkin is quite nice. I've made a few slight modifications to the recipe, but Cara's original version, which serves 2, is available through the link below. My version serves 3-4 because we like to have leftovers for lunch.

Chicken Sausage and Penne in a Pumpkin Cream Sauce

Ingredients:
6 ounces penne pasta
1 Tablespoon olive oil
1 medium onion, thinly sliced
1 garlic clove, grated or more to taste
1 teaspoon dried rubbed sage
3 sliced chicken sausage links, such as apple from TJ's
3/4 cup 1% low fat cottage cheese
3/4 cup pumpkin puree
3/4 cup skim milk
5 oz. baby spinach, roughly chopped
Salt and freshly ground pepper to taste
Parmesan cheese, optional

Directions:
1. Heat olive oil in a skillet over medium-low heat. Add onions and cook for about 15-20 minutes, until softened and beginning to caramelize. Add garlic, sage, and chicken sausage; continue to saute.

2. Meanwhile, cook pasta according to package directions. In a small food processor or blender, combine pumpkin, cottage cheese, and milk. Blend until smooth. Add to sausage mixture in the skillet and continue to cook over low heat. Season with salt and freshly ground pepper to taste.

3. Drain pasta and add to sausage mixture with the baby spinach. Toss together until the spinach is wilted. Raise heat if necessary to melt any remaining bits of cottage cheese, while continuing to stir until creamy. Top with Parmesan cheese, if desired.

Source: Adapted from Cara's Cravings

Tuesday, May 5, 2009

For Cinco de Mayo: Honey Lime Chicken Fajitas

Happy Cinco de Mayo! :) Several years ago Bob found a Rachael Ray recipe for Grilled Honey Lime Chicken Sandwiches. He adapted the recipe to something we called "Bob's Honey Lime Chicken," which was simply the marinated chicken baked in the oven and served alongside pasta/rice and vegetables. The chicken has a delicious, sweet flavor. I started thinking how this chicken could be used in other recipes, and fajitas came to mind. I usually just use McCormick fajita seasoning, and we love it, but I thought I'd switch it up a bit. These fajitas were great! I have some ideas for how to use this chicken in other ways too. I'll have to experiment!

Honey Lime Chicken Fajitas

Ingredients:
For the marinade:
Juice of 1 lime
2 Tablespoons honey
1 rounded teaspoon cumin
1 Tablespoon finely chopped cilantro
1/2 Tablespoon extra-virgin olive oil

2-3 chicken breasts, cut into strips
salt and pepper, to taste

1 green pepper, 1 orange pepper, 1 red onion, 1 yellow onion - each cut into strips (any veggie of choice works here - zucchini, squash, mushrooms, spinach, etc.)
1 Tablespoon extra-virgin olive oil
Flour tortillas

For the toppings:
Light sour cream
Salsa
Monterey Jack cheese
Shredded lettuce

Directions:
1. Combine the marinade ingredients in a small bowl. Sprinkle strips of chicken with salt and pepper. Add the chicken to the marinade and stir to coat. Set aside for 10 minutes.

2. Heat 1 tablespoon olive oil in a skillet over medium-high heat. Add peppers and onions. Cook until softened, about 7-10 minutes.

3. Transfer the peppers and onions to a serving dish. Add the contents of the small bowl to the warm skillet containing 1/2 tablespoon olive oil, if necessary. Cook until chicken is done and browned and liquid has evaporated. Transfer to serving dish.

4. Warm tortillas between wet paper towels in the microwave, and transfer toppings to serving dishes. Serve all components separately and fill tortillas as desired. Enjoy!

Source: Recipe idea from You're Gonna Bake It After All, marinade from Rachael Ray

Monday, May 4, 2009

For Cinco de Mayo Eve: Fresh Homemade Salsa

Happy Cinco de Mayo Eve! I've never really celebrated Cinco de Mayo before (I took French in high school), but Bob and I love Mexican food, so I thought this was a great opportunity to post some of our favorite Mexican recipes!

I've already posted my favorite homemade salsa here, but for Superbowl back in January I decided to try out a new recipe I had seen on Annie's Eats. It just looked so good in her picture. I was skeptical that I would like it, especially since I was making it with winter tomatoes, but the Black Bean Salsa better watch out because this one is now vying for the title of my favorite salsa! It's so fresh tasting, and the flavors work so well together. It tastes like salsa from a really good restaurant. I also love the consistency, and the fact that it's SO easy to make - almost no chopping involved, and it's done in just minutes. If you like salsa, this recipe is a winner!

When I first made the recipe, I followed it exactly except I replaced half the amount of canned diced tomatoes with fire-roasted because I think they are SO good. I was really happy with the resulting flavor. I've made this salsa a total of 3 times, and each time I've tweaked it ever so slightly, and I think I've finally got the perfect balance for our taste. If you're sensitive to spice, scale back on the cayenne. We happen to think the spiciness is just right.

One note about the garlic: The original recipe calls for 4 cloves of garlic. The first time, I used 3 very large cloves and one medium-sized thinking you can never have too much garlic! It turns out, you can. It was way too garlicky. The overpowering garlic flavor is not necessarily apparent while you're eating it, but rather later that night . . . and at 3 am . . . and during breakfast the next morning. Each time I've made it, I've scaled back on the garlic and finally ended up thinking 1 clove was about right for us. You can always add more later. Just keep in mind that the garlic flavor seems to intensify over time when the salsa is stored in the fridge.

This salsa is the perfect accompaniment to so many dinners, many of which I will be posting in the next week or so. If you're looking for an excuse to celebrate Cinco de Mayo tomorrow, whip up a batch of this salsa - I promise you won't be disappointed!
Fresh Homemade Salsa

Ingredients:
2 fresh jalapeno peppers, seeded and very coarsely chopped
1 large clove garlic, halved (or more to taste)
2 large or 3 small/medium vine-ripened tomatoes, seeds and juice removed
14.5-ounce can diced tomatoes, drained
14.5-ounce can fire-roasted diced tomatoes, drained with some juice reserved
2 Tablespoons red wine vinegar
1 Tablespoon cumin
1/2 sweet yellow onion, coarsely chopped
1/2 teaspoon salt
1/2 teaspoon ground cayenne pepper
1/4 cup fresh cilantro
juice of one lime

Directions:
1. In the bowl of a food processor, combine the jalapenos and garlic. Process until finely chopped. Scrape down sides of bowl as necessary.

2. Add all other ingredients to the food processor. Pulse in very brief pulses until the vegetables have reached the size you desire. Add reserved juice from fire-roasted tomatoes if needed to achieve desired consistency.

3. Transfer to an airtight container and refrigerate at least 2 hours before serving to allow flavors to blend.

Source: Adapted from Annie's Eats

Friday, May 1, 2009

Garlic Chicken

When I was growing up, my mom made this recipe often, and we called it Chinese Chicken, although the 'official' name is Garlic Chicken. I've made it many times on my own, and Bob and I both love it. It has a wonderful, slightly sweet sauce, and it's so healthy. We serve it over white or brown rice. Rice noodles would probably be good too. It's not the most photogenic meal, but if you're looking for a quick, simple weeknight recipe, this is a great one!

Garlic Chicken

Ingredients:
boneless/skinless chicken breasts, cut into bite-sized pieces
broccoli flowerettes
carrots, cut into match-sticks
mushrooms, fresh or canned (I omit)
green onions with some tops, sliced
1 can water chestnut slices
2 Tablespoons chicken bouillon
2 teaspoons chopped or grated garlic

*Notes: Any vegetables can be added to this, such as snow pea pods or bamboo shoots. Amounts of chicken and each vegetable are up to your discretion - for the two of us, I'll use 1-2 chicken breasts, 1-2 carrots, a handful of broccoli flowerettes, and 1 bunch of green onion.

For the marinade:
1 heaping teaspoon cornstarch
2 Tablespoons soy sauce (reduced sodium is fine)

For the sauce:
3 heaping teaspoons honey
2 Tablespoons soy sauce

Directions:
1. Mix together cornstarch and soy sauce in a medium-sized bowl. Add chicken, stir, and set aside to marinate for ~30 minutes.

2. Meanwhile, cut vegetables and dissolve chicken bouillon into 1 cup hot water.

3. Saute chicken in 2 tablespoons oil over medium-high heat. Stir-fry until chicken is white. Add the chicken bouillon water, the carrots, and 2 teaspoons chopped garlic. Cover and cook for about 10 minutes.

4. Uncover and add the rest of the vegetables and a sauce made of 3 heaping teaspoons honey and 2 tablespoons soy sauce. Stir-fry until done. Serve over cooked rice.

Source: My mom!

  © Blogger template Brownium by Ourblogtemplates.com 2009

Back to TOP