Search This Blog

Showing posts with label Pie. Show all posts

Monday, August 31, 2015

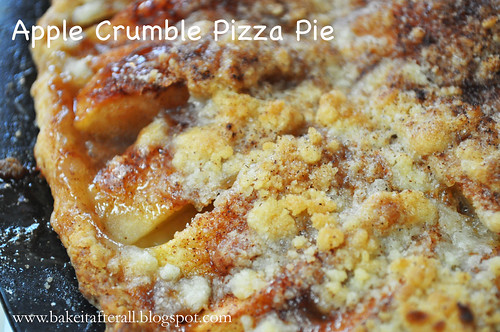
Apple Crumble Pizza Pie

DSC_0894_ed


Let's kick off September with an apple recipe, shall we?  This recipe is a family favorite from my mom's old Betty Crocker Cookbook. Interestingly, it has been omitted from the new Betty Crocker Cookbook, as the one I received as a wedding gift does not have this recipe!  I was really surprised to discover this considering how much my family loves this dessert.  It's so simple, especially if you use a store bought pie crust, but it looks impressive and tastes just like apple pie, but possibly better!


Apple Crumble Pizza Pie

Makes 8 to 10 servings

Ingredients:
Pastry for 8- or 9-inch two-crust pie, store-bought or homemade (see recipe below)
6 to 7 tart apples, peeled and cut into 1/2-inch thick slices
1/2 cup sugar
1 teaspoon cinnamon
1/4 teaspoon nutmeg
Crumble topping (see below)

Preheat oven to 450F.

1. Prepare pastry as directed except roll 1 inch larger than 12- or 13-inch pizza pan. Ease into pizza pan and flute edge. (Alternatively, roll the dough into a 13- or 14-inch circle and place on an ungreased baking sheet and flute).

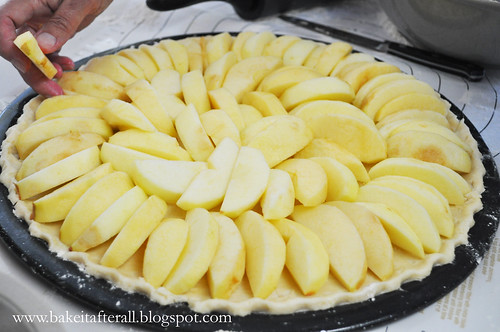
2. Beginning at the ends of the crust and overlapping the slices, cover the crust with apples.

DSC_0884_ed

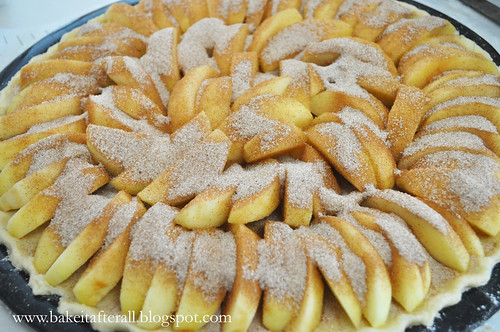
3. Stir together the sugar, cinnamon, and nutmeg. Sprinkle the mixture over the apple slices. Top with Crumble Topping.

DSC_0887_ed

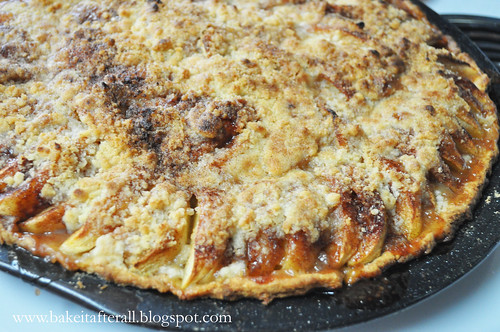
4. Bake 30 to 40 minutes or until edge is golden brown and apples are tender. Best served warm and, if desired, topped with vanilla or cinnamon ice cream!


Crumble Topping

Ingredients:
3/4 cup all purpose flour
1/2 cup sugar
1/2 cup firm butter

Directions:
Mix until crumbly.

DSC_0891_ed

Source: The Betty Crocker Cookbook

This is my go-to pie dough recipe:

All-Butter Double-Crust Pie Dough

Ingredients:
1/3 cup ice water, plus extra as needed
3 tablespoons sour cream
2 1/2 cups (12 1/2 ounces) unbleached all-purpose flour, plus extra for the work surface
1 tablespoon sugar
1 teaspoon table salt
16 tablespoons (2 sticks) unsalted butter, cut into 1/4-inch pieces and frozen for 10 to 15 minutes

Directions:
1. Mix 1/3 cup of the ice water and the sour cream in a small bowl until combined. Process the flour, sugar, and salt together in a food processor until combined. Scatter the butter pieces over the top and pulse the mixture until the butter is the size of large peas, about 10 pulses.

2. Pour half of the sour cream mixture over the flour mixture and pulse until incorporated, about 3 pulses. Repeat with the remaining sour cream mixture. Pinch the dough with your fingers, if the dough feels dry and does not hold together, sprinkle 1 to 2 tablespoons more ice water over the mixture and pulse until he dough forms large clumps and no dry flour remains, 3 to 5 pulses.

3. If using for Apple Crumble Pizza Pie, refrigerate dough until it is a consistency suitable for rolling. If using for a pie, divide the dough into 2 even pieces and wrap in plastic wrap, forming into 4-inch disks before refrigerating.

Source: America's Test Kitchen

Sunday, May 17, 2015

Ambrosia Pie

DSC_0631_ed

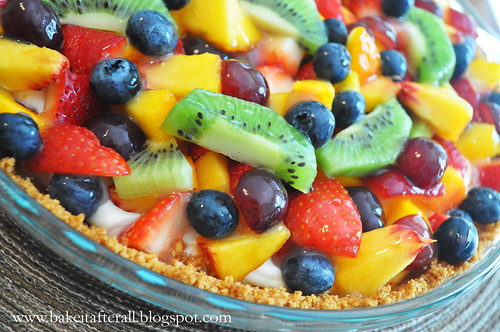
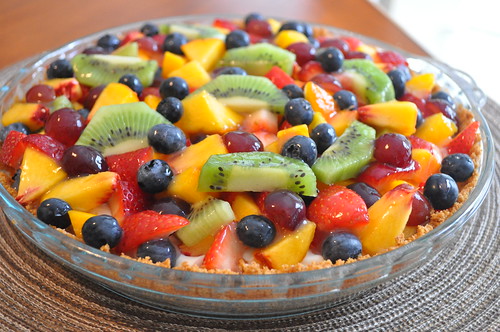
Tippin's was a restaurant that served amazing pies and really good casual dining fare. My extended family often met there for birthday lunches or just to get together, especially when some of us would come home from college.  Sadly, Tippin's closed several years ago. One of my cousins Angie loved  their Ambrosia Pie. She remembers when she worked at Tippin's and would sneak some of the glaze as she made pies in the back of the restaurant. For her birthday a couple years ago, I decided to try to recreate this pie. I remembered it as a graham cracker crust, topped with a cheesecake-like filling (but softer than cheesecake), and covered with fruit that was coated in a sweet glaze.  I pieced together different components from multiple sources for this pie.  Everyone thought it was great, and it's pretty darn close to the original.  You can customize this pie to contain any combo of fruit you'd like, which is nice because it can be great for any season.  


Ambrosia Pie

Inspired by Tippins Restaurant

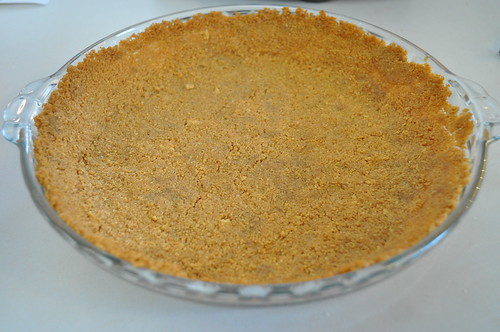
Graham Cracker Crust
5 graham crackers (full sheets)
5 tablespoons unsalted butter, melted and cooled
3 tablespoons sugar

Pulse graham crackers in a food processor.  Add butter and sugar and pulse until combined.  Press into a 9-inch pie plate and bake at 325 degrees for 13 - 18 minutes until fragrant and browned.  

Source: The Complete America's Test Kitchen TV Show Cookbook 

Cheesecake Filling
8 oz cream cheese
1/2 cup powdered sugar
1/2 teaspoon vanilla extract
1 tablespoon heavy cream
1 cup heavy cream (to be whipped with hand mixer)

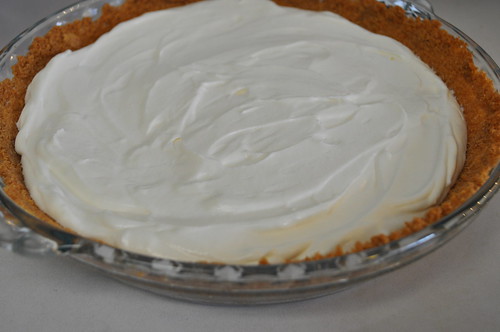
1. Mix together cream cheese and powdered sugar in stand mixer or with hand mixer until smooth and creamy.  Stir in vanilla extract and 1 tablespoon heavy cream.

2. In a separate bowl, whip cream until peaks form.

3. Carefully fold whipped cream into cream cheese mixture.

4. Spread into crust and chill. 

Source: Adapted from Allrecipes.com

Fruit
~1 large peach
~1/3 cup blueberries
~6 large strawberries, diced
~2 kiwi, sliced into wedges
~1/3 cup red grapes, sliced in half

Fruit Glaze
1 cup water
1/2 cup sugar 
1 teaspoon clear vanilla extract (or regular)
1 tablespoon cornstarch (or more)
1/4 cup water
1 tablespoon lemon juice

1. Combine water, sugar, and vanilla in a saucepan over medium heat.  Bring to a simmer. 

2. Dissolve cornstarch in 1/4 cup water.  Add to the saucepan and stir.  Simmer a few minutes until thickened.  (Add more water/cornstarch if it's not getting thick).  Stir in lemon juice and cool glaze.

Source: Adapted from Ehow.com

To assemble pie:

1. Bake graham cracker crust and cool. 

DSC_0623

2. Fill shell with cheesecake filling mixture. 

DSC_0624

3. Top pie with diced fruit.

4. Brush warm glaze onto fruit.

5. Chill pie until ready to serve.


Enjoy!

DSC_0627


Tuesday, June 29, 2010

Sweet Cherry Pie

DSCN6663_labeled

I attempted to make a heart in the center . . .

DSCN6659_labeled

Cherry pie is one of my dad's favorite desserts. I've always wanted to make a fresh cherry pie, and I even received a cherry pitter for Christmas to do just that. I served this pie for the Father's Day dinner Bob and I made for my parents. I find making a pie entirely from scratch very satisfying, and that is especially true for this pie because my family had never had a truly homemade cherry pie.

I don't typically like cherry pie. The cherries are soggy and have a strange texture. The cherries in this pie have a texture that is, well, natural. They are more firm but still very juicy. The pie crust was perfectly flaky, and the whole thing is relatively quick to make. I did the entire thing in 1 day, although I would have preferred to do the crust the day before to lessen the work. My family loved this pie, and I actually did too!

For me, the pie dough was very sticky. The high humidity here may have affected the consistency a bit, but the finished product was fantastic, so don't worry if yours doesn't quite match the description. Some CI notes - the vodka is not detectible at all but helps maintain the moisture in the crust (not recommended to skip), and the tapioca should be measured first, then ground. Since my instant tapioca came pre-ground, I used 2 tablespoons ground, and it was fine. Lastly, if you use frozen fruit, measure it frozen then let it thaw before making the filling. I was going to do a lattice top for this pie, but I read on CI's website that they do not recommend lattices for cherry pie - it allows too much moisture to evaporate and alters the juiciness of the filling.

Happy Baking!!!

Sweet Cherry Pie

Ingredients:
For the pie dough:
2 1/2 cups (12 1/2 ounces) unbleached all-purpose flour
1 teaspoon table salt
2 tablespoons sugar
12 tablespoons (1 1/2 sticks) cold unsalted butter, cut into 1/4-inch pieces
1/2 cup cold vegetable shortening, cut into 1/4-inch pieces
1/4 cup vodka, cold
1/4 cup cold water

For the cherry filling:
2 red plums, halved and pitted
6 cups (about 2 pounds) pitted sweet cherries or 6 cups pitted frozen cherries, halved
1/2 cup sugar (3 1/2 ounces)
1/8 teaspoon table salt
1 tablespoon juice from 1 lemon
2 teaspoons bourbon (optional)
2 tablespoons instant tapioca, ground
1/8 teaspoon ground cinnamon (optional)
2 tablespoons unsalted butter, cut into 1/4-inch pieces
1 large egg, lightly beaten with 1 teaspoon water

Directions:
1. For the pie dough: process 1 1/2 cups flour, salt, and sugar in a food processor until combined, about two 1-second pulses. Add butter and shortening; process until homogenous dough just starts to collect in uneven clumps, about 15 seconds (dough will resemble cottage cheese curds and there should be no uncoated flour).

2. Add remaining 1 cup flour and pulse until mixture is evenly distributed around bowl and mass of dough has been broken up, 4 to 6 quick pulses. Empty mixture into medium bowl.

3. Sprinkle vodka and water over mixture. With rubber spatula, use folding motion to mix, pressing down on dough until dough is slightly tacky and sticks together. Divide dough into 2 equal balls and flatten each into a 4-inch disk. Cover each with plastic wrap and refrigerate for at least 45 minutes or up to 2 days.

4. Remove 1 disk of dough from refrigerator and roll out on generously floured (up to ¼ cup) work surface to a 12-inch circle, about 1/8-inch thick. Roll dough loosely around rolling pin and unroll into pie plate, leaving at least 1-inch overhang. Ease dough into plate by gently lifting edge of dough with 1 hand while pressing into plate bottom with other hand. Refrigerate until dough is firm, about 40 minutes.

5. For the filling: Adjust oven rack to lowest position, place baking sheet on oven rack, and heat oven to 400 degrees. Process plums and 1 cup halved cherries in food processor until smooth, about 1 minute, scraping down sides of bowl as necessary.

5. Strain puree through fine-mesh strainer into large bowl, pressing on solids to extract liquid; discard solids. Stir remaining halved cherries, sugar, salt, lemon juice, bourbon (if using), tapioca, and cinnamon (if using) into puree; let stand for 15 minutes.

6. Transfer cherry mixture, including all juices, to dough-lined plate. Scatter butter pieces over fruit. Roll second disk of dough on generously floured work surface (up to ¼ cup) to 11-inch circle about 1/8 inch thick. Roll dough loosely around rolling pin and unroll over pie, leaving at least ½-inch overhang. Flute edges using thumb and forefinger or press with tines of fork to seal. Brush top and edges with egg mixture. With sharp knife, make 8 evenly spaced 1-inch-long vents in top crust. Freeze pie 20 minutes.

7. Place pie on preheated baking sheet and bake 30 minutes. Reduce oven temperature to 350 degrees and continue to bake until juices bubble around the edges and crust is deep golden brown, 30 to 40 minutes longer.

8. Transfer pie to wire rack; let cool to room temperature so juices have time to thicken, 2 to 3 hours. Cut into wedges and serve.

Source: Adapted from Cook's Illustrated

Tuesday, August 4, 2009

Fresh Blueberry Pie

Last week blueberries on sale for 99 cents a pint!  (They are typically $4.99 a pint at our store). So, I bought 4 pints to use and freeze! My dad suggested that I make a pie with a "criss-cross top," which I thought was a fantastic idea considering I've never made a lattice topped pie before but have always wanted to.  This pie was delicious! It was a little less sweet than the Mixed Berry Pie, which was almost like a jam . . . mmm jam. This pie was perfect paired with whipped cream!

Fresh Blueberry Pie

Ingredients:
Pie crust for a 2-crust 9-inch pie
4 cups fresh blueberries, rinsed and dried
1/2 cup sugar
2 Tablespoons lemon juice (~1 medium lemon)
2 teaspoons finely grated lemon zest (I used all of the zest of the medium lemon)
2 Tablespoons cornstarch
dash of salt
milk to brush on crust and sugar to sprinkle on top

Directions:
Preheat oven to 425F.
1. Prepare crust. Press the bottom crust in a pie plate. 

2. In a large bowl, add sugar, lemon juice and zest, cornstarch, and salt. Mix well. Add fresh berries and stir to coat evenly. Transfer berries to pie plate containing the bottom crust.

3. Roll top crust out into a large oval (~10 inches x 8 inches). Using a clear plastic ruler and a knife or pizza cutter, cut strips of desired width (mine were 1-inch).  Lay parallel strips across the berries, all in one direction.  Fold back every other strip and then lay a strip perpendicularly across berries (to make lattice). Continue to do this by alternating which strips are folded back. You may leave as much space as you desire between the strips - you can even leave no space at all, which simply makes a solid top crust with a beautiful design, but in this case you might want to roll the dough thinner otherwise the top crust will be a double layer (and you would run out of dough!)

4. If desired, brush top crust with milk (I used skim), then sprinkle with sugar.

5. Bake for 40-50 minutes or until crust is golden. You may need to cover the edges with aluminum foil after 10-20 minutes to prevent them from over-browning.

6. After baking, let pie cool at least a few hours before slicing. Enjoy with some whipped cream!!! 

Source: Adapted from the Pie and Pastry Bible

Saturday, March 14, 2009

Mixed Berry Pie for Pi Day!

My sister is a high school math teacher, which is why I know that today is Pi Day.  You know, pi = 3.14 and it's March 14th, get it? Anyone? No? Right . . .   

Anyway, in honor of Pi Day, I am posting the first from-scratch pie I ever made.  Back in 2007, my boss brought in her copy of Rose Levy Beranbaum's The Pie and Pastry Bible for a lab mate of mine, who then baked a Blueberry/Peach pie to share with the lab.  I had never tried blueberry pie before and didn't think I would like it, but it was sooooo good!  I don't know why I ever hesitated to try blueberry pie!  And the crust was amazing, which is odd because I usually don't like crust.  It turns out, she made it from scratch!  What?!  A pie crust that didn't come from a Pillsbury box?  (No offense, Mom!)  I never thought making a crust from scratch could be so different from the store bought ones, but it was.  
Doesn't the tart on the cover look delish?!?  I had this copy of the cookbook on loan until I received my own, along with Ms. Beranbaum's Cake Bible (more on that later), for Christmas 2008 from my mother-in-law - are you seeing a theme here :)  We both love cookbooks!  I absolutely love The Pie and Pastry Bible.  First of all, Ms. Beranbaum includes all of her measurements in terms of weight, which I love.  She also explains a lot of the science of baking - why certain steps are taken, what it really means if dough is under/over-worked, etc. And she includes tips for successful baking and troubleshooting ideas.  I can see where some might get overwhelmed by all the text - I did at first - but it really is a great, comprehensive guide to pies and pastries.  

I am also inspired by Ms. Beranbaum's beginnings as a baker.  She had no experience baking when she first got married, and learned everything she knows throughout her adult life.  That reassures me that I'm not 'behind' the learning curve; there's still hope!

Now on to the pie.  After discovering my love for blueberry pie, I decided to make one on my own following the recipe for "Blueberry/Cranberry Internet Pie" as a guide.  I love all kinds of berries, so I though substituting mixed berries (strawberries, raspberries, blackberries, and blueberries) for the cranberries would be a good start.  The pie was so awesome that I made it again for my dad's birthday last year.  I'm including the recipe for both the crust and the filling. I love this crust recipe because it can be made in a food processor.  Unfortunately, I don't have a KitchenAid stand mixer (yet!  That's another post all it's own), so a lot of recipes are off limits for me, specifically a lot of breads and doughs - that is unless I want to knead by hand all day, which I don't!  

This is a pretty long recipe, so if you have your own crust in mind, just skip to the filling part. The whole process is a bit time consuming, but can be broken up over the course of a few days, so it's not too bad.  

The filling burst through the top crust, so I recommend more slits to vent.

Basic Flaky Pie Crust

For a 2-crust 9-inch pie

Ingredients:
14 Tablespoons (200 g) unsalted butter, cold
2 1/4 c. + 2 Tablespoons (or 2 1/4 c. dip and sweep method*, or 320 g) pastry flour** or bleached all-purpose flour
1/4 + 1/8 teaspoon salt
Optional:  1/4 teaspoon baking powder (if not using, double the salt)
5 to 7 Tablespoons ice water
1 Tablespoon cider vinegar

*Dip and sweep method is explained under "Pointers for success for making flaky pie crusts"
**Commercial or homemade pastry flour is recommended , as it will result in a more tender crust than one made with all-purpose flour (see below how to make your own pastry flour)

Directions:
1. Divide the butter into two parts, about two thirds to one third:  4.5 oz and 2.5 oz (9 T and 5 T).  Cut the butter into 3/4-inch cubes.  Wrap each portion of butter with plastic wrap. Refrigerate the larger amount and freeze the smaller amount for at least 30 minutes.  Place the flour, salt, and optional baking powder in a recloseable gallon-size freezer bag and freeze for at least 30 minutes.  

2. Place the flour mixture in a food processor with the metal blade and process for a few seconds to combine.  Set the bag aside.  

3. Add the larger amount of butter cubes to the flour and process for about 20 seconds or until the mixture resembles course meal.  Add the remaining frozen butter cubes and pulse until all the frozen butter is the size of peas.  (Toss with a fork to see it better).

4. Add the lowest amount of ice water and the vinegar and pulse 6 times.  Pinch a small amount of the mixture together between your fingers.  If it does not hold together, add half the remaining water and pulse 3 times.  Try pinching the mixture again.  If necessary, add the remaining water, pulsing 3 times to incorporate it.  The mixture will be in particles and will not hold together without being pinched.

5. Divide the crust mixture in half at this point (for top and bottom crusts), place each portion in a plastic bag.

6. Holding both ends of the bag opening with your fingers, knead the mixture by alternately pressing it, from the outside of the bag, with the knuckles and heels of your hand until the mixture holds together in one piece and feels slightly stretchy when pulled.

7. Separately wrap doughs with plastic wrap, flatten into discs, and refrigerate for at least 45 minutes, preferably overnight.  

Storage:  Refrigerated, up to 2 days; frozen, up to 3 months.

Making your own pastry flour:  if using a scale, do two thirds bleached all-purpose flour to one third cake flour by weight.  If measuring by volume, use the following proportions:  4 cups of bleached all-purpose flour, measured by dip and sweep, and 2 1/4 cups of cake flour, measured by dip and sweep.  Stir the flours lightly before measuring and mix them well after combining them to blend them evenly.  This will make 6 1/4 cups of pastry flour (almost 2 pounds).  Store it airtight.

POINTERS FOR SUCCESS FOR MAKING FLAKY PIE CRUSTS

* For flaky crust, ingredients must be cold to start with and stay cold.
* Use the correct flour.  It is practically impossible to make a flaky crust or even one that holds together using cake flour and equally difficult to make a tender crust using unbleached all-purpose or bread flour.
* If using baking powder, be sure not to use SAS baking powders, which contain sodium aluminum sulfate, or the crust will have a bitter aftertaste.  Use an all-phosphate product containing calcium acid phosphate, such as Rumford, available in some supermarkets and most health food stores. (I found Rumford at my local grocery store - it's next to the Clabber Girl brand in a red container).
* If not weighing the flour, use the dip and sweep method:  Lightly stir the flour, then dip the cup into the flour and sweep off the excess with a metal spatula or knife.
* Brush off any excess flour on top of the dough after shaping it, as it will taste bitter after baking.


Blueberry/Mixed Berry Pie 

Ingredients:
Basic Flaky Pie Crust for a 2-crust 9-inch pie
1 1/2 cups sugar (amount for the blue/cran pie, so you can probably reduce it, I used between 3/4 cup to 1 cup)
1/3 cup cornstarch (dip and sweep method)
1 Tablespoon finely grated lemon zest 
3 Tablespoons freshly squeezed lemon juice
a pinch of salt
2 packages or 1 1/2 pounds (680 grams) frozen blueberries
1 package frozen mixed berries
1 Tablespoon heavy cream or milk
1 Tablespoon sugar

Directions:
1. Make the dough.

2. Remove the dough for the bottom crust from the refrigerator.  If necessary, allow it to sit for about 10 minutes or until it is soft enough to roll.

3. On a floured pastry cloth or between two sheets of lightly floured plastic wrap, roll the bottom crust 1/8 inch thick or less and large enough to cut a 13-inch circle.  Transfer it to the pie pan, easing it in to fit up against the sides.  Trim, if necessary, to 1/4 inch past the edge of the pan.  Cover it with plastic wrap and refrigerate it for a minimum of 30 minutes and a maximum of 3 hours.

4. In a large non-reactive saucepan, stir together the sugar, cornstarch, lemon zest, lemon juice, and salt.  Add the blueberries and mixed berries and toss to coat them well.  Allow the mixture to sit for about 30 minutes or until a little liquid starts to form.  

5. Cook the berries over medium heat, stirring constantly, until very thickened and some of the the berries are just beginning to burst, about 8 to 10 minutes after it comes to a boil.  Remove the pan from heat and allow the mixture to cool completely, without stirring, about 1 hour.

6. Transfer the berry mixture to the pie shell.

7. Roll out the top crust large enough to cut a 12-inch circle.  Use an expandable flan ring or a cardboard template and a sharp knife as a guide to cut the circle.

8. Moisten the edges of the bottom crust with water and place the top crust over the fruit.  Tuck the overhang under the bottom crust border and press down all around the top to seal it.  Reroll the scraps no more than 1/8 inch thick and cut them into decorative shapes.  Brush the top crust with cream or milk and arrange the decorative pieces on top of it, overlapping them slightly.  Brush them with the remaining cream or milk and sprinkle all over with the sugar.

9. Cover the pie loosely with plastic wrap and refrigerate it for 1 hour before baking to chill and relax the pastry.  This will maintain flakiness and help to keep the crust from skrinking.

10. Preheat the oven to 375F at least 20 minutes before baking.  Set one oven rack at the lowest level and one at the highest level and place a baking stone or baking sheet on the lower rack before preheating.  

11. To make a steam vent use a small cutter, the bottom of a pastry tube, or a knife to cut a small hole (about 1 inch) in the middle of the top crust.  Lift out the cut round of pastry and discard it.  I think a few slits should be cut to prevent the mixture from splitting through the top crust, which happened the first time I made this pie as shown in the picture above.  Set the pie directly on the stone and bake for 40 minutes.  Transfer the pie to the upper rack and continue baking for 20 to 30 minutes or until the crust is golden brown.  (The filling will not bubble).  After 1 hour, protect the edges from overbrowning with a foil ring.

12. Cool the pie on a rack for at least 6 hours before serving.

Store:  Room temperature, up to 3 days.

Her notes:  I find that in my oven it works well to bake this pie for the first 40 minutes directly on the floor of the oven instead of the bottom shelf.  Frozen blueberries work well for this filling because they release their juices more quickly than fresh ones, but fresh blueberries are fine to use as well.

My notes:  I tried baking on the oven floor, and even the lowest rack, and the bottom got too brown, too fast.  I suggest just baking it on the middle rack and monitoring it every so often.

Source:  Adapted from The Pie and Pastry Bible

Thursday, March 12, 2009

Grasshopper Pie

Ever since I can remember, my Aunt Suey has made Grasshopper Pie for St. Patrick's Day. This is one of my all-time favorite desserts. Not only do I love mint chocolate-chip ice cream, but the crust on this 'pie' is out of this world! It's seriously soooooooo good. You'd think it was an ohh-so chocolaty compressed brownie, but even that doesn't describe it. There are no words :) If you have been looking for a dessert to make to celebrate St. P's Day - look no further!  

I will add a picture after St. Patrick's Day, but for now this will have to do:

UPDATE!!!

My aunt made these Grasshopper Pies in March for our St. Patrick's Day celebration, and she was kind enough to let me photograph her assembling the pies. Here are the pictures from our photo shoot:


Grasshopper Pie

Ingredients:
For the crust/shell:
1 package Pillsbury Plus dark chocolate cake mix*
3/4 cup water
3/4 cup Pillsbury Supreme chocolate fudge frosting
1/4 cup oil

For the filling:
1/2 gallon mint chocolate chip ice cream, softened

For the drizzle:
The remainder of the can of chocolate frosting

*I'm not sure if they still make Pillsbury Plus, but she recommends using a dark chocolate cake mix (like Pillsbury Moist Supreme dark chocolate cake mix); using dark chocolate/fudge for the mix and frosting will make the crust fudgy and chewy.

Directions:
1. Heat oven to 350F. Grease bottom and sides of 2 9-inch pie or cake pans.

2. In a large bowl, beat all ingredients for 2 minutes on high. The batter will be kind of fluffy. Pour 1/2 of the batter into each pan.  DO NOT SPREAD OUT.

3. Bake 25-30 minutes. It will be very puffy and soft. The cake will fall when taken out of the oven. Use a spoon to flatten it down as much as possible while it's still warm. When flattening, the cake will be up the sides a little - this is ok because it's the "crust."  Let cool.

4. Fill cooled shell with softened ice cream.

5. Melt remaining frosting from the can in the microwave and drizzle on top.  

6. Cover pans with press-and-seal or foil and freeze for at least 2 hours.

My notes:  This is best baked in a metal pan that you don't mind being scratched with a knife when you cut the slices.  This pie is a bit of a pain to get out of the pan, and I wouldn't be comfortable making it in my coated non-stick pans. 

If you prefer, you can use light or even reduced sugar/sugar free mint chocolate chip ice cream to lighten it up.  This recipe is not limited to St. Patrick's Day obviously - you could use any flavor/color combo - like strawberry for Valentine's Day, or vanilla/chocolate-chip for any day!  Edy's French Silk ice cream (one of my fav's) would be AMAZING!

Source: My Aunt Suey!


  © Blogger template Brownium by Ourblogtemplates.com 2009

Back to TOP