Search This Blog

Tuesday, April 20, 2010

Ricotta Gnudi in a Parmesan Broth


Although it's nearing the end of April, we've had another cold front come through Chicago, so I thought I would post this comforting soup-like meal. I made it sometime this winter, and I really liked these tasty ricotta dumplings bathing in a warm Parmesan broth. This was definitely not one of Bob's favorite meals, mainly because he doesn't really like ricotta cheese. I naively thought I could change his mind :)

Giada has this meal filed under "hearty pastas" in her cookbook, Everyday Pasta, but I think a small portion could be served as a soup course at a dinner party. If you like ricotta cheese, you should give these a try!

Ricotta Gnudi in a Parmesan Broth

Makes 4 to 6 servings

Ingredients:
Parmesan Broth
6 cups low-sodium chicken broth
1 teaspoon freshly ground black pepper
1/4 cup freshly grated Parmesan cheese

Ricotta Gnudi
2 1/2 cups whole-milk ricotta cheese
1/2 cup freshly grated Parmesan cheese
1 egg
1 egg white
2 ounces prosciutto, chopped (I omitted this)
2 Tablespoons chopped fresh flat-leaf parsley (or 1/2 Tablespoon dried)
1/4 teaspoon freshly grated nutmeg
1 teaspoon salt
1/2 teaspoon freshly ground black pepper
1/2 cup plus 2 Tablespoons all-purpose flour, plus 1 cup for dredging

Directions:
1. Bring the chicken broth to a boil in a medium saucepan over high heat. Reduce the heat to medium-low and simmer until the broth has reduced to 4 cups, about 20 minutes.

2. Meanwhile, make the gnudi: bring a large pot of salted water to a simmer over high heat. In a large bowl, combine the ricotta, Parmesan, egg, egg white, prosciutto (if using), parsley, nutmeg, salt, and pepper; mix thoroughly.

3. When the water is simmering and ready, stir the flour into the ricotta mixture. It is important not to add the flour too soon; otherwise they will become dense and gummy rather than light.

4. Shape the gnudi using 2 large soup spoons: scoop up a large spoonful of ricotta mixture into one spoon, then scoop the mixture onto the other spoon and back again, forming a three-sided oval. I have also seen these shaped into little round balls, like meatballs.

5. Drop the gnudi into the dredging flour. Form another 8 or 9 gnudi at a time, dredge in flour on all sides, and tap off the excess.

6. Slide the formed gnudi into the simmering water, being careful not to overcrowd the pot. Remove the gnudi using a slotted spoon after they have floated to the top and have cooked for about 4 minutes total.

7. While the gnudi cook, create another batch of gnudi and dredge them in flour. Continue cooking and forming gnudi, transferring cooked gnudi to a platter in a single layer, until you have used all the ricotta mixture.

8. Divide the gnudi among the serving bowls. Pour the reduced broth over the gnudi. Sprinkle with a pinch of the pepper and a spoonful of grated Parmesan and serve.

Source: Everyday Pasta

Thursday, April 15, 2010

Blueberry Buttermilk pancakes

DSCN5406_labeled

To be honest, I don't usually care for homemade pancakes, and I certainly don't like pancakes from restaurants. My favorite pancakes are actually Aunt Jemima's Complete Buttermilk Pancakes, but not made the way the box recommends. I like them with more water, so the batter is very pourable, making for a very fluffy, light pancake. This may sound like breakfast blasphemy to some, but like I said, I'm just being honest :)

Several weeks ago I had some leftover buttermilk from another recipe, and I decided to search for a buttermilk pancake recipe. Because I had an abundance of Michigan blueberries in my freezer, I went with Blueberry Buttermilk Pancakes. These pancakes were great! They were light and fluffy and had a delicious buttery flavor. As much as I love blueberry pancakes, I'd love to make these without the blueberries too. These just might have been better than my beloved Aunt Jemima Pancakes!

In the mood for some unique pancakes? Check out these Ricotta Pancakes or Blue Cornmeal Pancakes!

Blueberry Buttermilk Pancakes

Yields 2 to 3 servings

Ingredients:
1 cup all-purpose flour
2 Tablespoons sugar
1 1/8 teaspoon baking powder
1/4 teaspoon baking soda
1/4 teaspoon salt
1 egg
1 cup buttermilk
2 Tablespoons melted unsalted butter, plus some for frying
1/2 cup blueberries, fresh or frozen

Directions:
1. In a large bowl, sift together the flour, sugar, baking powder, baking soda, and salt.

2. Beat the eggs with the buttermilk and melted butter. Combine the dry and wet ingredients into a lumpy batter, being careful not to overmix (Overmixing results in flat, heavy pancakes!).

3. Heat some butter in a skillet over medium heat. Spoon 1/3 cup batter into the skillet and sprinkle the top with some of the blueberries. Cook for 2 - 3 minutes on each side.

4. Serve with maple syrup or topping(s) of choice.

Source: Adapted from Food Network

Tuesday, April 13, 2010

American Sandwich Bread

DSCN5127_labeled

DSCN5120_labeled

DSCN5125_labeled

I actually made this bread back in January but saved it because I knew I wouldn't be getting much cooking/baking done this spring while we're trying to finish up work and school before our big move.

This was a fantastic bread! I love how high it bakes up, and it has a great flavor. The dough was super easy to whip up using my stand mixer. This is one of the instances when I love having an oven-safe instant-read digital thermometer - I just sat back and watched the temperature rise, knowing that I'd have a perfectly baked loaf of bread in the end. I definitely plan to make this again!

American Sandwich Bread

Ingredients:
3 3/4 cups (18 3/4 ounces) unbleached all-purpose flour, plus more for dusting the work surface
2 teaspoons salt
1 cup warm whole milk (about 110F)
1/3 cup warm water (about 110F)
2 Tablespoons unsalted butter, melted
3 Tablespoons honey
1 envelope (about 2 1/4 teaspoons) instant yeast

Directions:
1. Adjust on oven rack to the lowest position and heat oven to 200F. Once oven reaches 200F, maintain the heat for 10 minutes, then turn off the oven.

2. Mix 3 1/2 cups of the flour and the salt in the bowl of a stand mixer fitted with a dough hook. Mix the milk, water, butter, honey, and yeast in a 4-cup liquid measuring cup. Turn the machine to low and slowly add the liquid. When the dough comes together, increase the speed to medium and mix until the dough is smooth and satiny, stopping the machine two or three times to scrape the dough from the hook, if necessary, about 10 minutes. Note: After 5 minutes of kneading, if the dough is still sticking to the sides of the bowl, add flour, 1 Tablespoon at a time and up to 1/4 cup total, until the dough is no longer sticky.

3. Turn the dough onto a lightly floured work surface; knead to form a smooth, round ball, about 15 seconds.

4. Place the dough in a very lightly oiled large bowl, rolling the dough around the bowl to coat lightly. Cover the bowl with plastic wrap and place in the warmed oven until the dough doubles in size, 40 to 50 minutes.

5. Gently press the dough into a rectangle 2-inch thick and no longer than 9 inches. With a long side facing you, roll the dough firmly into a cylinder, pressing with your fingers to make sure the dough sticks to itself. Turn the dough seam-side up and pinch it closed.

6. Place the dough seam-side down in a greased 9 x 5-inch loaf pan and press it gently so it touches all four sides of the pan. Cover with plastic wrap; set aside in a warm spot until the dough almost doubles in size, 20 to 30 minutes.

7. Keep one oven rack at the lowest position and place the other at the middle position. Heat oven to 350F. Place an empty baking pan on the bottom rack. Bring 2 cups water to a boil in a small saucepan. Pour the boiling water into the empty pan on the bottom rack, and set the loaf onto the middle rack.

8. Bake until an instant-read thermometer inserted at an angle from the short end just above the pan rim into the center of the loaf reads 195F, about 40 to 50 minutes.

9. Remove the bread from the pan, transfer to a wire rack, and cool to room temperature. Slice and serve.

Source: Annie's Eats, originally from Baking Illustrated

Thursday, April 8, 2010

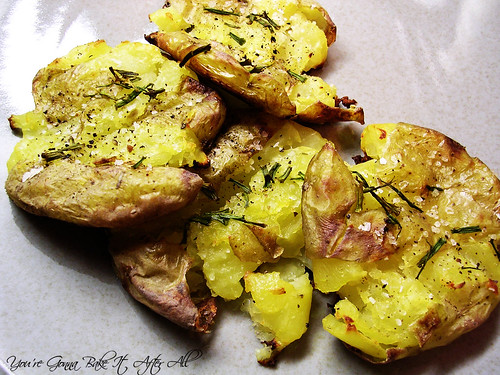
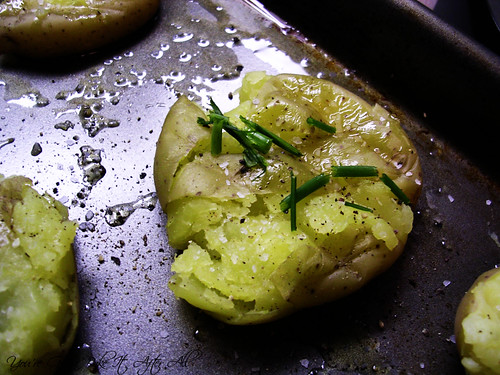
Crash Hot Potatoes


Here is another recipe from the Pioneer Woman. It may sound simple, but I don't have a problem with simple - I actually like a simple recipe if the results are delicious, which these are. I made the full recipe thinking that we'd have a lot leftover . . . turns out we didn't! These were so tasty that Bob and I kept going back for more until they were gone! I think I even pushed the main dish aside in favor of more potatoes :)

These are my submission to this month's Side Dish Showdown. I have made a real effort to make more side dishes this year, even though it's tough for me. This is yet another potato, but for so long I was a little intimidated by potatoes that once I got on a roll, I just kept going!

Side Dish Showdown Blogger Event

I can't remember what I served these with, but it was definitely some type of chicken. These potatoes would go perfectly with steak too!

Crash Hot Potatoes

Ingredients:
12 whole new potatoes or other small round potatoes
3 Tablespoons olive oil
Kosher salt, to taste
Black pepper, to taste
Rosemary or other herbs of choice (I used chives), to taste

Directions:
Preheat oven to 450F.
1. Bring a pot of water to a boil. Add a generous amount of salt. Add potatoes and cook until fork-tender.

2. On a sheet pan, generously drizzle olive oil. Place tender potatoes on the cookie sheet leaving plenty of room between each potato.

3. With a potato masher, gently press down each potato until it slightly mashes, rotate the potato masher 90 degrees and mash again. Brush the tops of each crushed potato genouersly with more olive oil.

4. Sprinkle potatoes with kosher salt, fresh ground black pepper, and fresh chopped herbs.


5. Bake for 20 - 25 minutes until golden brown.

Source: Adapted from The Pioneer Woman Cooks

Tuesday, April 6, 2010

Breakfast Chicken Sausage Patties

DSCN5471_labeled

I received the KitchenAid mixer food grinder attachment for Christmas and finally tried it out to make these chicken sausages. It was great to be able to grind my own chicken. I am very suspect of what's actually in the ground chicken from the grocery store, not to mention it is so expensive (more than ground turkey at my store!) That being said, you can certainly make these using pre-ground chicken!

These chicken sausage patties were fantastic! Bob and I had them with waffles for breakfast one Saturday, and we loved them. They are so flavorful and have a great blend of spices. I didn't have allspice for some reason, so I added a dash of cinnamon, nutmeg, and cloves. I might omit these next time to give it a more savory flavor, or I'll get some allspice and try that. I used only chicken breasts, but you can certainly use dark meat or a combination of the two. I halved the recipe but will post the full - I wished I had made more! :)

Breakfast Chicken Sausage Patties

Ingredients:
1 pound ground chicken
1/2 teaspoon dried sage
1/2 teaspoon dried marjoram
1/2 to 3/4 teaspoon dried thyme
1/4 teaspoon ground cayenne pepper
heaping 1/4 teaspoon ground allspice, optional
1/4 teaspoon freshly ground black pepper
about 3/4 teaspoon kosher salt
1 garlic clove, finely minces or pressed
1/2 Tablespoon real maple syrup
2 - 3 teaspoon olive oil

Directions:
1. Lightly mix all ingredients together until the herbs and spices are well-incorporated. Do not overmix.

2. Divide the mixture into 4 equal parts, then make 4 patties out of each portion for a total of 16 1-ounce patties.

3. Heat a nonstick pan over medium heat and add 1 teaspoon oil. Fill the pan with as many patties as will fit, and cook about 2 minutes per side or until browned and cooked through. Repeat with remaining batches, adding an additional teaspoon of olive oil per batch.

Source: Adapted from Elly Says Opa!

Sunday, April 4, 2010

Friday, April 2, 2010

Easter Cookies

DSCN5805_labeled

DSCN5832_labeled

Hi everyone! I have been really slacking on the blog this week because I'm in St. Louis preparing for our big move in May. We signed a lease, Bob had some job interviews, and I've been getting in some quality family time (and shopping!) I have been busy ever minute, but it's been a lot of fun.

My mom, my sister, and I decided that this year, instead of dyeing Easter eggs we would decorate sugar cookies! After seeing several posts about Easter cookies, I couldn't resist trying them out. I love the technique of using toothpicks to drag out lines or dots into beautiful patterns. We had so much fun playing around with different designs!

DSCN5813_labeled

DSCN5787_labeled

DSCN5810_labeled

DSCN5834_labeled

DSCN5837_labeled

Each time I've used Royal icing (here and here), I used a different recipe for the icing and a different sugar cookie recipe (see a great sugar cookie comparison post here). I keep thinking I'll find one that is better than the last time, but really they all seem very similar to me. I'll provide links to the recipes I used this time below, but know that these techniques work on any cookie, and I'm sure any royal icing recipe.

The one thing I did differently this time was to use only one consistency icing per color and to use it for both outlining and flooding, which were done at the same time, rather than what I've done in the past: outline, wait for it to dry, then flood. When using the same color for outlining and flooding, the outline blends in nicely. Of course this might not work for the Monkey Face Cookies where having a distinct outline is essential, but for these cookies it worked very well.

This time, I drew inspiration from a number of different sources. I first saw this post on the King Arthur flour blog about these fun techniques for Easter cookies. Then I saw a guest post on Bake at 350 from Sweetopia, which led me to other posts at Sweetopia. Each of these blogs have some great tips for working with royal icing.


The bunnies:

DSCN5779_labeled

Chick wearing bunny ears:
DSCN5776_labeled

Chicks wearing sweaters (my mom invented these!):
DSCN5786_labeled

For those of you who celebrate Easter, you still have time to try these out before Sunday - so get to it! :) Or see the sidebar for some other great Easter treats.

Have a great Easter, Passover, or a nice relaxing weekend!

Sugar Cookie Recipe - Roll-out Sugar Cookies by The Way the Cookie Crumbles
Royal Icing Recipe - Bake at 350


My mom's creation - remind you of anyone?
DSCN5768_labeled

DSCN5795_labeled

DSCN5801_labeled


Can you guess which one my dad did? :)

DSCN5821_labeled

DSCN5844_labeled

  © Blogger template Brownium by Ourblogtemplates.com 2009

Back to TOP