Search This Blog

Monday, April 6, 2009

Tomates Provencales

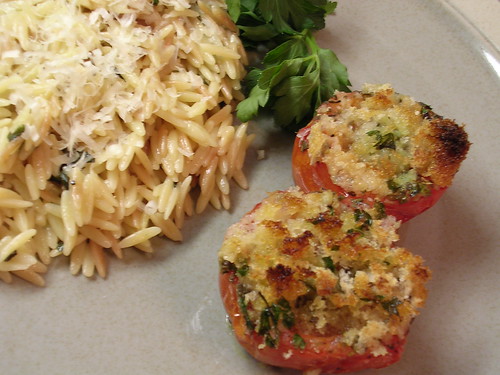
My sister's boyfriend Steve is a great cook. He always changes recipes and improvises ingredients, ultimately improving the dish. For New Year's Eve this year, the four of us decided to stay in and have a nice, quiet dinner at home. Steve did the cooking. He made basil orzo (which I will post next!) and tomates provencales, using a recipe from Pace of Provence by Yolande Hoisington as a guide. It was one of the best dinners, and completely meatless!

Here's what the book says about Tomates provencales (Tomatoes with garlic):

Provence is a southern part of France well-known for its fields of lavender and the landscapes that inspired the painter Cezanne. Although this recipe is best when made with vine-ripened summer tomatoes, excellent results can be obtained with fresh tomatoes, which are available all year-round. Tomates provencales are delicious warm or cold. They make a great accompaniment to a dish or plain white rice or Basmati rice and are particularly delicious with lamp chops or fish.

Steve's version:

My version before baking:
After baking:
With the basil orzo that will be posted next!

Tomates Provencales

Ingredients:
8 large plum tomatoes, halved crosswise
Salt and pepper to taste
2 Tablespoons garlic, finely chopped
2 Tablespoons parsley, finely chopped
2 teaspoons fresh Italian herbs (rosemary, thyme, oregano), or 1 teaspoon dried Italian herbs
1/2 cup unseasoned fresh bread crumbs
2 Tablespoons olive oil

Directions:
1. Preheat oven to 400 F.

2. Place tomatoes cut side up in a shallow baking dish. Sprinkle with salt, pepper, garlic, parsley, herbs, and bread crumbs evenly over tomatoes. Drizzle with olive oil.

3. Bake 10 to 15 minutes, or until the tomatoes are tender but not falling apart. Serve warm.

8 servings, 82 calories per serving

Steve's notes and modifications: He uses herbes de provence and Italian seasoning, places whole garlic cloves between the tomatoes while they bake, and bakes these at 475 - 500F for about 30 minutes. He used dried bread crumbs when making it for us because it was all we had on hand. He may have used bigger tomatoes and more bread crumbs than the recipe states too, as judged by the pictures.

When I made it, I used 3 plum tomatoes, making 6 halves. I used fresh breadcrumbs from Italian bread, and herbes de provence to season. I baked uncovered for about 10 minutes at 475F, then continued baking covered for 20 minutes.

Source: Adapted from Pace of Provence by Yolande Matore Hoisington

Saturday, April 4, 2009

Tapas Night!

One of my favorite restaurants in Chicago is the tapas bar Cafe Ba Ba Reeba. Delicious food, great sangria, and a fun atmosphere. A few years ago I received the Williams-Sonoma cookbook "Savoring Spain & Portugal." I recently decided to make two of my favorite tapas, Tortilla Espanola (potato and onion omelet) and Pa amb Tomaquet (tomato bread), which are both served with Spanish alioli. I have never fried food before, so this was a new experience. Not something I will do on a daily, or even weekly, basis, but I'm glad I tried it. This dinner was really wonderful - it actually tasted just like the restaurant! My only problem was that my pan was apparently too big because the omelet is very thin - it's actually supposed to be quite thick; didn't affect the taste, but my Venezuelan friend brought it to my attention when I shared the leftovers with some coworkers :) If it didn't take so darn long to make, I'd probably always make it at home. At Cafe Ba Ba Reeba, they sometimes serve the potato omelet cold, so we had the leftovers this way - yum! I think this could probably be adapted in a way that avoids frying the potatoes - perhaps baking up the potato slices in the oven . . . I'll have to work on that!

Tortilla Espanola (potato omelet)

Unlike most omelets, a tortilla espanola is served at room temperature. It is the classic tapa, prepared all over Spain, but reputed to be best in La Mancha, a forbidding land of parched earth and aging windmills.

Ingredients:
1/2 cup plus 2-3 Tablespoons olive oil
2 lbs baking potatoes, peeled and sliced 1/4-inch thick*
salt and freshly ground pepper to taste
2 yellow onions, thinly sliced
6 eggs, lightly beaten
2-4 ounces serrano ham, diced (optional) (did not use)
1 large red bell pepper, roasted, peeled, seeded, and cut into strips (optional) (did not use)
chopped fresh flat-leaf (Italian) parsley

*I used russets; 2 lbs was 2 large potatoes and 1 very small

Directions:
1. In a large frying pan over low heat, warm 1/2 cup olive oil. Add half of the potato slices and fry, turning occasionally, until tender but not browned, 15-20 minutes.** Transfer to a plate and season with salt and pepper. Repeat with the remaining potato slices. Leave the oil in the pan.

2. Meanwhile, in another frying pan over medium heat, warm the 2-3 tablespoons oil. Add the onions and fry until soft and golden, about 15 minutes. Remove from the heat and let cool a bit.

3. In a large bowl, whisk the eggs until blended. Mix in the onions and the ham and roasted pepper, if using. Season with salt and pepper. Fold in the cooked potatoes.

4. Heat the oil remaining in the large pan over low heat and pour in the egg mixture. Cook until the bottom is set and golden, 8-10 minutes. Invert a plate on top of the pan, invert the pan and plate together, and lift off the pan.*** Slide the omelet back into the pan and return to low heat. Cook until the second side is set, about 4 minutes. Slide onto a plate, garnish with parsley, and cut into wedges. Serve with alioli for dipping.

Serves 4-6

**I did not need to cook the potatoes this long, and mine did get brown. I may have had the oil too hot. The end result was great, so I don't think it mattered.

***This is a bit tricky. I had to have Bob help me for this part. We did not have a plate big enough to do this safely, and I felt that the hot oil would just spill all over, so Bob gently but quickly turned the omelet over by tipping the frying pan over onto a jelly roll pan. The sides of the jelly roll prevented the oil from dripping off. I then slid the omelet back into the frying pan using a spatula to help guide the omelet over the side of the jelly roll pan. Maybe not the most efficient way, but it worked!

Source: Adapted from Savoring Spain & Portugal by Joyce Goldstein

Pa amb Tomaquet (grilled bread with tomato)

This classic Catalan tapa is the soulmate of the better-known Italian bruschetta. It is nothing more than good rustic bread that is grilled, rubbed with garlic, then rubbed with a ripe tomato half and drizzled with a fruity olive oil. The tomatoes can also be very, very finely chopped, almost to a puree, and rubbed into the bread. (This is how Cafe Babareeba does it actually). If you wish to add a small embellishment, top with a chopped anchovy or a paper-thin slice of serrano ham.

Ingredients:
6 slices coarse country bread, each about 1/3-inch thick*
extra-virgin olive oil, preferably Spanish**
2 cloves garlic
2 very ripe tomatoes, halved***
salt and freshly ground pepper to taste

*I used a loaf of Italian bread
**I used Italian EVOO
***I used 2 roma/plum tomatoes

Directions:
1. Preheat a broiler (griller), or prepare a fire in a charcoal or gas grill.

2. Brush both sides of the bread lightly with oil. Place on a baking sheet and slip under the broiler, or place on the grill rack. Broil or grill, turning once, until golden brown on both sides, 4-6 minutes total.

3. Transfer the bread to a platter. Rub the hot bread on one side with the garlic cloves, and then squeeze the tomato halves as you rub them across the surface. Drizzle with oil and season with salt and pepper. Serve immediately, with alioli for dipping.

Source: Adapted from Savoring Spain & Portugal by Joyce Goldstein

Spanish Alioli (garlic mayonnaise)

The recipe for alioli in the cookbook is from scratch - meaning you make the mayo with eggs and oil. I prefer not to serve dishes with raw eggs (mainly because Bob won't eat them!), so I tried looking up a few recipes online. Each had the basic idea - garlic, mayo, and lemon juice, but they each seemed overly complicated. So I just made up my own:

Ingredients:
~1/2 cup mayonnaise (light or regular)
1 or 2 garlic cloves, grated
lemon juice to taste (~1/2 a lemon)

Directions:
Measure mayonnaise into a small bowl. Grate garlic directly on top, and squeeze in the juice of half a lemon. Stir to combine. Taste to decide what component, if any, you need more of. Too garlicky - add more mayo; too bland - add another clove or partial clove of garlic, etc. I used 2 cloves of garlic for ~1/2 cup mayo and it was intense! I'd probably suggest just 1 or maybe 1 1/2. You can always put more in so use your judgement.


Thursday, April 2, 2009

Chocolate Chip Scones

Believe it or not, but I've never really had a scone before. My nut allergy prevents me from trying a lot of baked goods that have not been prepared by someone I trust, and no one I know has ever made a scone. When I saw this recipe, I knew I had to try it out. I thought it would be difficult, but this is just about the easiest recipe ever! And these scones are sooo good. I obviously have nothing to compare it to, but I took them to work and everyone seemed to enjoy them. I am going to try blueberry scones next! I just made a half-batch because I only had 1 cup of whipping cream left from other recipes, so I've provided both the full and half recipes below.
[Dark] Chocolate Chip Scones

Ingredients:
Full batch (24 scones):
3 1/4 cups all-purpose flour
1/2 cup sugar
1 Tablespoon + 1 teaspoon baking powder
1/4 teaspoon salt
2 cups (12-ounce package) dark chocolate chips
2 cups heavy whipping cream
2 Tablespoons butter, melted
additional sugar, for sprinkling

Half-batch (12 scones):
1 1/2 cups + 2 Tablespoons all-purpose flour
1/4 cup sugar
1/2 Tablespoon + 1/2 teaspoon baking powder
1/8 teaspoon salt
1 cup dark chocolate chips*
1 cup heavy whipping cream
1 Tablespoon butter, melted
additional sugar, for sprinkling

*I used about a 1/2 cup of semi-sweet mini chocolate chips because it was all I had on hand. These actually worked really well! I love the mini chocolate chips because you don't have to use as many.

Directions:
1. Preheat oven to 375F. Lightly grease two baking sheets (1 baking sheet for half-batch).

2. Stir together flour, sugar, baking powder, and salt in a large mixing bowl. Stir in chocolate chips. Add whipping cream to flour mixture, stirring just until ingredients are moistened. Turn the mixture out onto a lightly floured surface. Knead gently until a soft dough forms, about 2 minutes.

3. Divide dough into 3 equal balls. One ball at a time, flatten into a 7-inch circle, cut into 8 triangles. Transfer triangles to prepared baking sheets, spacing 2 inches apart. (For a half-batch, I divided the dough into 2 equal balls, flattened to about 5 or 6-inch circles, and cut each into 6 triangles).

4. Brush each scone with melted butter and sprinkle with additional sugar. Bake 15-20 minutes or until lightly browned.

Source: Adapted from Annie's Eats and Brown Eyed Baker

Tuesday, March 31, 2009

Spring Green Risotto

I've never made risotto before . . . I may have never really eaten risotto before either, unless the kind from the box counts. I always choose pasta over rice at Italian restaurants, I'm not sure why. Anyway, I've been wanting to make risotto for a long time now, so when I saw Ina Garten make this primavera version, on a particularly 'spring-like' weekend temperature-wise, I decided this was the recipe. This was wonderful! I loved the colors of the green vegetables, and the creaminess of the dish, even though you don't use cream. The lemon zest and juice really brighten the flavor. I've never worked with fennel bulb before, so I was excited to try it. I knew it was supposed to have a slight anise flavor when raw, which I could taste in the raw piece I tried, but I didn't taste that in the finished dish. I'm not quite sure what flavor it imparted, but it's always nice to try new things.
Spring Green Risotto

Ingredients:
1 1/2 Tablespoons good olive oil
1 1/2 Tablespoons unsalted butter
3 cups chopped leeks, white and light green parts (2 leeks)
1 cup chopped fennel
1 1/2 cups Arborio rice
2/3 cup dry white wine
4 to 5 cups simmering chicken stock, preferably homemade
1 pound thin asparagus
10 ounces frozen peas, defrosted, or 1 1/2 cups shelled fresh peas
1 Tablespoon freshly grated lemon zest (2 lemons)
Kosher salt and freshly ground black pepper
2 Tablespoons freshly squeezed lemon juice
1/3 cup mascarpone cheese, preferably Italian
1/2 cup freshly grated Parmesan cheese, plus extra for serving
3 Tablespoons mince fresh chives, plus extra for serving

*My notes about the ingredients: I used salted butter, so I just used less salt later in the recipe. I ended up needing close to 6 cups of chicken broth (canned) because my rice took longer to soften. I just had a BIG can of chicken broth and used the whole thing. I used frozen petite peas. I didn't use mascarpone because it's expensive, and it was already costing a decent amount between all the veges and the Arborio, so I used 1/3 red fat cream cheese instead. We didn't think that mascarpone would have added that much more, so I'm glad I didn't splurge on it. And lastly, I didn't use the chives. Again, it's about $3 for a pack of chives in our store, so I just left them out. If I had a private, year-round garden in the Hamptons like Ina, I'd use them too ;)

Directions:
1. Heat the olive oil and butter in a medium saucepan over medium heat. Add the leeks and fennel and saute for 5 to 7 minutes, until tender. Add the rice and stir for a minute to coat with the vegetables, oil, and butter. Add the white wine and simmer over low heat, stirring constantly, until most of the wine has been absorbed. Add the chicken stock, 2 ladles at a time, stirring almost constantly and waiting for the stock to be absorbed before adding more. This process should take 25 to 30 minutes.

2. Meanwhile, cut the asparagus diagonally into 1 1/2-inch lengths and discard the tough ends. Blanch in boiling salted water for 4 to 5 minutes, until al dente. Drain and cool immediately in ice water. (If using fresh peas, blanch them in boiling water for a few minutes until the starchiness is gone.)

3. When the risotto has been cooking for 15 minutes, drain the asparagus and add it to the risotto with the peas, lemon zest, 2 teaspoons salt, and 1 teaspoon pepper Continue cooking and adding stock, stirring almost constantly, until the rice is tender but still firm.

4. Whisk the lemon juice and the mascarpone together in a small bowl. When the risotto is done, turn off the heat and stir in the mascarpone mixture plus the Parmesan cheese and chives. Set aside, off the heat, for a few minutes, sprinkle with salt and pepper, and serve hot with a sprinkling of chives and more Parmesan cheese.

Recipe notes: I blanched the asparagus right away, not 'meanwhile.' I just didn't think I'd be able to do that and babysit the rice at the same time. I'm glad I got it out of the way, because I still was trying to zest the lemons and prepare the cheese/lemon juice mixture while stirring. I really need to learn how to 'prep' better! The process of softening the rice took me quite a bit longer. I might have had the heat too low, I'm not sure. I just kept adding more broth until the rice was cooked.

Source: Adapted from Ina Garten's recipe on Food Network

Sunday, March 29, 2009

Baked Oatmeal

A few weeks ago, we enjoyed a day of 65 degrees weather. We went to sleep and woke up to 15 degree weather! Luckily, I had just seen this recipe for Baked Oatmeal and had the ingredients on hand. This is a great recipe! It smells like a big oatmeal cookie baking in the oven. Bob loved this - he said "it's the perfect amount of sweetness, and the raisins just burst in your mouth." The leftovers keep for many days and reheat well. This recipe is definitely a keeper!
Baked Oatmeal

Ingredients:
2 cups uncooked oats
1/2 cup packed light brown sugar (I only had dark)
1/3 cup raisins (or dried fruit of choice)
1 Tablespoon chopped walnuts (or nut of choice - omitted)
1 teaspoon baking powder
1 1/2 cups milk
1/2 cup applesauce
2 Tablespoons butter, melted
1 large egg, beaten
Cooking spray

Directions:
1. Preheat oven to 375F. Coat an 8-inch square baking dish with cooking spray.

2. Combine the first 5 ingredients (or 4 if omitting nuts) in a large bowl. Combine the milk, applesauce, butter, and egg in a separate bowl. Add milk mixture to oat mixture; stir well. Pour oat mixture into prepared dish. Bake for 20 minutes*. Serve warm.

*Note: My oven is possessed, so I had to bake this much longer to get it to the right consistency, but it was worth the wait! This would be really good with craisins too.

Source: Adapted from Brown Eyed Baker, originally from Cooking Light

Friday, March 27, 2009

Fiesta Chicken and Spinach Enchiladas

This is a great recipe courtesy of Jenny at Picky Palate. Jenny always posts delicious-sounding (and looking!) recipes and most are her own creations! She also has a wonderful ability to sneak in vegetables and make them taste great at the same time. I've made these Fiesta Chicken and Spinach Enchiladas following the traditional recipe, and as a casserole (courtesy of Mary Ann at Meet Me in the Kitchen). Both ways are wonderful. I've tried both flour and corn tortillas, and I think I prefer the corn only because they hold up better against the sauce, especially with leftovers, which you probably will have! And these are delicious leftover. Make them on a Sunday and have lunch for the rest of the week!

See the pretty colors:
This is a picture from when I made these as a casserole. Our grocery store has these super cheap corn tortillas (39 cents for ~12!) but the catch is, they're so small that they don't stay rolled, so I find a casserole is just easier. Please visit Jenny and Mary Ann's blogs for their beautiful pictures of this dish!

Fiesta Chicken and Spinach Enchiladas

Ingredients:
For the filling:
2 Tablespoons extra virgin olive oil
1 large onion, finely minced
1 jalapeno, minced*
3 fresh garlic cloves, minced
10 oz bag baby spinach leaves, chopped (I used a 6 oz bag)
4 boneless, skinless chicken breasts, cooked and shredded**
1 teaspoon salt
1/2 teaspoon pepper
1/4 teaspoon garlic salt
1 1/2 Tablespoons ground cumin
1 10-ounce can Mild Rotel diced tomatoes with Green Chilies*

For the sauce:
1 lb (large family size can) cream of chicken soup***
1 cup red enchilada sauce*
8 ounces sour cream (light is fine)
1/2 cup milk (I used skim)
pinch of salt

corn tortillas
2 cups shredded Mexican blend cheese (2% red. fat is fine)

Directions:
1. Preheat oven to 350F. Place oil into a large skillet or dutch oven over medium heat. Saute onion and jalapeno until softened, about 5 minutes. Stir in garlic and cook for 1 minute. Add chopped spinach and cook until wilted down. Stir in chicken, salt, pepper, garlic salt, cumin, and diced tomatoes. Reduce heat to low and simmer.

2. Place soup, enchilada sauce, sour cream, milk, and salt into a large saucepan over medium heat. Stir until warmed through.

3. Ladle a small amount of sauce into the bottom of a large 9x13-inch baking dish (or bigger if you have one), just enough to cover the bottom. Place a spoonful of chicken mixture inside of corn tortillas, roll, and place seam side down. Fill tortillas until chicken filling is used up. Top evenly with sauce and shredded cheese. Bake for 25-30 minutes until hot and bubbly.

10-12 servings

My notes:
*Much to my dismay, our grocery store does not sell the mild Rotel, so I got the regular. To adjust for spiciness, I eliminated the jalapeno and bought mild enchilada sauce, which our store does sell, funnily enough.
**I used 2 very large breasts and there was plenty of meat.
***I weighed out 1 pound (16 ounces) of Healthy Request (Red. fat/red. sodium) cream of chicken soup, which is almost 2 cans (roughly 1 3/4).

Source: Adapted from Picky Palate and Meet Me in the Kitchen

Wednesday, March 25, 2009

Almost-Fudge Gateau

It seems like I'm posting a ton of desserts, but I'm just catching up on things I've made (and taken pictures of) in the last year. I actually don't bake that much! :)

In my quest for new cooking blogs, I stumbled upon a group of bloggers called Tuesdays with Dorie. Each Tuesday they make a recipe out of the cookbook Baking: From My Home to Yours by Dorie Greenspan. I think the idea of such a group is really neat - almost a way to force yourself to make recipes that you'd like to but otherwise might not. I can't commit to a group like this at the present time, but I can pick out the recipes that are particularly appealing to me. This brings me to another factoid: I love chocolate. As in, I've never had a chocolate dessert and said "this is too rich"-kind of love. As long as I have a glass of cold skim milk, I'm good to go. I think I'd always take chocolate dessert over fruity (my husband is the opposite), even though I like both. That being said, when I saw the cake called "Almost-Fudge Gateau," I couldn't resist. I made this for a few friends in January, and it was great. Gateau in French means cake, and like the name suggests, it really was 'almost-fudge.'

This picture was taken after part of the cake had been frozen and thawed, so it became more crumbly. The fresh cake would not have come apart like this:

Almost-Fudge Gateau

Ingredients:
For the cake:
5 large eggs
9 oz. bittersweet chocolate, coarsely cho
pped (or broken into squares)
1 cup sugar
5 Tablespoons unsalted butter, cut into chunks (I used salted)
2 Tablespoons coffee or water (I used prepared instant decaf coffee)
1/3 cup all-purpose flour
pinch of salt

For the glaze:
4 ounces bittersweet chocolate, coarsely chopped
1/2 cup heavy cream
2 teaspoons light corn syrup

Directions:
1. Center a rack in the oven and preheat to 350F. Butter a 9-inch springform pan, line the bottom with parchment paper, butter the paper, dust the inside of the pan with flour and tap out the excess. Place pan on a baking sheet.

2. Separate the eggs, putting the whites in a large mixing bowl and the yolks in a small bowl.

3. To the top of a double boiler (or a small heatproof bowl placed above simmering water), add the chocolate, sugar, butter, and coffee. Stir occasionally until the chocolate and butter are melted; the sugar may still be grainy - that is fine.

4. Transfer the mixture to the counter and let sit for 3 minutes. Using a rubber spatula, stir in the yolks one by one, then fold in the flour.

5. Working with the whisk attachment of a hand- or stand-mixer, beat the egg whites with a pinch of salt until they hold firm but glossy peaks. Using the spatula, stir about one quarter of the beaten egg whites into the batter, then gently fold in the rest.

6. Scrape the batter into the prepared pan and jibble the pan from side to side a couple of times to even the batter.

7. Bake for 35-45 minutes, or until the cake has risen evenly (it might rise around the edges and you'll think it's done, but give it a few more minutes, and the center will puff too) and the top has firmed (it will probably be cracked) and doesn't shimmy when tapped; a thin knife inserted into the center should come out just slightly streaked with chocolate. Transfer pan to a cooling rack and let cake rest for 5 to 10 minutes.

8. Run a blunt knife gently around the edges of the cake and remove the sides of the pan. Carefully turn the cake over onto a cooling rack and remove the pan bottom and the parchment paper. Invert the cake onto another cooling rack and cool to room temperature right side up. As the cake cools it may sink.

9. To make the glaze, turn the cooled cake onto another cooling rack so you will be glazing the flat bottom, and place the rack over a baking sheet lined with parchment or wax paper to catch any drips.

10. Put the chocolate in the top of a double boiler and melt above simmering water (or use microwave to melt). The chocolate should be just melted and only warm, not hot. Meanwhile, bring the cream to a boil in a small saucepan. Pour the hot cream over the chocolate and stir very gently with a rubber spatula until the mixture is smooth and shiny. Stir in the corn syrup.

11. Pour the glaze over the cake and smooth the top with a long metal icing spatula. Don't worry if the glaze drips unevenly down the sides of the cake, it will add to its charm. Decorate if desired (see note below). Allow the glaze to set at room temperature, or slip the cake into the refrigerator about 20 minutes.

My notes: This cake can be decorated however you wish. After I put the glaze on the cake, I sprinkled some mini-chocolate chips around the edges, and then pressed in some Hershey's Kissables in red, pink, and white for Valentine's Day. Then I put the cake in the fridge. I served the cake slightly chilled with a simple homemade strawberry sauce (see below), and vanilla ice cream. The cake may have tasted better at room temperature, or even warmed up, but we didn't try that.

Source: Adapted from Annie's Eats, originally from Dorie Greenspan's Baking: From My Home to Yours


Strawberry Sauce

I had some strawberries that I got on sale, but all the recipes I found for strawberry sauce were pretty involved. I just came up with this recipe on the fly, but it was pretty good.

Ingredients:
Strawberries
Water
Sugar (to taste, optional)

Directions:
1. Wash and dry a package of strawberries. Remove stems with huller or knife. Cut in half and place in a mini-food processor (a blender might work for this too).

2. Add a little water and puree the strawberries to a thick, yet still liquid, consistency. The amount of water is not critical because it can be adjusted in the next step.

3. Pour the puree through a fine metal strainer to remove strawberry pulp. Transfer remaining mixture to a small saucepan and heat to simmering, stirring often. At this step, you can decide the thickness and sweetness of the sauce. If the sauce is too thin, let the sauce reduce by cooking longer. If the sauce is too thick, add water. Add sugar to taste. I don't think mine needed any, if if did it was around 1 Tablespoon.

4. Store sauce in the fridge until ready to use.

Note: I just plated the sauce underneath each slice of cake, but this sauce
would be great on ice cream or other desserts.

  © Blogger template Brownium by Ourblogtemplates.com 2009

Back to TOP