
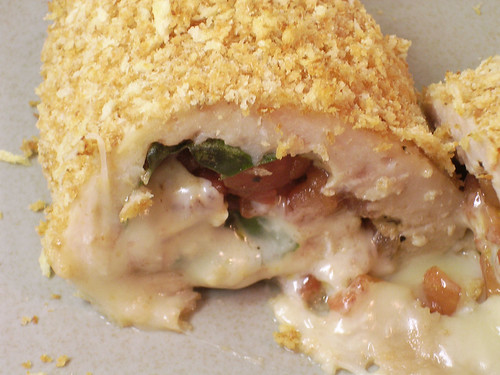
Anyway, I was watching Tyler Florence over Bob's spring break (ok I took off too!), and he made this recipe for the "ultimate" Chicken Cordon Bleu, and I liked his idea of how he wrapped up the chicken to avoid using toothpicks, so I came up with this Caprese Stuffed Chicken. It might come as no surprise from past posts, but I love love love tomatoes and basil. I could probably eat the combination every day. Throw in some mozzarella - even better! I've made the recipe for 2 portions, which may or may not serve more than 2 people, depending on the size of your chicken breasts. You won't see too many original recipes from me, but this is one of them.
Caprese Stuffed Chicken
Ingredients:
2 boneless/skinless chicken breasts
1 Tablespoon extra virgin olive oil, divided
1/2 Tablespoon balsamic vinegar
1 Roma/plum tomato, finely chopped
1-2 ounces mozzarella cheese
4 very large basil leaves, or several more smaller ones
1 cup panko breadcrumbs
1/2 clove of garlic, grated (optional)
3 Tablespoons grated Parmesan cheese
1/4 cup all-purpose flour
1/8 teaspoon ground (cayenne) red pepper, optional
1/2 cup lowfat buttermilk
Salt and freshly ground pepper to taste
Directions:
1. Whisk together the balsamic vinegar and 1/2 tablespoon olive oil in a small bowl to make the dressing.
I have this adorable little whisk, but it's obviously not necessary!
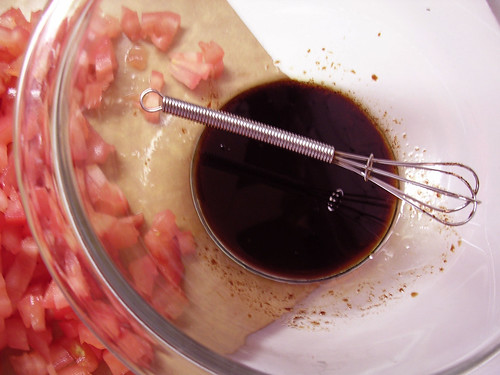
2. Add chopped tomato to the dressing and season with salt and pepper. Thoroughly combine and set aside.
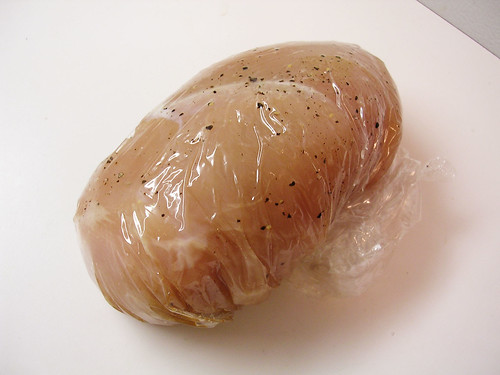
3. Pound chicken until very thin. Dry with paper towels and season with salt and pepper. Place each chicken breast on a large piece of plastic wrap.
4. On each breast, arrange 2 basil leaves, slices of mozzarella, and top with chopped tomatoes, using a slotted spoon to transfer them as to leave behind the excess dressing. 

5. Roll the chicken very tightly, using the plastic wrap as a guide. When you are finished, the chicken should be very tightly rolled and completely covered in plastic wrap like this:
6. Place chicken rolls in refrigerator for 30 minutes to set. Preheat oven to 350F.
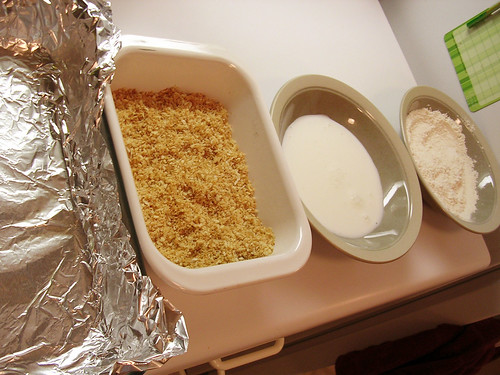
7. Meanwhile, heat the remaining 1/2 tablespoon of oil over medium-high heat in a small skillet. Toast the panko until golden, about 7 minutes.
8. Transfer panko to a shallow dish to cool. In a bowl, combine flour and cayenne (if using) with salt and pepper. Pour buttermilk into a second bowl.
9. Once panko bread crumbs have cooled, grate 1/2 garlic clove into them (if you like garlic), and stir in Parmesan cheese. Combine well. Line a baking dish with aluminum foil lightly greased with olive oil or cooking spray.
Now your stations should look like this:
10. After 30 minutes has elapsed, remove chicken rolls from fridge. Unwrap and dip into flour mixture to coat. Tap off excess. Dip roll into buttermilk, then into panko, making sure to press the panko on if it's not sticking. Place roll into baking dish and repeat with second roll.

11. Bake uncovered for 40 minutes, or until chicken is no longer pink. Note: You could also start cooking the rolls in a skillet with olive oil for a few minutes then transferring them to a baking dish to place in the oven.
Source: You're Gonna Bake It After All


Yum, what a great recipe you created - I love all the ingredients you used! I'm going to have to try that technique to avoid using toothpicks.
ReplyDeleteThe hubs will love this one!
ReplyDeleteI'm drooooooling, this looks fabulous and you gave me a great dinner item for this week. Seriously, this looks devine. BRAVO!
ReplyDeleteJenifer
J&J DISH
What a great recipe...Sounds wonderful.....Love your blog....Hope you will stop by and visit me.
ReplyDeleteThis looks positively delicious! MMM!
ReplyDeleteI just love your blog! I just found it through Cake, Batter & Bowl-it is so cute! You are such a great cook! Can't wait to see more of your recipes!
ReplyDeleteThis looks so great! I stumbled onto your blog from the leftover queen forum... I live in Chicago too and it is so hard to cook in a tiny kitchen... you seem to be doing well! :)
ReplyDelete