Search This Blog

Friday, February 26, 2010

Guacamole Turkey Burger


Apparently it's Mexican week on my blog! :)

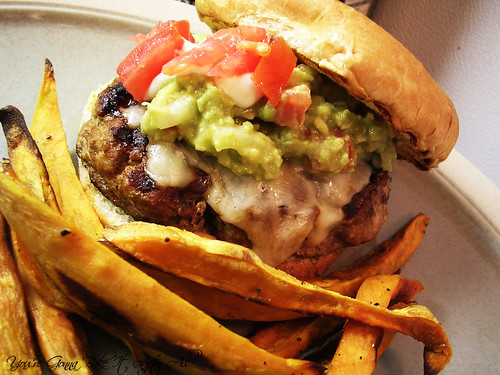
Bob has wanted me to do a Red Robin copycat burger for a long time. If you've never been to Red Robin, they have tons of varieties of burgers, including turkey burgers and "chicken burgers" as they call them (it's an actual chicken breast, not ground chicken). Bob's favorites are the two with guacamole. I've recently been eating more avocados after avoiding them for a while because they made my mouth itch, strange I know. I looked at the Red Robin menu online and decided I would pick elements of the Santa Fe Burger and turn it into the ultimate turkey burger.

I made Alton Brown's Guacamole and topped the burger with Monterey Jack cheese (Pepper Jack would have been amazing but we didn't have any), sour cream, fresh chopped tomatoes, and chipotle mayonnaise. I knew I would like this burger -what's not to like?- but I had no idea how good it would be. This is one of my new favorite dinners! It was SO good! You could make this using any meat - turkey, chicken (ground or whole), beef, sirloin, even salmon!

Guacamole Turkey Burger

Serves 2

Ingredients:
1/2 pound ground turkey (or meat of choice)
2 Tablespoons Worcestershire sauce
Salt and pepper, to taste
Extra virgin olive oil, for brushing grill pan
Monterey or Pepper Jack cheese (2 slices or equivalent amount of shredded)
guacamole, purchased or your favorite recipe (I made 2/3 of Alton's recipe)
2 Tablespoons light sour cream
1 Roma tomato, chopped
2 hamburger buns

Chipotle mayonnaise:
1/2 chipotle pepper in adobo sauce, chopped
1 teaspoon adobo sauce, to taste
1/4 cup light mayonnaise
Squeeze of lime juice, optional
Salt and freshly ground black pepper

Directions:
1. Combine the ground turkey with the Worcestershire sauce and salt and pepper to taste. Shape into 2 patties.

2. Brush a grill pan with extra virgin olive oil and heat over medium-high. Open buns and place the pieces that face the burger down onto the grill. Cook until slightly toasted. Remove to a plate and keep toasted side face-up.

3. Brush additional oil on grill pan, if necessary, and add turkey burgers to the pan. Cook until nice and brown on one side, flip, and cook fully. Adjust heat as necessary. When the burgers are completely cooked, add cheese on top of each, turn off the heat, and put a lid over the grill pan to melt the cheese.

4. Meanwhile, combine mayonnaise ingredients.

5. To assemble the burgers, spread chipotle mayonnaise on each half of the bun. Place a turkey burger on the bottom portion of the toasted bun, then top with guacamole, ~1 Tablespoon sour cream, and chopped tomatoes. Top with the other side of the bun, and enjoy!

Source: You're Gonna Bake It After All, chipotle mayonnaise from Bobby Flay

Wednesday, February 24, 2010

Red Chili Chicken and Rice


Monday I posted about Pioneer Woman's delicious salsa, so today I will post a recipe that I served to go with the salsa (wait, shouldn't it be the other way around?!)

I first saw this Rick Bayless recipe on Elly's blog. Rick Bayless is a celebrity in Chicago, and most Chicagoans are proud to have such a talented and decorated chef practice his craft here. I've been to Frontera several times, on one visit Rick was there meeting with the staff. I've also been to his Mexican street food restaurant XOCO, and he happened to be there quality control taste-testing the drinks! I'd love to try Topolobampo sometime. Last time I called they were booked for 6 weeks!

I quickly bookmarked this recipe when Elly posted it, and then I saw that Annie recommended it as well, so I knew I'd love it. It's been on my 'to make' list for a long time, but for some reason I kept moving it. I finally realized I had all the ingredients one night and went for it - it's fabulous!!! I have a weird relationship with black beans, so I left them out. The ingredient list is simple, but the components combine together perfectly to make a very tasty dish. If you want to make this a little less healthier, you could even top it with some cheese and sour cream - not sure what Mr. Bayless would say about that, but he'll never know!

Red Chile Chicken and Rice

Serves 2

Ingredients:
1 Tablespoon canola oil
2 boneless, skinless chicken breast halves
1 1/4 Tablespoons ancho chili powder, divided*
1/2 medium onion, large dice
1/2 cup rice
2 cloves garlic, minced
3/4 cup chicken broth
7.5 ounces black beans, drained and rinsed (optional)
2 Tablespoons chopped green onions, roots and wilted outer leaves removed before chopping
salsa, for serving

*I only had regular "chili powder" and did some Googling but couldn't find a definitive answer as to what types of chiles are in it . . . so I just used it and it was great.

Directions:
1. Heat the oil in a medium heavy pot (with a lid) over medium-high heat. Sprinkle both sides of the chicken breast with salt and 1/2 Tablespoon of the ancho chili powder. Place chicken in the hot oil and brown on each side, 2 - 3 minutes. Remove to a place, leaving behind as much oil as possible.

2. Add the onion and rice to the pot. Stir for several minutes, until the rice turns from translucent to opaque. Add the garlic and the remaining 3/4 Tablespoon ancho chili powder. Cook one minute, and then add the broth and salt to taste. Stir well.

3. When the mixture comes to a boil, reduce the heat to medium-low. Cover, and cook for 10 minutes.

4. Cut the chicken breast into 1" pieces. Add them to the pot along with the beans, if using. Recover and cook 12 minutes longer.

5. Sprinkle the green onions and test a kernel of rice. It should have no more than a hint of chalkiness in the center, in which case you place the cover back on, remove it from the heat and let stand 5 - 10 minutes. If it's not cooked, cook for another 5 minutes or so (at this point I added a tad more chicken broth because I think my pan was too big and the added surface area caused more of the liquid to evaporate; if you use the right size pan this should be fine).

6. Fluff the mixture with a fork and serve with salsa.

Source: Adapted from Elly Says Opa!, also featured on Annie's Eats, originally from Mexican Everyday by Rick Bayless

Monday, February 22, 2010

Restaurant Style Salsa

DSCN5235_labeled

DSCN5244_labeled

I've recently rediscovered the Pioneer Woman. This may sound a little strange, but I went to her blog off and on several years ago. For some reason, it was really confusing to me. This was before my Google Reader days, and all those different forums - photography, cooking, etc. - were just overwhelming, so much to the point that I didn't visit very often. After all the buzz about her cookbook tour this past Fall, I added her to my Google Reader and have been pleasantly surprised. I see why so many people love her blog. I know it will be a great resource for me when I finally take the plunge and get a DSLR camera too!

Recently PW posted this Restaurant Style Salsa. Now, I have two favorite salsa recipes already (here and here), but her pictures looked so good and I figured it couldn't hurt to try another, so I made it for Superbowl. The problem is that I now have 3 favorite salsas! I can't decide among them! The black bean(less) salsa is an entirely different beast in my mind, but PW's is very similar to this one, yet I love them both. Maybe someday I will make them side by side, but I have a feeling I will just keep going back and forth between them :) Plus, each batch makes a LOT of salsa!

PW's salsa is exceptionally fresh tasting, despite not having any fresh tomatoes. It's really delicious. With how quick and simple it is to whip up a batch of fresh salsa, it makes me think twice about buying it from the store (Unless Rick Bayless's Frontera salsa is on sale of course!) As of now, I plan to keep making all of these salsas, and often :)

Restaurant Style Salsa

Ingredients:
1 28-ounce can whole tomatoes with juice
2 10-ounce cans Rotel diced tomatoes and green chilies*
1/4 cup chopped onion
1 clove garlic, minced
1 whole jalapeno, quartered and sliced thin*
1/4 teaspoon sugar
1/4 teaspoon salt
1/4 teaspoon ground cumin
1/2 cup cilantro (more to taste)
juice from 1/2 lime

*PW used 1 can regular and 1 can mild Rotel and included the seeds/ribs of the jalapeno. I could only find regular Rotel, so I began by leaving out the ribs and seeds. It wasn't quite spicy enough, so I dumped them in. Then it was pretty spicy, maybe a little too spicy. Use your judgement depending on the heat you prefer!

Directions:
1. Combine whole tomatoes, Rotel, onion, jalapeno, garlic, sugar, salt, cumin, lime juice, and cilantro in a blender or food processor. Pulse until you the salsa to the consistency you prefer (around 10 to 15 pulses).

2. Test seasonings with a tortilla chip (love this part!) and adjust as needed.

3. Refrigerate for at least an hour. Serve with tortilla chips or your favorite Mexican fare.

Friday, February 19, 2010

Ben & Jerry's Hot Fudge Sauce


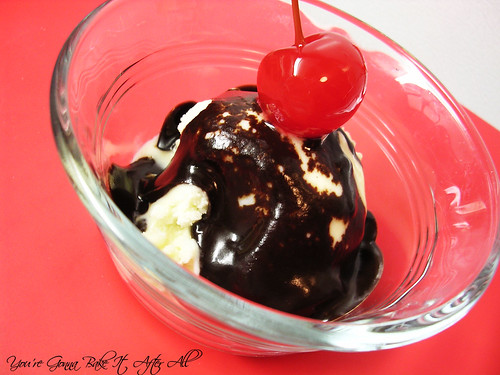
Bob and I had his sister and her boyfriend over for dinner a few weeks ago. I debated about what to make for dessert. Flipping through my Ben & Jerry's Dessert Cookbook, I wanted to make just about everything! I finally decided on Hot Fudge Sundaes - French vanilla ice cream, homemade hot fudge, whipped cream, sprinkles, and of course maraschino cherries.

This hot fudge was pretty simple to make, it just takes a while. The great thing is that it keeps stored in fridge (where it hardens to a consistency of traditional fudge), so you can enjoy the leftovers at your own pace. I actually thought it was even better a few days later . . . eaten by itself . . . directly from the container . . . cold . . . with a spoon. Yeah, it's that good :)

Hot Fudge Sauce

Makes 2 cups

Ingredients:
2 ounces unsweetened chocolate
1/2 stick butter
6 Tablespoons unsweetened cocoa powder
1 cup sugar
1/4 cup milk*
1/4 cup heavy or whipping cream*

*I just used 1/2 cup of whole milk because it's what I had on hand.

Directions:
1. Melt the chocolate and butter, stirring frequently, in the top of a double boiler over simmering water. Add the cocoa and whisk until dissolved.

2. Using a slotted spoon, gradually stir in the sugar. (The mixture should be the consistency of wet sand.) Cook, stirring occasionally, over simmering water for 20 minutes. Check the water level in the double boiler occasionally and replenish if necessary.

3. Gradually stir in the milk and cream and keep stirring until completely blended. Continue cooking, stirring and checking the water occasionally, for 1 hour. The fudge is ready when it is completely smooth and all the sugar is dissolved. Store leftovers in fridge; it lasts a "long time" according to the book.

Source: Ben & Jerry's Homemade Ice cream & Dessert Book

Wednesday, February 17, 2010

Pico de Gallo Chicken Quesadillas

I found this recipe on AllRecipes a LONG time ago (I think at least 2 years) and had it saved. I kept putting off making it, which is unfortuante, because these were fantastic!!! The pico de gallo was so fresh tasting with plenty of lime (just like I've had in Mexico!) and I loved how it was added to the quesadillas and used for topping. Bob took one bite and said "oh yeah!" and nodded his head - that's pretty much his sign of approval :)

Pico de Gallo Chicken Quesadillas

Ingredients:
2 tomatoes, diced
1 onion, finely chopped
2 limes, juiced
2 Tablespoons chopped fresh cilantro
1 jalapeno pepper, seeded and minced
Salt and pepper to taste
2 Tablespoons olive oil, divided
2 skinless, boneless chicken breast halves, cut into strips (or the equivalent of cooked chicken)
1/2 onion, thinly sliced
1 green pepper, thinly sliced
2 cloves garlic, minced
4 12-inch flour tortillas
1 cup shredded Monterey Jack cheese
1/4 cup sour cream, for topping

Directions:
1. In a small bowl, combine tomatoes, onion, lime juice, cilantro, jalapeno, salt and pepper. Set aside.

2. In a large skillet, heat 1 Tablespoon olive oil. Add chicken and saute until cooked through. Remove chicken from skillet and set aside.

3. Put the remaining 1 Tablespoon of olive oil in the hot skillet and saute the sliced onion and green pepper until tender. Stir in the minced garlic and saute until the aroma is strong. Mix in half of the pico de gallo and chicken breast meat. Set aside; keep warm.

4. In a heavy skillet, heat one flour tortilla. Spread 1/4 cup shredded cheese on the tortilla and top with 1/2 the chicken mixture. Sprinkle another 1/4 cup cheese over the chicken and top with another tortilla. When the bottom of the tortilla is lightly brown and cheese has started to melt, flip quesadilla and cook on the opposing side. Alternatively, place filling (1/8 of the cheese, then 1/4 of the chicken, then 1/8 of the cheese) on half the tortilla and fold it over. Repeat with all 4 tortillas.

5. Remove quesadilla from skillet and cut into quarters. Repeat with the remaining ingredients. Serve quesadillas with sour cream and remaining pico de gallo.

Source: Adapted from Allrecipes.com

Monday, February 15, 2010

Mango Lassi

Note: You may have noticed that I changed the look of my blog a bit. I will continue to tweak it until it I'm happy, so it's a work in progress at the moment. One big change is that I have added links to the pictures in my blog header under the "PHOTOS ABOVE" tab. Hopefully this will help with tracking down a recipe if you see something you like :)

Bob and I visited my sister and her boyfriend Steve in Michigan in early December. We paid another visit to the adorable Bavarian town Frankenmuth. We bought pastries at the Bavarian Inn, visited the Cheese Haus, and drove by Bronner's, the World's Largest Christmas store. I say drove by because we didn't go in; it was crazy busy!!! We had already gone in the summer, and let me tell you, it's incredible. If you like Christmas, you will love this store! They have every type of decoration you can imagine, as well as every type of ornament that exists. Bob and I bought 7 ornaments, each of which uniquely represents us as individuals or as a couple. See these cute little S'mores ornaments:
I have the one on the right :)

During our visit, Steve made us some Mango Lassi's. While Bob loves fresh mango, every time I've tried it, it tends to have a very pine-y taste. This might indicate that it's not ripe, or that the piece I try is too close to the stone, but when Steve offered this traditional Indian drink to me I definitely didn't think I would like it. Well, I was right, I didn't like it . . . I loved it :) Maybe because he used mango pulp, which is made out of perfectly ripe mangoes, or maybe it's the combination with the yogurt and cardamom, but this drink is fantastic!

Mango Lassi

Makes 2 cups

Ingredients:
1 cup plain yogurt
1/2 cup milk
1 cup mango pulp (or chopped mango)
4 teaspoons sugar, to taste (I used a tad more)
Dash of ground cardamom (optional)
5-7 ice cubes (optional)

Directions:
1. Put ice, mango, yogurt, milk, sugar, and cardamom into a blender and blend for 2 minutes.

I found mango pulp at an international foods store in Michigan.

These measuring spoons were my great aunt's. They are pretty funny :)

2. Pour into individual glasses, sprinkle with a little cardamom, and serve.

Note: The lassi can be kept refrigerated for up to 24 hours.

Source: Steve, adapted from Simply Recipes

Friday, February 12, 2010

Mexican Rice

I have a major backlog of posts waiting, but I'm trying to spread them out. This one is from November! :)

One of my favorite things about Mexican restaurants, other than the chips and salsa, is the rice. Usually rice and beans are served with your entree and people tend to push them to the side. Not me. I always ask to substitute the beans with extra rice, and if I don't eat the rice at the restaurant, I will take it home. I love that it's, for lack of a better word, dry - meaning that it's not saucy but still very flavorful. I've never really tried to make Mexican rice at home (other than Rice-a-Roni!) so I decided to give it a shot, especially since this recipe is originally from Cook's Illustrated. I was a little nervous during the cooking process that there would be too much liquid, but that wasn't the case at all. The end result was a rice that rivals the best Mexican restaurant!

Mexican Rice

Ingredients:
2 ripe tomatoes, cored and quartered
1 medium white onion, peeled, trimmed and quartered
2 cups long grain white rice
1/3 cup Canola oil
4 cloves garlic, minced or pressed through a garlic press
3 medium jalapenos, ribbed, seeded, and minced
2 cups low-sodium chicken broth
1 Tablespoon tomato paste
1 1/2 teaspoons salt
1/2 cup minced fresh cilantro (optional)
1 lime, cut into wedges for serving

Directions:
Preheat oven to 350F and move a rack to the middle position.
1. Process tomatoes and onions in the food processor until smooth and thoroughly pureed, about 15 seconds, scraping down the bowl if necessary. Transfer the mixture to a liquid measuring cup; you should have 2 cups. If necessary, spoon off excess or add water so that the volume equals 2 cups.

2. Place the rice in a large fine mesh strainer and rinse under cold running water until the water runs clear, about 1 1/2 minutes. Shake rice vigorously in a strainer to remove all excess water.

3. Heat the oil in a heavy-bottomed oven-safe Dutch oven or straight-sided saute pan with a tight-fitting lid over medium-high heat, 1 to 2 minutes. Add the rice and fry, stirring frequently, until it is golden and translucent, 6 to 8 minutes. Reduce the heat to medium; add the garlic and minced jalapenos; cook, stirring constantly, until fragrant, about 1 1/2 minutes.

4. Stir in pureed tomatoes and onions, chicken broth, tomato paste, and salt; increase heat to medium-hight and bring to a boil. Cover the pan and transfer to the oven; bake until the liquid is absorbed and rice is tender, 30 to 35 minutes, stirring well after 15 minutes.

5. Stir in cilantro, if desired, and serve with lime wedges.

Source: Adapted from Annie's Eats, originally from Cook's Illustrated.

  © Blogger template Brownium by Ourblogtemplates.com 2009

Back to TOP